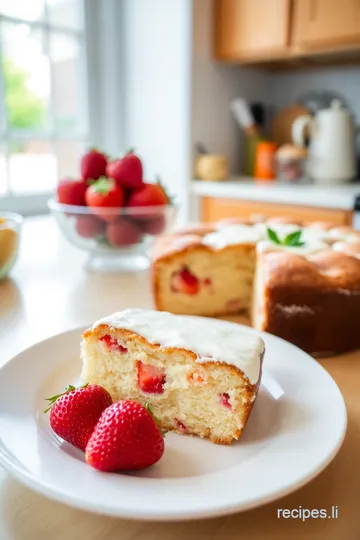
Strawberry Earthquake Cake Recipe
Discover my easy and delightful strawberry earthquake cake recipe, featuring a gooey cream cheese center and fresh strawberries that will wow your friends and family!

Okay, picture this: it’s a sunshiny spring afternoon, and i’m in my kitchen, surrounded by a bunch of strawberries that were calling my name at the farmers' market.
I’ve got this overwhelming urge to bake something that brings the vibe of fresh fruit and a little indulgence into one glorious dessert.
That’s when i stumbled upon the strawberry earthquake cake recipe . it’s like a cake that’s had a little fun shake-up, with gooey cream cheese filling and the bright pop of strawberries.
Honestly, what more could you ask for? the combination reminded me of those warm, sunny picnics where dessert is simply a must.
Recipe Overview
Now, let's get a bit historical here, because the idea of an " earthquake cake " has roots that are just as delightful as the cake itself.
This fun dessert originally emerged with a bit of whimsy, where the "earthquake" part reflects the delightful mess of melted cream cheese that bubbles up while baking.
Fast forward to today, and it’s become a hit, especially in springtime, when everyone is craving light, fruity flavors.
You might be wondering, “how much time do i need to whip up this beauty?” well, you’re looking at about 20 minutes for prep and 40- 45 minutes of baking time , rounding it all out to just over an hour.
And let’s be real, this isn’t rocket science; it’s a medium-difficulty recipe. if you're comfy with mixing batters and dolloping cream cheese, you're golden!
Now, let’s chat about cost and yield. you could serve around 10 to 12 people with this cake; perfect for a gathering! and surprisingly, it doesn’t break the bank—most ingredients are kitchen staples and fresh strawberries, which usually bring you a decent bang for your buck at the store.
Key Benefits
So, why should this strawberry eruption of yum be your next baking project? oh, boy, where do i start! first off, let’s talk about the health perks .
Strawberries are packed with vitamin c and fiber, making this cake a bit of a guilt-free indulgence. plus, we all know that fresh fruit makes everything feel more like a light dessert option—bonus points for that.
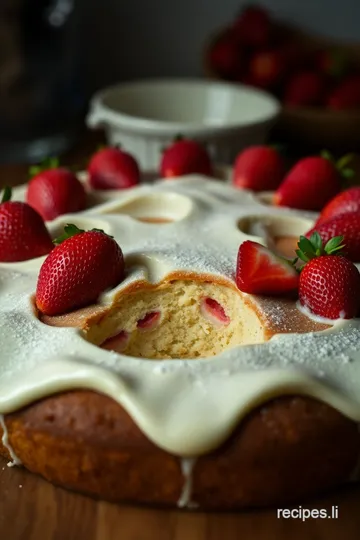
The beauty of this cake is in its unique selling points. it boasts a rich, creamy filling that contrasts beautifully with the moist cake layered throughout.
Trust me, nobody is leaving your table without going back for seconds. and when it comes to special occasions, this cake shines.
Whether it’s a birthday, a springtime brunch, or honestly, any reason to celebrate, it fits right in with the crowd.
Compared to your average strawberry cake recipe, the earthquake version stands out with its ooey-gooey filling and layered textures.
And don't even get me started on the serving suggestions! Plopping a scoop of vanilla ice cream on a piece of warm cake? YUM! Or how about a drizzle of whipped cream topping on a beautifully plated slice? Trust me; it’s a visual feast and an absolute delight!
Ready to dive into making this scrumptious treat? Let’s check out the ingredients you’ll need to pull this strawberry magic together!
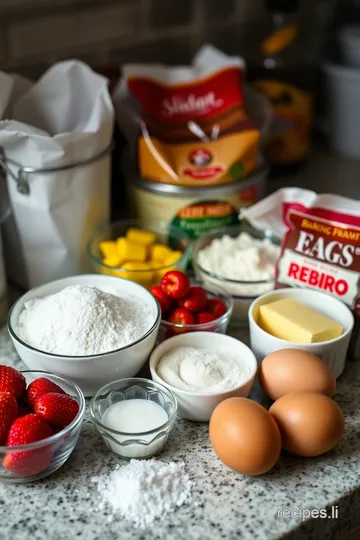
Essential Ingredients Guide for Strawberry Earthquake Cake
When it comes to baking, especially that eye-catching and moist strawberry earthquake cake recipe, understanding your ingredients is key. whether you’re a newbie or a seasoned baker, having an essentials guide makes a world of difference.
Let’s dive in!
Premium Core Components
First off, let’s chat about those premium core components you need:
-
Detailed Measurements : For our cake, you’ll want 1 ½ cups (190 g) all-purpose flour and the same for granulated sugar. Precision helps ensure that your strawberry cake recipe bakes up perfectly.
-
Quality indicators : freshness is everything. when picking strawberries, go for those that are bright red and firm. if they’re mushy or have white spots, just pass.
For the butter, check that it’s nice and creamy without any weird smells.
-
Storage guidelines : keep those strawberries in the fridge, but not in the crisper drawer. they’ll go bad way quicker there! as for leftover cake? wrap it up tightly and stash it in the fridge.
It’ll stay fresh for about 3-4 days.
-
Freshness Tips : Always give strawberries a gentle wash right before you use them. Keeping them dry until then helps them last longer.
Signature Seasoning Blend
Now, let’s sprinkle in some flavor with our signature seasoning blend !
-
Essential spice combinations : in our cake, you don’t need a ton of spices. a touch of vanilla and a hint of salt are just perfect.
They elevate the flavors beautifully without overshadowing the strawberries.
-
Herb selections : herbs might be a little unconventional in a cake, but you can use a touch of mint to freshen things up if you want.
Just chop it finely and sprinkle it in.
-
Flavor Enhancers : Consider a little lemon zest for a refreshing twist. It plays so well with strawberries, creating a perfect layered cake experience .
Smart Substitutions
Didn’t find an ingredient? No sweat—let's explore some smart substitutions !
-
Common Alternatives : If you run out of buttermilk, mix milk with a teaspoon of vinegar. Voila! Instant buttermilk.
-
Dietary Modifications : For a gluten-free version of the strawberry earthquake cake, substitute the flour with a gluten-free blend. It works like a charm!
-
Emergency Replacements : No cream cheese ? Use ricotta instead for that rich filling.
-
Seasonal Options : In the spring, strawberries are ripe. But, you can definitely swap them out for blueberries or raspberries in a pinch!
Kitchen Equipment Essentials
Don’t get caught without your baking gear! Here are some kitchen equipment essentials :
-
Must-Have Tools : A 9x13-inch baking pan is crucial for our cake. Also, an electric mixer makes cream cheese filling a breeze.
-
Alternative Equipment Options : If you don’t have a mixer, a good ol’ whisk and some elbow grease will work just fine. It just takes longer!
-
Preparation Tips : Always preheat your oven before mixing. It’s such a game changer and saves time!
Elevate Your Baking
Finally, let’s get straight to why you're really here—creating the unforgettable strawberry earthquake cake delight ! with everything prepped, you can whip up this easy cake recipe with strawberries that’ll wow your friends and family.
Remember, baking is about having fun and experimenting. Don’t be afraid to make it your own—maybe some chocolate chips adding a layer of richness?
Next in our journey, we’ll walk through step-by-step instructions for making this delightful cake, making sure it’s both creamy and delicious . Buckle up; your kitchen is about to smell amazing!
Getting Started in Professional Cooking
Alright, my friend, let’s dive into the world of professional cooking ! if you’ve ever watched a cooking show and thought, “how do they make it look so easy?” well, the answer often lies in a few easy-to-follow steps.
From prepping your ingredients to mastering the art of timing, here’s how to get it done right.
Essential Preparation Steps
Mise En Place: The Cook's Best Friend
First things first, try to wrap your head around the concept of mise en place . it’s fancy french for “everything in its place.
” basically, you gather and prep all your ingredients before you start cooking. think of it as laying out your tools before building a treehouse.
Chop those strawberries, measure your flour, and have everything at arm’s reach. trust me, it saves you a ton of hassle when you’re in the thick of it.
Time Management Tips
Time is key when it comes to professional cooking. get comfortable with your oven timers and as a beginner, use a two-hour timer for practice, especially while you’re testing recipes like the strawberry earthquake cake recipe .
It’ll help keep you on track, and you can adjust cooking times later as you get the hang of things.
Organization Strategies
Keeping your workspace tidy can drastically improve your cooking flow. use multiple bowls and tools to keep similar tasks together, like mixing wet and dry ingredients.
You don’t want to be hunting for the sugar when you need it in the next step of making a moist strawberry cake with creamy filling.
Safety Considerations
Let’s chat about safety. always keep those kitchen knives sharp; dull ones can slip and cause accidents. and please, wash your hands! especially after handling raw ingredients or strawberries, which can carry bacteria.
Safe cooking is happy cooking, i always say!
Step-by-Step Process
Let’s break down the actual cooking process with some clear steps, like you’re flipping through a magazine!
-
Preheat your oven to 350° F . Not doing this is like trying to catch a bus that’s already left!
-
Get your baking pan ready by greasing it. Think butter or good ol’ cooking spray.
-
Mix your dry ingredients : flour, baking powder, baking soda, and salt in one bowl.
-
Cream butter and sugar until lovely and fluffy. You’re looking for a light texture; think whipped-up clouds!
-
Add your eggs and vanilla extract; mix well.
-
Incorporate those dry ingredients with buttermilk. Alternate them, so it blends without clumps.
-
Gently fold in your diced strawberries . You don’t want to crush them too much—the chunks are part of the fun!
-
Prepare your cream cheese filling while that batter takes a break. Whip together cream cheese, sugar, egg, and vanilla.
-
Layer it up : Pour half the batter, dollop the cream cheese mixture, then cover with the other half of the batter. It’s like a hug for your strawberries!
-
Bake for 40- 45 minutes ! This is key—don’t peek too often or you risk letting all that heat escape.
-
Check for doneness with a toothpick. If it comes out clean, you’re golden!
Expert Techniques
Now for the cool stuff—expert techniques that’ll make you feel like a rockstar in the kitchen.
-
Always keep an eye on temperature control . Your cake is baking at 350° F ; too hot and it’ll burn, too cold and it’ll flop.
-
During baking, look for those visual cues for doneness —golden edges and a firm middle.
-
Troubleshooting? If your layers seem too dense, next time, try folding better or adding more air.
Success Strategies
Let’s not sugarcoat it—mistakes happen! Here’s how to avoid common pitfalls.
-
One big mistake? Don’t overmix! Stir just enough to combine ingredients.
-
Quality assurance tip: Always taste test your batter before it hits the oven. Try that strawberry flavor and adjust sweetness as needed.
-
Want to get ahead? This strawberry earthquake cake can be prepped a day in advance. Just store it in the fridge and ice it the next day.
Making my strawberry earthquake cake the other day, i realized just how fun it was to blend all those flavors.
This cake is not just for those special celebrations— it’s perfect for spring desserts or summer cookouts with friends.
Ready to elevate your baking game? Wait till you try this delicious treat! And for tips, tricks, and more scrumptious recipes, stay tuned for Additional Information .
Pro Tips & Secrets
Alright, friends, let’s dive into the nitty-gritty of this strawberry earthquake cake recipe. i’ve learned a thing or two in my baking adventures, and let me tell you, there are absolutely pro tips that can make or break your cake.
First off , when you’re working with that oh-so-decadent cream cheese filling, make sure everything is at room temperature. this makes mixing a breeze and ensures that creamy goodness is smooth as can be.
And trust me, nobody wants lumps in their luscious filling!
For those of you who ain’t got a lot of time (i see you!), time-saving techniques are key. mix your dry ingredients ahead and store them in an airtight container.
You can even prepare the cream cheese mixture the night before. yes, please!
Flavor enhancement tips ? i always toss in a splash of lemon juice or zest to brighten up those strawberries.
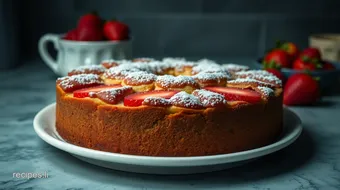
It really brings out their sweet flavor. and don’t forget about presentation; sprinkle some powdered sugar on top before serving — it’s like giving your cake a cute little dusting of magic.
Perfect Presentation
Now, let’s talk about how to make your cake look as good as it tastes! after all, we eat with our eyes first, right? for plating techniques , i like to slice the cake into squares and arrange them on a colorful plate.
It really pops!
When it comes to garnish ideas , fresh mint leaves and extra strawberries can really elevate your creation. just imagine that vibrant color contrast! oh, and a dollop of whipped cream on top? yes, please! it adds a lovely creamy touch.
Color combinations are everything in baking. Use bright, ripe strawberries against a golden-brown cake for that stunning visual appeal. You want it to make your mouth water before you've even taken a bite!
Storage & Make-Ahead
Let’s face it, we all need to figure out what to do with leftovers. this moist strawberry cake can last in the fridge for about 3-5 days , but make sure to wrap it tightly to keep it fresh.
For preservation methods , i’d recommend freezing slices if you know you won’t finish the whole cake in time. just wrap each slice in plastic wrap and pop them in a freezer bag.
When you're ready to indulge again, let it thaw in the fridge overnight.
Reheating instructions ? Honestly, I’d just let it come to room temperature. It’ll keep that delightful texture and flavor. Freshness is where it’s at! No one wants a rock-hard cake.
Creative Variations
Let’s get creative! while this strawberry dessert idea is perfection as is, there are endless ways to customize it. want a chocolate twist? add some chocolate chips to the batter for a gooey surprise.
If you’re feeling adventurous, why not try a seasonal twist and swap out strawberries for fresh peaches in the summer? oh, the possibilities! and for those looking for gluten-free options, you can easily substitute the flour with a gluten-free blend.
Complete Nutrition Guide
Now, i know we love a good treat, but it’s also nice to know what we’re munching on. this strawberry earthquake cake offers a delightful combo of sweetness and richness.
While a slice has about 320 calories, it’s packed with flavor and gives the sweetness your taste buds crave.
Remember, portion control is always a good idea, especially with something as rich as this! feel free to pair it with a fruit salad or a light yogurt for a more balanced dessert approach.
Expert FAQ Solutions
One of the most common questions i get asked is, “what happens if my cake falls apart?” don’t worry—this happens to everyone, even the pros! it might mean you didn’t let it cool enough before cutting.
Just embrace the “cake decomposition” as part of the fun!
And when it comes to unique variations, don’t shy away from experimenting! if you want to use different berries, go for it! the beauty of this strawberry earthquake cake is how customizable it can be while still delivering that ooey-gooey goodness.
So there you have it, folks! this strawberry earthquake cake is not just a dessert; it’s a true celebration cake wrapped up in a delightful experience.
Whether you're preparing for a spring gathering or just a weekday treat, this cake will charm the socks off your guests.
Embrace the baking journey, have fun with the flavors, and don’t forget the extra whipped cream on top! Happy baking, and here’s to crafting memorable bites that will keep you and your loved ones coming back for seconds!
Strawberry Earthquake Cake Recipe Card
⚖️ Ingredients:
- 1 ½ cups (190 g) all-purpose flour
- 1 ½ tsp baking powder
- ½ tsp baking soda
- ¼ tsp salt
- ½ cup (1 stick, 115 g) unsalted butter, softened
- 1 cup (200 g) granulated sugar
- 2 large eggs
- 1 tsp vanilla extract
- ½ cup (120 ml) buttermilk
- 2 cups (300 g) fresh strawberries, hulled and diced
- 8 oz (226 g) cream cheese, softened
- ½ cup (65 g) powdered sugar
- 1 large egg
- 1 tsp vanilla extract
- ½ cup (120 ml) heavy cream
- 1 cup (120 g) powdered sugar
- Fresh strawberries for garnish (optional)
🥄 Instructions:
- Step 1: Preheat the oven to 350°F (175°C).
- Step 2: Prepare the baking pan by greasing it with butter or using cooking spray.
- Step 3: Mix the dry ingredients: In a bowl, combine flour, baking powder, baking soda, and salt.
- Step 4: Cream the butter and sugar: In a separate bowl, beat the softened butter and granulated sugar until light and fluffy.
- Step 5: Add the eggs and vanilla: Mix in eggs one at a time, followed by vanilla extract.
- Step 6: Incorporate the dry ingredients: Gradually add in the dry mixture, alternating with buttermilk until just combined.
- Step 7: Fold in the diced strawberries gently to prevent breaking.
- Step 8: Prepare the cream cheese filling: In another bowl, beat together cream cheese, powdered sugar, egg, and vanilla until smooth.
- Step 9: Layer the batter: Pour half of the cake batter into the prepared pan, then dollop the cream cheese filling over it, and finally top with the remaining cake batter.
- Step 10: Bake: Place in the oven and bake for 40-45 minutes, or until a toothpick inserted into the center comes out clean.
- Step 11: Cool: Allow the cake to cool in the pan for 15 minutes before transferring to a wire rack.
- Step 12: Make the topping: Whip the heavy cream and powdered sugar together and spread over the cooled cake.
- Step 13: Garnish with fresh strawberries if desired.
Previous Recipe: Ultimate Butterfinger Balls Recipe: 7 Irresistibly Delicious Treats!
Next Recipe: Ultimate Keebler Cheesecake Recipe: 5 Delicious Ways to Impress!