Simmered Silverside Beef: Comforting Flavor
Wondering how to create truly comforting flavor? Discover my Simmered Silverside Beef recipe, infused with savory herbs and tender richness, perfect for family dinners!

You know that feeling when you walk into your kitchen, and the smell of something delicious just wraps around you like a warm hug? that’s exactly how i felt the first time i made simmered silverside beef: comforting flavor .
Seriously, it was like a culinary embrace straight from my grandma's recipe book. i can still hear her saying, "there's nothing like a good meal to lift your spirits," and boy, was she right!
This dish is the ultimate in comfort food recipes . tender, juicy beef slowly cooked to perfection with aromatic vegetables? yes, please! it's all about that warm, cozy feeling, perfect for those chilly evenings when you just want to curl up and dig into something hearty.
Recipe Overview
Let’s take a little trip back in time. the roots of simmered beef go way back to the days when slow cooking was necessary to bring out flavor and tenderize tougher cuts of meat.
Silverside beef is one of those traditional cuts that shines in this method. it’s a slice of history that’s still rocking dinner tables today!
Fast forward to modern times, and this dish is a staple for many families. whether you’re prepping for sunday dinner or trying to impress at a holiday gathering, it’s as straightforward as it is delicious.
You've got about 15 minutes of active prep, then let it simmer for a good 2- 3 hours. trust me, the wait is worth it.
You’ll feel like a kitchen hero!
When it comes to costs, you can whip this up for about $20, serving up to eight people. So, if you're scouting for family dinner ideas that won’t break the bank, this one’s your ticket!
Key Benefits
Now, let's chat about why this beefy wonder is a must-have in your recipe repertoire. first off, the health benefits of beef are real.
It’s a great source of protein, iron, and essential nutrients that’ll have your body cheering "thank you!"
The unique selling point? it’s not just delicious; it’s versatile. you can tweak it with different spices, or add in an array of veggies for those looking for meat and vegetable recipes .
Plus, it's perfect for serving on special occasions or just as a way to treat yourself after a long day.
Compared to other hearty beef recipes , simmered silverside beats the competition because of its depth of flavor. slow simmering lets those spices and aromatics (we’ll get to that in a bit) penetrate the meat, resulting in a dish that’s literally bursting with taste.
Not to mention, it’s also one of the make-ahead comfort meals that can be made in advance and stored! leftovers? you can turn them into sandwiches the next day, or toss them into a beef broth recipe .
This recipe is perfect for cold winter days when you’re craving some easy beef recipes . It’s cozy, it’s nostalgic, and it brings the family together—what more could you want?
So, ready to get cooking? Let’s dive into the ingredients you’ll need to bring this savory masterpiece to life!
Essential Ingredients Guide
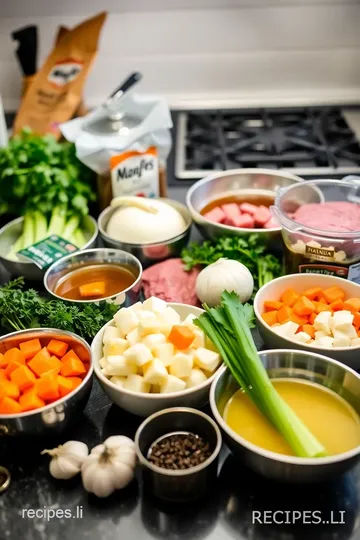
Cooking is like a dance, and your essential ingredients are your partners. these are the premium core components that can elevate any meal, especially when you're diving into something as cozy and comforting as simmered silverside beef .
Seriously, this dish is a warm hug in a bowl! so, let’s get down to the nitty-gritty of what you need to whip up this classic comfort food.
Premium Core Components
When it comes to cooking silverside beef, freshness is key ! start with 3-4 pounds (1.4-1.8 kg) of trimmed silverside.
Look for meat that’s bright red with good marbling. if it’s looking a bit dull or gray, just move on.
For your aromatics , you’ll need sturdy ingredients like onion, garlic, carrots, and celery . these not only add flavor but also make your kitchen smell amazing while it simmers.
Storage guidelines ? keep your beef in the coldest part of your fridge, wrapped tightly. it’ll be good for 3-5 days .
For veggies, a crisper drawer will keep them fresh longer. here’s a pro tip: when you’re shopping, choose firm, colorful produce—it just tastes better, trust me.
Signature Seasoning Blend
Now let’s jazz it up! a simple spice combination does wonders for your simmered silverside beef . think salt, black pepper, and dried thyme thrown into the mix.
Ever tried tossing in a bay leaf while it simmers? game-changer. and don’t forget the worcestershire sauce ; it’s like liquid gold when it comes to beef dishes.
What’s incredible about this recipe is how you can play with flavors . want a dash of heat? add some crushed red pepper.
Prefer a more herby vibe? fresh rosemary would do wonders! each region has its own twist, so feel free to let your creativity fly.
Smart Substitutions
Sometimes, life happens and you can’t find exactly what you need. that’s cool! there are always smart substitutions . for instance, if you can't find silverside, brisket or chuck roast works just as well for those sluggish winter dinners.
If you’re cutting back on red meat, try it with a nice piece of mushroom for a savory, hearty dish.
Got dietary restrictions? no problem. you can use vegetable broth instead of beef broth for a lighter option. and if you’re in a pinch without any wine, just throw in more broth.
It won’t be exactly the same, but it’ll still be delicious!
Kitchen Equipment Essentials
Now, onto tools. you don’t need a ton of fancy gadgets to whip up simmered silverside beef . a sturdy dutch oven is your best friend here; it locks in moisture and enhances those rich flavors.
If you don’t have one, don’t sweat it. any heavy-bottomed pot will do.
Make sure you have a sharp knife to cut your veggies and a wooden spoon for stirring. you’ll also want some measuring cups because precision is key when dealing with comfort food recipes.
And for serving, a ladle will help you dish out that steaming broth without a mess—it’s all about them cozy dinner ideas!
A Personal Touch
Slice into that tender beef and let me tell you—it’s worth every minute of the 2 to 3 hours of simmering.
You’ll have that flavorful broth wrapped around the beef that just warms you from the inside out. plus, cooking this dish means your home will smell like heaven!
You know, one of my best memories is making this silverside dish for family gatherings. my grandma always said, “cooking for loved ones is love in action.
” and honestly, seeing everyone gathered around the table with smiling faces makes all the effort worth it.
So, as we gear up to dive into those step-by-step instructions, keep in mind that this dish isn’t just about feeding your belly.
It’s about heart and soul, bringing a bit of warmth to those chilly winter nights. ready to get cooking? let’s do this!
Professional Cooking Method
Cooking is an art and a science, right? when you dive into something like simmered silverside beef: comforting flavor , there's a whole ballet of preparation that makes it all come together.
So, let's talk about how to get it done like a pro, making sure each step is something you can tackle without breaking a sweat.
Essential Preparation Steps
Mise en place , fancy french for “everything in its place,” is the first step to making life a little easier in the kitchen.
You want to have all your ingredients ready before you dive into cooking. chop those onions, mince the garlic, and measure out your beef broth beforehand.
It’s honestly a game-changer!
Time management is your best buddy here. plan out your prep time , and don't forget to factor in the simmering phase.
You’re looking at about 2 to 3 hours for that tender magic to happen. trust me, the waiting game is worth it!
Next up, let's chat about organization strategies . keep your workspace tidy and your tools handy. it helps prevent that moment when you're digging through a cluttered drawer for your measuring spoons while your beef is, like, on the verge of destruction (not good!).
Lastly, don't skip on safety considerations . make sure your beef is cooked to an internal temperature of at least 145° f before serving.
You don’t want to ruin a delicious dinner by skipping this step!
Step-by-Step Process
Now, let’s get down to business with some clear, numbered instructions that’ll lead you straight to beef bliss.
-
Prepare the Beef: Pat it dry and season generously with salt and black pepper.
-
Sear the beef: heat olive oil until it shimmers, then brown the beef on all sides, about 4 to 5 minutes each side.
It’s like giving your beef a crispy coat to keep it juicy!
-
Sauté the Vegetables: Toss those chopped onions, garlic, carrots, and celery into the pot. Let them get all soft and aromatic, around 5 to 7 minutes .
-
Add Seasonings: Mix in your bay leaf and dried thyme. They’ll bring a beautiful fragrance that’ll transport you straight to Grandma’s kitchen.
-
Deglaze the Pot: Pour in that red wine, scraping up those sleepy bits at the bottom. It’s like waking the dish up!
-
Simmer: return your seared beef to the pot and add your beef broth. bring it to a boil, then lower that temperature to low and cover.
Let it simmer gently for 2- 3 hours . this is where the magic happens, my friends!
-
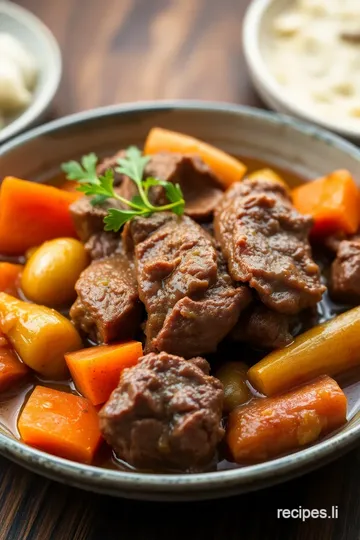
Finish and Serve: Once that beef is fork-tender, let it rest for 10 minutes before slicing. You’ll want to serve it with those beautifully simmered veggies and the rich broth.
Expert Techniques
Now, let’s talk expert techniques to nail down this dish.
One key step is to check the doneness of your meat periodically. if you find it’s not falling apart like you expected, give it a little more time.
Be patient; it really does pay off!
Quality checkpoints? absolutely! you want to taste the broth as you go. adjust seasoning as needed so it’s a perfect balance of savory and rich.
And whatever you do, don’t skip that resting period after cooking. it lets the juices redistribute.
If you run into trouble, don’t panic! If the beef isn't tender enough, just pop it back on the stove for a little longer. Sometimes slow-cooked beef dishes need that extra love!
Success Strategies
Alright, let’s wrap this up with some success strategies. Here’s what to avoid:
- Don’t rush! The longer you simmer, the better the flavor. Aim for that low and slow approach.
- Keep an eye on your broth. If it thickens too much, add a splash of water or stock to keep it soupy and lovely.
- As for make-ahead options, you can make this ahead of time and let the flavors deepen. Refrigerate the leftovers and enjoy it the next day! Those savory beef dishes only get better.
Whether you're planning a family dinner or just need a warm hug in a bowl, simmered silverside beef is your go-to.
Cozy up with this classic comfort dish, and watch your loved ones gather around the table, soaking in the aroma of that simmering goodness.
So, what’s next on the horizon? let’s dive into some additional information about variations, pairing options, or even leftover recipes that’ll leave you smiling long after the plates are cleared!
Pro Tips & Secrets
Alright, if you want to make simmered silverside beef: comforting flavor truly shine, listen up! first, let me drop some of my favorite chef secrets .
Make sure to season your beef well before searing. nothing worse than bland beef! a good sprinkle of salt and pepper before it hits the pan is all you need.
Now, about time-saving techniques —if you’ve got a pressure cooker , it can cut that simmer time in half! no kidding.
You still get that amazing flavor without the wait. just be sure to adjust the liquid levels accordingly, alright?
For flavor enhancement, don’t skip on the aromatic veggies —the onions, garlic, and thyme really take this dish over the top.
They create a beautiful flavor foundation that your beef will soak up as it cooks.
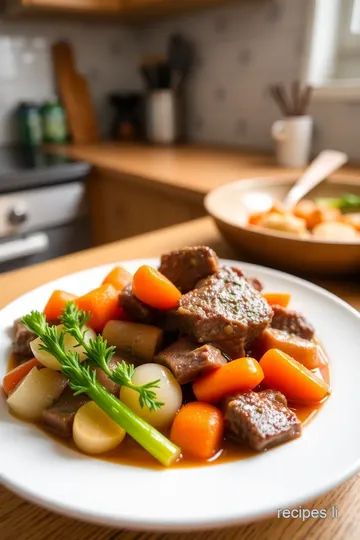
And let's talk presentation. when you serve it up, slice the beef against the grain for the most tender bites.
Drizzle some of that rich broth over it and you’ve got a meal that looks as good as it tastes!
Perfect Presentation
You know what they say: we eat with our eyes first . plating techniques can really elevate your dish from good to gourmet.
Try stacking slices of beef with veggies on the side. a little height adds drama!
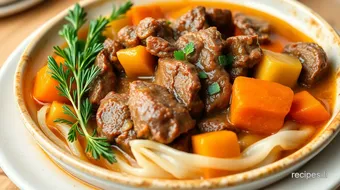
Garnish ideas? fresh herbs like parsley or chives can bring a pop of color and a fresh flavor to your dish.
You might even toss some sautéed greens over the top for that extra wow factor.
Think about color combinations too. The earthy tones of the silverside and carrots paired with vibrant greens can make the plate so appealing. It’s like art—your dish can be a masterpiece!
Storage & Make-Ahead
Let’s talk leftovers , shall we? if you want to make this dish ahead of time, it’s perfect for meal prep! just let it cool completely, then store it in an airtight container.
You can pop it in the fridge for about 3-4 days or freeze for up to 3 months . just remember to keep some of that broth handy; it keeps the beef juicy when you reheat.
Speaking of reheating, put it on medium heat on the stove with a splash of water or broth. This’ll keep it from drying out and will warm it up beautifully.
Creative Variations
One of the best parts about cooking is getting creative ! If you're feeling adventurous, throw in some diced potatoes or root veggies for a more filling meal.
Want some seasonal flair? Try adding some butternut squash in the fall or fresh peas in the spring. It’s a simple way to freshen up this classic dish.
And hey, if you prefer a lighter version, swap out the silverside for pork shoulder or even a vegetable medley for a veggie version. Just ensure you adjust your cooking times accordingly.
Complete Nutrition Guide
So, let’s get into the nitty-gritty. each serving of this comforting dish packs a punch with around 40 grams of protein ! aside from being a hearty choice, beef is rich in iron and essential vitamins.
Just be mindful of the sodium if you’re watching that.
For dietary considerations, this dish can fit into many healthy eating plans, especially if paired with lots of veggies. Plus, with its hearty nature, it makes for a great family dinner idea.
Expert FAQ Solutions
Now, i know you might have some questions. common ones are, “why is my beef tough?” if it’s not simmering long enough, that could be it.
You want it fork-tender, so patience is key.
Another question might be, “Can I use other cuts of beef?” Absolutely! Cuts like brisket or chuck will work wonderfully too; just adjust the cooking time based on what you choose.
And here's a fun fact: simmering beef not only enhances flavors but also produces one of the best beef broth recipes ever.
You can even use the broth as a base for soup !
So there you have it, folks! dishing out simmered silverside beef: comforting flavor isn’t just about the food—it's about gathering everyone around the table for a cozy meal.
Remember, cooking is all about experimenting and making it your own. don't be afraid to try new flavors or tweak it to fit your taste.
Now go ahead, grab those ingredients, and create some hearty family recipes that will warm your souls this winter. You’ve got this!
Simmered Silverside Beef: Comforting Flavor Card
⚖️ Ingredients:
- 3-4 pounds silverside beef, trimmed
- 1 tablespoon olive oil
- Salt and black pepper, to taste
- 1 large onion, chopped
- 3 cloves garlic, minced
- 2 large carrots, chopped
- 2 stalks celery, chopped
- 1 bay leaf
- 1 teaspoon dried thyme
- 4 cups beef broth or stock
- 1 cup red wine (optional)
- 1 tablespoon Worcestershire sauce
🥄 Instructions:
- Step 1: Pat the silverside beef dry with paper towels and season generously with salt and black pepper.
- Step 2: Heat olive oil in the pot over medium-high heat, add the beef, and sear on all sides until browned, about 4-5 minutes per side. Remove and set aside.
- Step 3: In the same pot, add the chopped onion, garlic, carrots, and celery. Sauté until softened, about 5-7 minutes.
- Step 4: Stir in the bay leaf, dried thyme, and Worcestershire sauce, cooking for an additional minute.
- Step 5: Pour in the red wine (if using) and scrape the bottom of the pot to release any browned bits.
- Step 6: Return the seared beef to the pot, along with the beef broth. Bring to a boil, then reduce heat to low and cover. Simmer gently for 2-3 hours, or until the meat is fork-tender, turning the beef occasionally.
- Step 7: Once tender, remove the beef from the pot and let it rest for 10 minutes before slicing. Serve with the simmered vegetables and broth.
Previous Recipe: How to Make the Best Grilled Turkey Steaks with Zesty Flavor
Next Recipe: How to Make the Best Quick Taco Soup with Ground Turkey Delight