Quick & Creamy Eskimo Pie Popsicles
Looking for a fun treat? Try my homemade Eskimo Pie popsicles! They’re creamy, chocolatey, and easy to whip up. Make Delicious Eskimo Pie Popsicles Fast!

- look into into Deliciousness: Eskimo Pie Popsicles
- Essential Ingredients Guide
- Professional Cooking Method: Unlocking Deliciousness
- Pro Tips & Secrets for Making Delicious Eskimo Pie Popsicles Fast
- Perfect Presentation Tips You’ll Love
- Storage & Make-Ahead Tips That Save the Day
- Creative Variations You’ll Want to Try
- Complete Nutrition Guide for a Healthy Treat
- Wrapping It Up with Some Encouragement
- Frequently Asked Questions
- Recipe Card
look into into Deliciousness: Eskimo Pie Popsicles
Oh my gosh, let me tell you about one of the best summer treats ever— eskimo pie popsicles ! you know those sunny days when the heat feels like it’s wrapping you up like a warm blanket? yeah, those are the days i crave something ice-cold and creamy.
Picture this: you’re lounging in your backyard, kids are running around, and you pull out a batch of homemade popsicles.
Instantly, you’re the hero of the day. everyone’s happy, and trust me, it’s a game-changer. you can make delicious eskimo pie popsicles fast, and i’m here to show you how!
A Sweet Slice of History
Did you know these popsicles have a rich history? the eskimo pie recipe dates back to 1920 when they were first created in the united states.
Thanks to a clever candy company, this chocolate-covered ice cream bar became a summer staple. today, they're not just a cool snack—they're a nostalgic classic! and honestly, they’re super popular.
Kids adore them; adults love the creamy indulgence.
Keeping It Real: Time and Cost
Now, let’s get down to business. this recipe is as easy as pie (or should i say popsicle?). it takes about 15 minutes of prep time and 2 hours of chill time.
Don't worry; you'll just kick back while they set. each recipe yields about 8 popsicles , which is perfect for sharing—if you're feeling generous.
Oh, and about the cost? you can whip these up for just a few bucks! who doesn’t love a budget-friendly treat?
Why You’ll Love Them
Let’s talk about the good stuff—the benefits! first up, the health perks . these popsicles can be made with vanilla or chocolate ice cream, and if you go for coconut or almond milk-based ice cream, they can be a fabulous dairy-free popsicle alternative ! plus, they let you control what goes in them.
No weird stuff—just pure, creamy goodness.
And guess what? They’re perfect for all kinds of occasions. Birthday parties, hot summer days, or even just a movie night in. Seriously, these are tasty summer desserts that’ll impress everyone.
You also have the freedom to customize! grab your favorite fun ice cream flavors . want something fruity? toss in some strawberry or banana puree to give it a punch.
Oh, and toppings! who doesn’t love to sprinkle some crushed nuts or colorful sprinkles on top? you’ll feel like a kid at recess!
Moving on to Ingredients
Ready to dive in? Here’s what you’ll need to Make Delicious Eskimo Pie Popsicles Fast . Gather your supplies, and let’s get started on whipping up something memorable!
Essential Ingredients Guide
So, you wanna whip up some quick & creamy eskimo pie popsicles ? let’s dive into the essential ingredients and tools you’ll need to make those bad boys come to life.
This is all about knowing what’s what and how to get the most out of your kitchen experience.
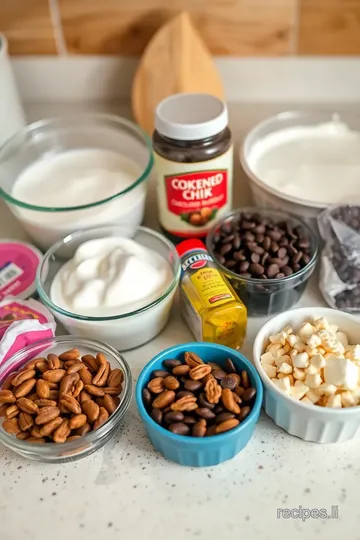
Premium Core Components
First things first, let’s get you set up with the basics. When you're making treats like popsicles, the quality of ingredients matters :
-
Vanilla ice cream : aim for 2 cups (473 ml) of high-quality vanilla ice cream. check for rich flavor and a smooth texture.
If you're feeling adventurous, chocolate ice cream would work, too! for the vegan squad , go for a coconut-based or almond milk ice cream.
-
Chocolate Chips : Grab a 1 cup (240 mL) bag of semi-sweet chocolate chips. Look for brands with minimal ingredients — that way, you know you’re getting good stuff.
-
Oil : just 1 tablespoon (15 ml) of vegetable or coconut oil is needed. this helps the chocolate melt smoother.
Pro tip : coconut oil makes everything a bit special in the flavor department.
Store all these goodies in your freezer, especially the ice cream! you'll want it fresh for those popsicle-making sessions. ice cream usually has a shelf life of about two months if kept cold.
To check freshness, just give it a sniff; any off smell means it's best to toss it.
Signature Seasoning Blend
Alright, while traditional Eskimo Pies don’t really need spices, let's talk about toppings . This is where you can jazz things up:
-
Chopped nuts : you know those crunchy toppings? a handful of chopped peanuts or almonds goes great with our popsicles.
Look for them fresh from the store. they should be crunchy, not stale.
-
Sprinkles or Coconut : Fun for parties or kids! Use what you have on hand . Fresh shredded coconut adds a tropical twist.
-
Salt : A pinch of sea salt can elevate the chocolate flavor. Trust me! Just a little sprinkle makes all the difference.
Smart Substitutions
Sometimes you don’t have what you need, and that’s totally fine! Check these smart substitutions :
- Ice Cream : No vanilla? No problem. Try a fruit-flavored yogurt for a refreshing alternative.
- Chocolate : Dark chocolate can be a delightful swap for milk. It gives a deeper flavor profile!
- Sweetening Up : If you wanna lower sugar, consider using unsweetened cocoa powder when melting for a non-sweet chocolate coating.
Kitchen Equipment Essentials
You don’t need a whole arsenal of tools to make these popsicles, but there are a few must-haves:
-
Popsicle Molds : These are essential for shaping your pops. You can find silicone molds for easy release or the classic plastic ones. Both work!
-
Mixing Bowl : A medium-sized bowl will do. Pro tip : Use a glass bowl for melting chocolate in the microwave. It helps you see when it’s perfectly melted.
-
Microwave/Saucepans : If you’re going the classic route, a double boiler works best. Just be careful, chocolate burns easily!
Conclusion: Let the Fun Begin!
Now that you know all the essential ingredients and tools you need, you’re ready to dive into the fun part - creating those delicious eskimo pie popsicles ! with a little prep and creativity, you’ll have these delightful frozen treats ready in no time.
Next, we’ll roll up our sleeves and tackle the step-by-step instructions! Let’s make that creamy dessert magic happen!
Professional Cooking Method: Unlocking Deliciousness
Let’s dive into the nitty-gritty of cooking like a pro! whether you're throwing a last-minute party or just want to make delicious eskimo pie popsicles fast, mastering some essential professional cooking techniques is key.
We’re gonna cover everything from prep to final touches. so, grab your apron and let’s get started!
Essential Preparation Steps
Mise en place: the game changer okay, first, let’s talk mise en place . it’s a fancy french term that just means having everything in its place before you start cooking.
Trust me, it makes a huge difference. gather all your ingredients, measure them out, and have your tools ready to go.
It’s like the secret sauce of the cooking world!
Time management tips keep an eye on your clock. setting timers for different tasks can save your bacon (or ice cream).
For example, while your popsicles are chilling in the freezer for at least 2 hours , why not tidy up or prep for your next recipe? multitasking is your friend!
Organization Strategies Label your ingredients if you've got a lot going on. A neatly organized kitchen counters not only makes you feel like a chef but also helps avoid burning the chocolate when we're getting ready to dip our popsicles!
Safety Considerations Don’t forget the basics—keep those fingers safe! Always use sharp knives with caution. Also, remember to wash your hands and your equipment to avoid any kitchen calamities.
Step-by-Step Process
-
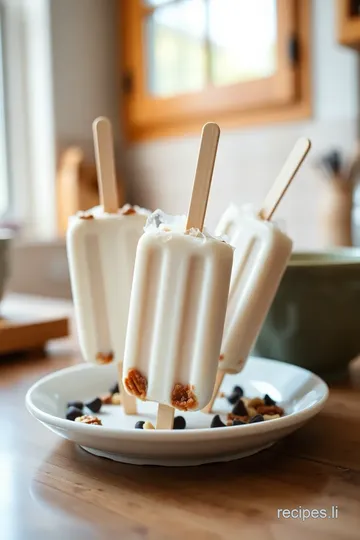
Prepare the Molds: Make sure your popsicle molds are squeaky clean. No one wants a surprise crunch from last week's leftovers!
-
Fill with ice cream: scoop about 2 cups of your favorite vanilla or chocolate ice cream into the molds. smooth the top with a spatula.
Think of it as the ice cream’s beauty routine before its big debut!
-
Freeze: Pop those molds into the freezer. Have patience—they need to freeze for at least 2 hours .
-
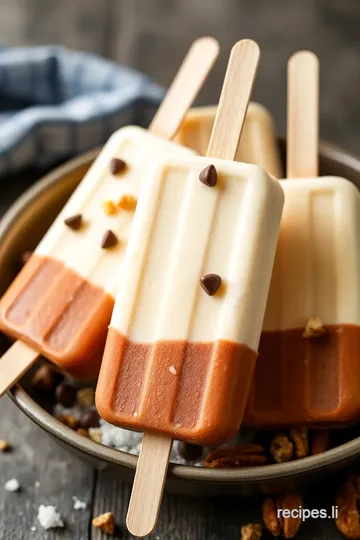
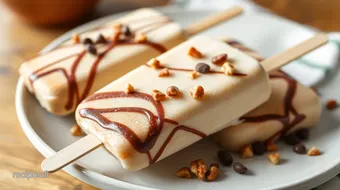
Melt the chocolate: now, the crucial part. melt about 1 cup of chocolate chips in a bowl with a tablespoon of oil, using 30-second bursts in the microwave.
Stir between those bursts, so your chocolate doesn’t turn into a burnt mess.
-
Remove Popsicles: Run warm water over the outside of the molds—this little trick makes getting the pops out a breeze.
-
Coat in Chocolate: Dip each popsicle in that glorious melted chocolate, letting the excess drip off. Want to make it extra special? Toss on some chopped nuts or sprinkles before the chocolate sets!
-
Set Chocolate: Lay those coated pops on a parchment-lined sheet and freeze for about 30 minutes to let the chocolate harden.
Expert Techniques
Now, let’s talk expert techniques to really wow your friends. always keep an eye on that chocolate—overheating is the enemy.
If it starts to seize up, just add a bit more oil and stir until it smooths back out.
Quality Checkpoints When your popsicles are ready, take a peek at that chocolate! It should have a nice glossy finish. No one likes a dull dessert!
Troubleshooting Tips If your chocolate isn't coating well, it might be too thick. Just whisk in a splash of vegetable oil. Boom! You’ve got it!
Success Strategies
Common Mistakes to Avoid Don’t rush the freezing process! If they’re still mushy, your pops won't hold up when you start to dip.
Quality Assurance Tips Always taste-test! If the flavor isn't poppin’, throw in a splash of vanilla extract or some mini chocolate chips in the ice cream mix.
Perfect Results Guide Follow the timing and temperature tips above for perfect popsicles every time!
Make-Ahead Options These Eskimo Pie Popsicles can be made a few days ahead, making them the perfect treat for unexpected guests or a hot summer day.
And voila! You’re all set to create those delicious Eskimo Pie Popsicles fast . Now you can impress friends and family with homemade popsicles that look and taste amazing.
Now that we’ve got your popsicles sorted, let’s take a peek at some Additional Information to elevate your home cooking game!
Pro Tips & Secrets for Making Delicious Eskimo Pie Popsicles Fast
Oh my gosh, if you want to make delicious eskimo pie popsicles fast, i’ve got some pro tips that’ll take your popsicle game to the next level! for starters, always let your ice cream sit out for a few minutes before scooping.
This way, you’ll avoid the arm workout of battling with hard ice cream. plus, it makes filling those molds a breeze!
Time-saving techniques ? here’s a gem: instead of waiting for the chocolate coating to harden after dipping, pop the coated popsicles back in the freezer for just 15 minutes to speed up the process.
Now, for flavor enhancement, try adding a pinch of sea salt to your melted chocolate—seriously, it makes a difference!
When it comes to presentation advice , make sure to use vibrant garnishes. chopped nuts, sprinkles, or even a little shredded coconut can make your popsicles look instagram-worthy in no time.
Trust me—your friends will be asking for the recipe just based on looks!
Perfect Presentation Tips You’ll Love
Let’s talk about plating techniques for your treats! even though these are popsicles, presentation matters! place them upright in a cup or cone.
This not only looks cute but keeps them from falling over. garnish ideas? how about a sprinkle of crushed nuts or a drizzle of chocolate sauce on top?
Color combinations can also elevate your popsicles. If you use chocolate ice cream, a sprinkle of colorful sprinkles brightens them up. They’ll be a feast for the eyes!
And while we’re on the topic of visual appeal , arrange them on a platter in a rainbow pattern if you make more than one flavor.
It’ll not only make your dessert table pop but also impress your friends when you whip these out at parties!
Storage & Make-Ahead Tips That Save the Day
Let’s be real—nobody likes melted popsicles. here are some storage guidelines to keep them fresh. first, ensure your popsicles are completely frozen before popping them out of the molds.
Once set, pack them individually into freezer bags to prevent ice crystals from forming.
For preservation methods , you can store them in the freezer for up to three weeks (if they last that long!).
Just remember, the longer they’re in there, the more likely they might not be as tasty. for reheating instructions , well, there’s none! but if you’re experimenting with the chocolate coating, you can always remelt it in the microwave for a few seconds.
Creative Variations You’ll Want to Try
Now, who doesn’t love a twist? When thinking of flavor adaptations , consider adding a swirl of peanut butter or Nutella in the ice cream before freezing. It’s a game changer!
For dietary modifications , if you’re looking for dairy-free popsicle alternatives, coconut milk-based ice cream is a fantastic choice. seasonal twists shine when you add fresh fruit like strawberries or peaches for summer.
And regional variations? how about a spiced version using cinnamon or nutmeg for an autumn vibe?
Complete Nutrition Guide for a Healthy Treat
Want to keep it real? Here’s the scoop! In your detailed breakdown , one popsicle sits around 150 calories. Not too shabby for a dessert, right? They’re low in protein but packed with joy!
Health benefits ? Let’s just say, every indulgent bite can bring a bit of happiness to your day. Always consider portion guidance, though—easy to share or just keep ‘em for yourself!
Wrapping It Up with Some Encouragement
So there you have it! making delicious eskimo pie popsicles fast doesn’t have to be complicated. with these tips and tricks, you’ll be the popsicle master in no time! honestly, nothing beats a homemade frozen dessert treat on a scorching summer day.
Get the kids involved and make it a fun experience—think of all the unique flavors you can create together! just remember, cooking is all about enjoying the process.
So grab those molds, get creative, and let’s make some tasty summer desserts that everyone will love! happy popping!
Frequently Asked Questions
How can I make delicious Eskimo Pie popsicles fast without the mess?
To make delicious Eskimo Pie popsicles fast and keep things tidy, be sure to use a microwave-safe bowl for melting chocolate and line your baking sheet with parchment paper. This setup will help you avoid sticky surfaces and make clean-up a breeze after coating your popsicles.
What are some variations I can try for these popsicles?
You can customize your Eskimo Pie popsicles by using different ice cream flavors like mint chocolate chip or strawberry. For a healthy twist, blend fruits like bananas and berries into the ice cream, or try adding nuts, sprinkles, or coconut flakes as toppings!
Can I substitute the ice cream in this recipe?
Absolutely! If you’d like a dairy-free option, use coconut or almond milk-based ice cream instead. Additionally, you can experiment with yogurt-based ice creams for a lighter version while still enjoying that creamy texture.
How do I store leftover popsicles?
To store leftover Eskimo Pie popsicles, wrap each popsicle in parchment paper or plastic wrap and place them in an airtight container. This will help maintain their freshness and prevent freezer burn, allowing you to enjoy them later!
What’s the best way to ensure the chocolate coating stays smooth?
When melting chocolate for coating, always use a microwave-safe bowl and melt it in 30-second intervals, stirring in between. Adding a tablespoon of vegetable or coconut oil can also help achieve a glossy, smooth finish that coats evenly and doesn’t crack.
Can kids help me make these Eskimo Pie popsicles?
Yes, kids can definitely help make these popsicles! They can scoop the ice cream into the molds and choose their favorite toppings. Just supervise them while melting the chocolate to ensure safety, as it can get quite hot!
Quick & Creamy Eskimo Pie Popsicles Card
⚖️ Ingredients:
- 2 cups vanilla ice cream (or chocolate ice cream)
- 1 cup chocolate chips (or chopped chocolate)
- 1 tablespoon vegetable oil or coconut oil
- Pinch of sea salt (optional)
- Chopped nuts (e.g., peanuts, almonds) (optional)
- Sprinkles (optional)
- Shredded coconut (optional)
🥄 Instructions:
- Step 1: Ensure popsicle molds are clean and ready to use.
- Step 2: Scoop the ice cream into the molds, filling them to the top. Insert popsicle sticks and smooth the top with a spatula.
- Step 3: Place molds in the freezer and freeze for at least 2 hours, or until solid.
- Step 4: In a microwave-safe bowl, combine chocolate chips and vegetable oil. Microwave in 30-second intervals, stirring in between, until fully melted and smooth.
- Step 5: Gently run warm water over the outside of the molds to easily release popsicles.
- Step 6: Dip each popsicle in the melted chocolate, allowing excess to run off. Optionally, sprinkle with nuts or other toppings before the chocolate hardens.
- Step 7: Place the coated popsicles back on a parchment-lined baking sheet and freeze for at least 30 minutes until set.
Previous Recipe: How to Sear Herb-Chicken Bliss in 45 Minutes: My Family's Favorite!
Next Recipe: My Easy Roll Smoked Salmon Delightful Cucumber Appetizer Recipe