Decadent Dipped Waffles
Craving a cozy treat? Make Delicious Dipped Waffles in 35 Min! These fluffy delights drizzled with rich chocolate are perfect for brunch or an easy dessert.

- Recipe Overview
- Key Benefits
- Essential Ingredients Guide: Unleash Your Inner Waffle Wizard!
- Decadent Dipped Waffles: A Sweet 35-Minute Delight!
- Pro Tips & Secrets to Make Delicious Dipped Waffles in 35 Minutes
- Perfect Presentation: Plating Techniques and Garnish Ideas
- Storage & Make-Ahead
- Creative Variations on Dipped Waffles
- Complete Nutrition Guide
- Expert FAQ Solutions
- Encouraging Conclusion
- Recipe Card
Oh my gosh, do you ever have those mornings where you just want to treat yourself but don’t feel like spending hours in the kitchen? i get it! we’re all busy.
Let me tell you, there’s nothing better than the joy of waking up to a fluffy batch of chocolate-dipped waffles that you whipped up in just 35 minutes .
Seriously, if you’re craving something sweet, these are your go-to! so, let’s dive into this easy waffle recipe that’s sure to become a family favorite.
Recipe Overview
Now, if you’re wondering about the origins of these delicious bites, they come from the famous belgian waffles , a classic that has made its way into our american brunch culture.
They’re not just pretty to look at; they’ve got that perfect combo of fluffiness and crispiness that makes them irresistible.
These dipped waffles have really taken off in recent years, becoming a trendy sweet treat at brunch spots across the country.
In terms of time and hassle, you can whip up these bad boys in about 35 minutes total. that’s only 15 minutes prep and 20 minutes cook time .
Seriously, you don’t have to be a master chef to nail this easy waffle recipe. what’s even better? you can get all of this done without breaking the bank.
Let’s say you could serve a family of four, and it’s super affordable too!
Key Benefits
Okay, let's break it down. finding quick brunch ideas that everyone loves can feel like hunting for gold sometimes. but these dipped waffles are not just yummy; they pack quite a punch in terms of health benefits too! made with whole milk and can be topped with fresh fruits like strawberries or blueberries, they’re a way to sneak in some nutrition while satisfying that sweet tooth.
You know what makes these waffles even better? they shine during special occasions! think birthdays, family brunches, or even surprising the kids on a weekend.
Plus, you can get creative with toppings! from whipped cream recipes to seasonal fruit toppings , the options are endless.
Honestly, how can you argue with that?
And if you’re looking for something different from the usual pancake breakfasts, these waffles stand tall against similar recipes. with their dipping sauce options, they offer a tactile and interactive dessert experience.
Sounds fun, right? kids and adults alike can't resist that! oh, by the way, if anyone in your crew is gluten-free, don’t sweat it — i’ve got you covered with a simple substitution that makes a perfect gluten-free waffle recipe.
So, are you ready to make these delectable dipped waffles? let’s check out the ingredients you’ll need to get started on this 35-minute meal idea that promises to be both a treat and a source of smiles around the breakfast table.
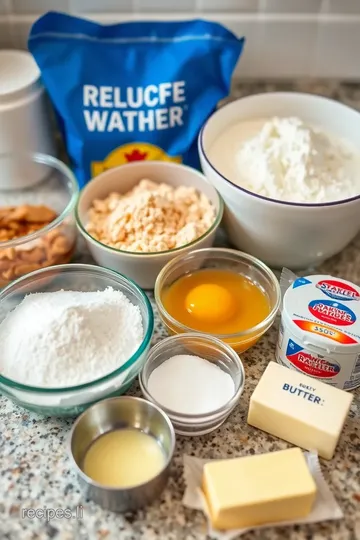
Essential Ingredients Guide: Unleash Your Inner Waffle Wizard!
Making chocolate-dipped waffles is easier than you might think, especially when you have the right ingredients and tools in your arsenal.
Seriously, nothing feels better than whipping up some homemade breakfast treats that will leave everyone drooling. let's dive into the essentials!
Premium Core Components
First things first: measurements . for that easy waffle recipe , you'll need 1 ½ cups (190g) all-purpose flour, 2 tablespoons (25g) granulated sugar, and 2 teaspoons baking powder, among other goodies.
If you're more of a metric person, i got your back too! it's all about the love, right?
Quality indicators matter, folks. when you’re picking flour, go for brands that feel soft and airy to the touch. granulated sugar? look for the purest white.
And check those ingredients! if there's anything funky in there, dig deeper.
Storage guidelines ? store your flour in a cool, dark place to keep it fresh. generally, all-purpose flour has a shelf life of about one year .
Don’t be surprised if you have an old bag hiding in the back—toss it if unsure!
For that added pop of flavor, be picky about your ingredients! for instance, try to get unsalted butter that's been well stored.
And for your chocolate dip , reach for high-quality semi-sweet chocolate chips. honestly, the taste difference is like night and day!
Signature Seasoning Blend: Spice it Up!
Next, let’s talk about the signature seasoning blend for your dipped waffles. a pinch of cinnamon goes a long way.
If you've got it, toss in a bit of vanilla extract too; it works like magic!
Don’t forget about herbs and aromatics! Fresh lemon zest can brighten up your batter. And why not add a bit of sea salt ? That little contrast brings out the sweetness of your chocolate dip in a way that’ll have your family saying, “Oh my gosh!”
Smart Substitutions: Flex Your Creativity!
Now, let’s say you’re missing an ingredient. don’t sweat it. here are some smart substitutions . if you’re out of all-purpose flour, grab that special gluten-free flour mix instead.
It’s a game changer for those with dietary restrictions!
And hey, if you’ve run out of chocolate chips? dark chocolate will do the trick, or even white chocolate if you’re feeling adventurous.
You could even melt nutella if you want a unique twist on the classic.
Kitchen Equipment Essentials: Your Ultimate Toolkit
You gotta have the right tools. A waffle iron is your best friend here, obviously. Don’t worry if you don’t have a fancy one; even old-school irons can work magic! Just be sure it’s clean and preheated—no one likes a soggy waffle!
And don’t forget about mixing bowls and a whisk . having a rubber spatula is also super helpful for scraping the batter clean into the iron.
It’s the little things that take a dish from good to amazing .
Got a question about storage solutions ? Store your waffle iron in a dry spot to keep it functioning well and ready for those family-friendly breakfasts .
Wrapping It Up: Let’s Get Cooking!
So now that you’re armed with the essential ingredients guide , you’re all set to Make Delicious Dipped Waffles in 35 Min ! Keep your toppings open-ended; maybe some fresh berries or a drizzle of whipped cream sounds enticing to you?
As we transition into the instructions part, remember: the key to great waffles is not just about the ingredients but how you combine them. So, spruce up your morning with waffle greatness.
Trust me, your brunch game is about to soar to new heights with that fluffy batter and luscious chocolate!
Let's jump right into making these sweet treats!
Decadent Dipped Waffles: A Sweet 35-Minute Delight!
Oh my gosh, if you haven’t tried chocolate-dipped waffles yet, you’re totally missing out! imagine fluffy, warm waffles that you can dip in melted chocolate—it's like brunch and dessert rolled into one.
Seriously, these are perfect for a quick family-friendly breakfast or a sweet treat after dinner. and guess what? you can make delicious dipped waffles in just 35 minutes ! let’s dive in!
Essential Preparation Steps
Mise en place
first off, let’s chat about mise en place. this fancy french term just means “everything in its place.
” you want to have all your ingredients ready before you start cooking. so, measure out your 1 ½ cups of flour and grab your 1 cup of chocolate chips .
It saves you from scrambling around and makes everything smoother. trust me, it’s a game-changer.
Time management tips
while you're prepping, keep an eye on the clock. with a prep time of 15 minutes and a cook time of 20 minutes , timing is everything.
You can set a timer after mixing the batter, so you can focus on other things like picking out perfect toppings for your waffles—like fresh berries or whipped cream!
Organization strategies
get your workstation tidy. have a bowl for dry ingredients, a bowl for wet, and your waffle iron set up and ready to roll! this way, you won’t be running around looking for a spatula while your waffles are cooking.
It’s all about a streamlined process!
Safety Considerations
And remember, waffle irons can get super hot. So, don’t forget to use oven mitts when opening it up! Safety first, my friends!
Step-by-Step Process
-
Preheat Waffle Iron: Set that waffle iron to medium heat to get it nice and toasty.
-
Prepare Dry Ingredients: In a large bowl, whisk together flour, sugar, baking powder, and salt until combined.
-
Mix Wet Ingredients: In a separate bowl, combine egg, milk, melted butter, and vanilla extract . Easy peasy!
-
Combine Mixtures: Pour the wet ingredients into the dry ones. Don’t overmix! Just stir until everything is combined, even if a few lumps are hanging around.
-
Cook waffles: lightly grease the waffle iron, pour in your batter, and cook until golden brown and crispy, about 5 minutes .
The best way to tell is when it stops steaming, and it looks beautiful and golden.
-
Prepare Chocolate Dip: Microwave the chocolate chips and heavy cream in 30-second intervals , stirring until it’s smooth and dreamy.
-
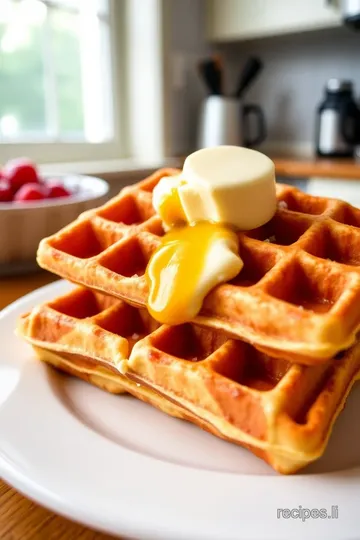
Dip Waffles: Carefully dip those gorgeous waffles halfway into the chocolate. It’s the best part!
-
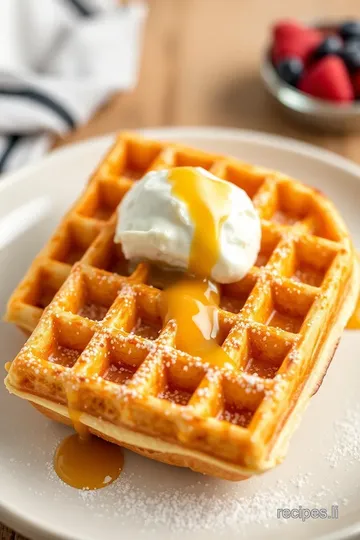
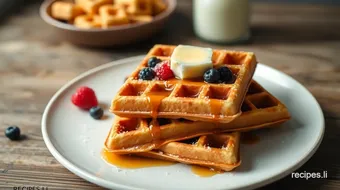
Garnish: Top them off with fresh berries or whipped cream if you’re feeling fancy.
-
Serve: Dig in right away while they’re warm and gooey!
Expert Techniques
Here’s where it gets even more fun!
-
Chocolate Melting Technique: If your chocolate's too thick, add a splash more of cream. For more decadent chocolate, use dark chocolate chips.
-
Quality Checkpoints: Your waffles are perfect when they are golden brown. Trust your senses—look for a crispy exterior.
-
Troubleshooting Tips: If your waffles stick to the iron, make sure to grease it well next time. No one wants a pancake masquerading as a waffle!
Success Strategies
We’ve all made mistakes in the kitchen, right? Don’t stress!
-
Common Mistakes to Avoid: One biggie is overmixing the batter. You want those light, fluffy waffles, so mix it just enough!
-
Quality Assurance Tips: Taste the batter before cooking! If it’s not sweet enough or a little bland, add a pinch more sugar.
-
Perfect Results Guide: Follow the timing! Every waffle iron is different, so use that 5-minute mark as a baseline.
-
Make-Ahead Options: If you want to prep, make your batter the night before and store it in the fridge. Just give it a quick stir again before cooking.
Now you’ve got all the secrets to making the fluffiest, most delicious dipped waffles ever! so, get that waffle iron ready for a sweet adventure.
And if you’re looking for more ideas, check out the upcoming section for additional information!
Pro Tips & Secrets to Make Delicious Dipped Waffles in 35 Minutes
Alright, friends, let’s talk about those chocolate-dipped waffles we’re all craving! you probably want them to not just be good, but amazing.
Here are some of my favorite pro tips and secrets that’ll help you nail this easy waffle recipe.
Chef's Secret Insights
First things first, keep it simple. seriously. a fluffy waffle recipe doesn’t need to be complicated. use good-quality ingredients, and your waffles will shine.
I swear by using whole milk for that added richness. also, don’t skimp on the vanilla extract ; it elevates the flavor big time!
Time-saving Techniques
We live in a world where time is precious, right? so, when you’re whipping up these beauties, have your all your ingredients pre-measured.
It makes everything go faster, and you can spend less time in the kitchen and more time enjoying those sweet treats.
Flavor Enhancement Tips
Want to kick things up a notch? add a pinch of cinnamon or nutmeg to the batter. it’s a simple way to go from meh to wow.
Make sure to taste that chocolate dip, too! you can adjust it by adding a pinch of salt or a splash of vanilla.
It makes the chocolate flavor pop!
Presentation Advice
Now that we have these scrumptious waffles ready, let’s make ‘em look gorgeous. when you pile them on a plate, stack those waffles high.
It looks impressive and is super inviting. drizzle some melted chocolate or sweet sauces for desserts over the top, and don’t forget those colorful toppings! fresh berries or a dollop of whipped cream makes everything just pop.
Perfect Presentation: Plating Techniques and Garnish Ideas
So, how do we make these waffles not just delicious but downright photogenic?
Color Combinations
Combining colors is vital. Think about it! Bright reds from strawberries or deep blues from blueberries contrast beautifully with the golden waffles. It’s like a little piece of art on your plate!
Visual Appeal Tips
When you serve these waffles, try to use a plate that enhances the colors. A classic white plate really makes those colors shine, and believe me, the Instagram likes will follow.
Storage & Make-Ahead
Okay, let’s chat about storage since I know some of you might be all about that meal prep life.
Storage Guidelines
These waffles are best when freshly made, but if you have leftovers, let them cool completely first. Store them in an airtight container in the fridge for about 2-3 days.
Reheating Instructions
When you’re ready to chow down, just pop them in the toaster or the oven at 350° f for a few minutes.
You want them hot and crispy again, just like fresh out of the waffle iron!
Creative Variations on Dipped Waffles
Here’s where the fun really begins!
Flavor Adaptations
You can totally switch things up based on your mood or season. How about a pumpkin spice version in October or a peppermint-infused chocolate dip during the holidays? The possibilities are endless!
Gluten-Free Waffle Recipe
For you gluten-free folks, switch out with a gluten-free flour blend . It’s easy, and everyone can join in the waffle fun.
Complete Nutrition Guide
I always get asked about the nutrition in these sweet delights.
Health Benefits
While these may not be your typical dietary considerations, homemade treats can often be healthier than store-bought because you control the ingredients.
Plus, you can add some whole grains or nuts for added nutrients!
Expert FAQ Solutions
I know you’ve got questions!
Common Questions
“Can I freeze these?” Heck yes! Just make sure to freeze them between layers of wax paper.
Success Tips
For those of you worried about the chocolate melting technique, go slow. Melt slowly in the microwave and stir often. You don’t want to scorch that chocolate!
Encouraging Conclusion
So there you have it! with these tips and tricks, i’m sure you can easily make those decadent dipped waffles .
Whether it’s a lazy weekend brunch or a quick dessert for your kiddos, these are the ultimate crowd-pleaser. just remember: have fun, experiment a little, and most importantly— enjoy every bite! get those waffle irons ready and let’s whip up something delish!
Decadent Dipped Waffles Card
⚖️ Ingredients:
- 1 ½ cups (190g) all-purpose flour
- 2 tablespoons (25g) granulated sugar
- 2 teaspoons baking powder
- ½ teaspoon salt
- 1 large egg
- 1 ¼ cups (300ml) whole milk
- 1/3 cup (75g) unsalted butter, melted
- 1 teaspoon vanilla extract
- 1 cup (170g) semi-sweet chocolate chips
- 2 tablespoons (30ml) heavy cream
- Fresh berries (strawberries, blueberries)
- Whipped cream
- Shredded coconut
🥄 Instructions:
- Step 1: Preheat Waffle Iron: Set your waffle iron to medium heat.
- Step 2: Prepare Dry Ingredients: In a large bowl, whisk together flour, sugar, baking powder, and salt.
- Step 3: Mix Wet Ingredients: In another bowl, mix egg, milk, melted butter, and vanilla extract.
- Step 4: Combine Mixtures: Pour the wet ingredients into the dry ingredients. Stir gently until just combined; its okay if there are a few lumps.
- Step 5: Cook Waffles: Lightly grease the waffle iron
- Step 6: Prepare Chocolate Dip: In a microwave-safe bowl, combine chocolate chips and heavy cream. Microwave in 30-second intervals, stirring until melted and smooth.
- Step 7: Dip Waffles: Carefully dip each waffle halfway into the chocolate dip and place on a baking sheet.
- Step 8: Garnish (optional): Top with fresh berries, whipped cream, or shredded coconut as desired.
- Step 9: Serve: Enjoy immediately while warm!
Previous Recipe: How to Make Bake Corn Delight: Easy Bollo de Maíz Nuevo for Sweet Moments
Next Recipe: How to Make Heavenly Fluffy Dinner Rolls with Buttery Goodness