Keebler Cookie Crust Cheesecake Delight
Looking for a rich dessert? This Keebler cheesecake recipe is creamy and dreamy! Trust me, it’s sure to become a family favorite—grab your apron!

- Sweet Nostalgia: The Story of the Keebler Cheesecake Recipe
- A Bit of Cheesecake History
- What Makes This Cheesecake Shine?
- Perfect Occasions for a Creamy Delight
- Essential Ingredients Guide for Your Cheesecake Adventure
- Whipping Up the Perfect Cheesecake: A Guide to Professional Cooking
- Additional Recipe Information for the Keebler Cheesecake Recipe
- Recipe Card
Sweet Nostalgia: The Story of the Keebler Cheesecake Recipe
You know that feeling when a smell brings back a flood of memories? for me, it’s the scent of a freshly baked cheesecake.
The first time i made a keebler cheesecake recipe was during a family gathering. my aunt, the queen of desserts, passed down her secrets, and i was determined to whip up something equally fabulous.
Trust me, the delicious cheesecake vanished in record time, leaving behind happy faces and compliments flying around the room. isn’t it funny how food can connect us all?
Everyone loves a good cheesecake. especially one with a buttery cookie crust like this cookie crust cheesecake . with vibrant flavors and a smooth texture, this dessert can transform any occasion.
Whether it’s a birthday or just another wednesday, this easy cheesecake recipe has become my go-to for gatherings. let me break down what makes this keebler cookie crust cheesecake delight so special!
A Bit of Cheesecake History
Cheesecake has been around for centuries, traveling from ancient greece to the u.s. where it took a permanent spot in our dessert lineup.
Fast forward to today, and it’s as popular as ever! you’ll find it on menus everywhere, and i swear, each restaurant claims they serve the best cheesecake ever ! go figure.
The twist with this recipe? it’s the famed keebler cookies that give it a unique edge — and let's be honest, who doesn’t love cookies?
This cheesecake is medium on the difficulty scale. if you can mix and bake without burning yourself (or the house down), you'll be just fine.
Prep time is a breeze, just about 15 minutes , and you'll give it a cozy 60 minutes in the oven.
Add a little chill time , and you’re set in 1 hour 45 minutes for a dessert that serves about 10-12 people .
Perfect for when you’re feeling fancy but don’t want to spend all day in the kitchen.
What Makes This Cheesecake Shine?
Let’s chat about health benefits and why this cheesecake deserves a special mention. sure, it has cream cheese and sugar, but it also contains protein and calcium! now, don’t quote me on a health lecture here; i just think balance is key, right? when you indulge in a slice, the rich texture wraps around your tongue like a warm hug.
What sets this cheesecake dessert apart from similar recipes? it’s all about that buttery cookie crust ! it adds depth and crunch that pairs perfectly with the creamy filling.
Not to mention, the flavors harmonize like your favorite band on stage. plus, it’s super versatile. this cheesecake is great for holiday dinners, summer picnics, or a spontaneous saturday night bake-off!
Perfect Occasions for a Creamy Delight
I can't stress enough how fun it is to serve this cheesecake at parties. throw on some chocolate sauce or a fresh fruit topping, and you’ve got an eye-catching dessert that’ll have everyone talking.
Imagine setting it on the table, and folks suddenly lose their minds over the rich cheesecake recipe —they won't even notice the other desserts (if you made any).
And let’s not forget about the cheesecake variations . Feeling adventurous? Swirl in some melted chocolate before you bake, or sprinkle in some nuts for an unexpected crunch.
So, are you feeling inspired yet? Let’s dive into the ingredients you’ll need to make this delightful cheesecake, transforming ordinary moments into extraordinary memories!
Let’s get baking, friends!
Essential Ingredients Guide for Your Cheesecake Adventure
When it comes to making the best cheesecake ever , having the right ingredients is absolutely crucial. we’re diving into the essentials—from premium core components to smart substitutions.
Trust me, this guide will elevate your cheesecake experience, whether you’re whipping up a classic cheesecake or dreaming up your own cheesecake variations.
Premium Core Components
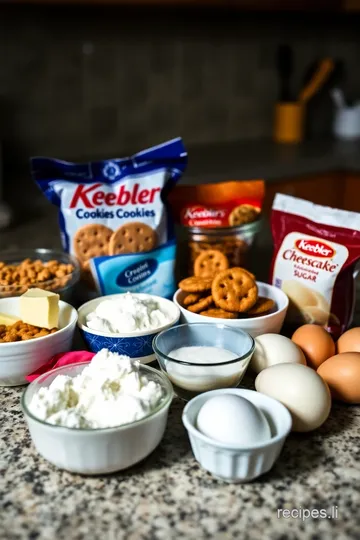
Let’s start with the basics. Here, you're gonna want to know your measurements. For this Keebler cheesecake recipe , you’ll typically need:
- Cream Cheese: At least 24 oz (680g) , softened. Look for blocks, not the spreadable kind.
- Granulated Sugar: 1 cup (200g) is what you need for that sweetness.
- Butter: You’ll need ½ cup (113g) unsalted, which makes that buttery cookie crust perfect.
When shopping, check the quality! Fresh cream cheese should be smooth and creamy, free from any cracks. For butter, the fresher the better—think about that rich flavor.
Storage is also crucial. look for the expiration date. usually, cream cheese can sit in the fridge unopened for about 2-3 weeks, but once you crack it open, use it within a week or so.
Signature Seasoning Blend
Now onto the fun part—seasonings and flavor enhancers.
- Vanilla Extract: Just 1 teaspoon of the good stuff goes a long way. Go for pure rather than imitation for that delicious depth of flavor.
- Optional Spices: Cinnamon or even a pinch of salt can enhance that rich flavor.
Don’t forget about those awesome regional variations ! For instance, using a hint of almond extract can give your cheesecake a totally unique twist.
Smart Substitutions
We all know life happens. Sometimes you might find yourself short on ingredients, and that’s where smart substitutions come in handy:
- If you’re out of sour cream , Greek yogurt is your best friend. It’ll keep that tangy flavor intact.
- Running low on butter? Coconut oil can work in a pinch, giving that crust a different vibe.
- Trying to watch those calories? Why not try a low-fat cream cheese instead?
Keep this in mind: Always taste as you go. You might find a combination that makes your no-bake cheesecake shine even brighter.
Kitchen Equipment Essentials
Alright, let’s get into the tools of the trade. To make your cheesecake, you'll need some staples like:
- Mixing bowls: A couple of sizes will help while mixing.
- Springform pan: The classic choice for cheesecakes. It makes releasing your creamy cheesecake easier.
- Electric mixer or whisk: Your arms will thank you later for not having to stir by hand!
And hey, if you don’t have a springform pan, don’t sweat it. An 8x8 pan can work in a pinch—just make sure to line it with parchment paper for easy removal.
Final Touches
Now that you’re armed with the essential ingredients , let’s make that keebler cheesecake recipe come to life! you’ll have everything you need to whip up something absolutely delicious.
Whether you're all about that smooth cream cheese cheesecake or exploring chocolate cheesecake variations, the right ingredients and tools will definitely help you avoid those common cheesecake mistakes.
By following these guidelines, not only will your cheesecake look fantastic , but it will also taste so good that it might just become your go-to dessert that gets everyone raving!
Ready to rock this recipe? Let’s dive into the step-by-step instructions for crafting your own unforgettable cheesecake experience!
Whipping Up the Perfect Cheesecake: A Guide to Professional Cooking
Oh my gosh, are you ready to become the ultimate cheesecake guru? whether you're dreaming of that keebler cheesecake recipe for a crowd-pleasing dessert or just want to dazzle your taste buds, we’ve got the scoop on professional cooking methods.
So, let’s dive into the step-by-step journey of mastering this rich and creamy delight!
Essential Preparation Steps
First things first, let’s break down the essentials. ever heard of mise en place ? it’s a fancy french term that simply means “everything in its place.
” gather your ingredients like cream cheese , keebler cookies , and butter before starting. your kitchen should feel organized, so you won't be making frantic searches while other ingredients sit out.
Time management is key. set aside about 15 minutes for active prep, followed by 30 minutes for chilling and then an hour for baking.
Seriously, timing is everything; give it space to breathe!
Don’t forget about safety considerations . Keep your workspace clean and always handle your oven with care. Don't want any hot butter spilled on that new kitchen rug!
Step-by-Step Process
Here are your handy dandy instructions to follow like a pro!
-
Preheat the Oven: First off, preheat your oven to 325° F ( 163° C) . This is the magical temperature for that dreamy cheesecake texture.
-
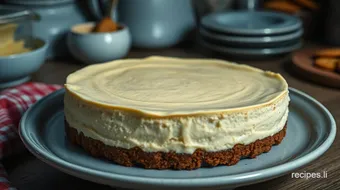
Prepare the Cookie Crust: Combine 2 cups crushed Keebler cookies with 1/2 cup melted unsalted butter. Press this buttery mixture firmly into the bottom of a 9-inch springform pan.
-
Bake the Crust: Bake it for about 10 minutes to let those flavors mingle, then take it out and let it cool.
-
Make the cheesecake filling: in a big bowl, beat 3 packages of cream cheese until it's super creamy. gradually add 1 cup of sugar , and mix those eggs, one at a time.
Stir in 1 teaspoon of vanilla and your 1 cup of sour cream , until just combined.
-
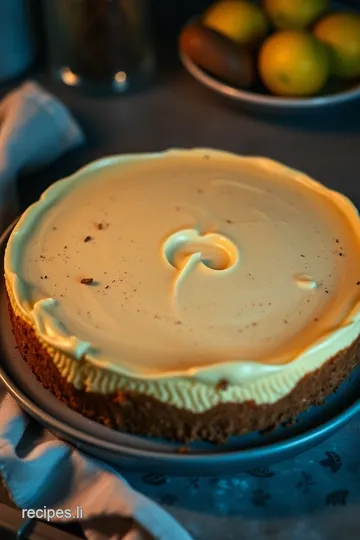
Pour Filling Into Crust: Carefully ladle that luscious filling over your cooled crust. It’s starting to look like pure magic!
-
Bake the Cheesecake: Now, here's the trick - bake for 50- 60 minutes until the center is set but still slightly jiggly. Trust me, jiggly is good!
-
Cool and chill: once it’s out of the oven, let the cheesecake cool in there for about 1 hour with the door slightly ajar.
Then, refrigerate it for at least 4 hours or overnight. patience is key for that perfect cheesecake!
Expert Techniques
Now, let’s talk like a true pro! A few critical steps can make or break your cheesecake.
-
Temperature Control: Ensure all your ingredients are at room temperature. This step will save you from that dreaded lumpy filling.
-
Quality Checkpoints: Look out for tiny cracks. If you slice into it and see a crack, don’t sweat it—you’re still winning in the cheesecake game.
-
Troubleshooting tips: if it cracks, don’t panic! top it with a whipped cream layer or some fruit topping for that classic cheesecake charm.
Honestly, you can cover up anything with a little love and creativity!
Success Strategies
Before you start throwing ingredients around, let's chat about common mistakes to avoid.
-
Overmixing: Mixing too much introduces air, resulting in cracks. Aim for smooth, not frothy!
-
Water bath: consider baking it in a water bath for an extra creamy texture. just wrap your pan in foil and place it in a bigger pan filled with hot water.
Total game-changer!
-
Chill it Overnight: The longer you can let it chill, the more the flavors come together. Trust me, the next day’s cheesecake is always better.
Final Thoughts
Alright, my dear cheesecake aficionado, you’re now armed with all the tips for creating the best cheesecake ever ! just remember, enjoy the process.
Each step contributes to that delicious cheesecake you’ll be proud to show off at your next shindig.
If you're ready to explore even more, stick around! Our last section will give you even more additional information and delicious variations to ensure your cheesecake becomes a household favorite. Happy baking!

Additional Recipe Information for the Keebler Cheesecake Recipe
When it comes to desserts, the keebler cookie crust cheesecake delight is a crowd-pleaser. it’s creamy, rich, and everything you dream about in a cheesecake—but even the best need a little love in the kitchen.
Let’s dive into some helpful tips and tricks that’ll take this delicious cheesecake to the next level and ensure it’s pièce de résistance at your next gathering!
Pro Tips & Secrets
Chef's personal insights: here’s the deal—using room temperature cream cheese is a game-changer. it blends smoothly and helps avoid those pesky lumps.
Oh, and while you're at it, don’t forget to use a nice electric mixer to help with that creamy consistency!
Time-Saving Techniques: If you’re short on time, consider prepping the filling while the crust is baking. Multi-tasking in the kitchen? Yes, please!
Flavor Enhancement Tips: For that extra oomph, try a splash of almond extract along with the vanilla in the filling. It sounds weird, but trust me; it makes a difference!
Presentation Advice: A well-presented cheesecake looks as good as it tastes. Top it with some fresh fruit or a drizzle of chocolate before serving. You're gonna want that Insta-worthy slice!
Perfect Presentation
Plating Techniques: Use a warm knife to cut the cheesecake. Dip it in hot water, dry it off, and slice. Clean cuts = happy plates!
Garnish Ideas: A few fresh mint leaves or a dusting of powdered sugar on top can add that “wow factor.”
Color Combinations: A vibrant raspberry sauce or bright blueberries against the creamy filling and dark cookie crust? So tempting!
Visual Appeal Tips: Elevate your cheesecake display by using a cake stand. Seriously, it makes everything feel a bit fancier.
Storage & Make-Ahead
Storage Guidelines: Keep your cheesecake in the fridge covered with plastic wrap for up to a week. It won’t last that long, trust me!
Preservation Methods: If you want it to last even longer, you can freeze it! Just wrap it tightly before popping it in the freezer.
Reheating instructions: a chilled cheesecake is meant to be enjoyed straight from the fridge. if you want to warm it up slightly, be super careful—too much heat can ruin that perfect cheesecake texture.
Freshness Duration: For the best flavor and texture, indulge your sweet cravings within a week. After that, it still tastes good, but freshness always wins!
Creative Variations
Flavor Adaptations: Want a chocolate cheesecake ? Swap some of the batter for melted chocolate and mix it all in. Yummm!
Dietary Modifications: Got gluten issues? Use gluten-free cookie crust for a fab alternative.
Seasonal Twists: In the fall, toss in some pumpkin puree for a pumpkin cheesecake version. It’s ridiculously good!
Regional Variations: How about some southern flair with a pecan crust instead of a cookie crust? Totally brings the southern charm!
Complete Nutrition Guide
Detailed Breakdown: This cheesecake is creamy and delightful. If you're counting calories, a slice usually packs about 350 calories.
Health Benefits: Besides its yummy-ness, cream cheese has some calcium and protein. It’s not a health food, but hey, balance, right?
Dietary Considerations: Got lactose intolerance? You can try dairy-free cream cheeses too!
Portion Guidance: A serving size is about 1/10 of the cheesecake. But let’s be real, everyone loves seconds—so plan accordingly!
Expert FAQ Solutions
Common Questions: "How did my cheesecake crack?" You may have mixed it too much or didn't cool it properly!
Troubleshooting Guide: To fix cracks, cover them with a fruit topping—it’s a delicious disguise!
Success Tips: “Chill overnight” is non-negotiable. This cheesecake gets better with time.
Variations Explained: Need a no-bake cheesecake? Skip the baking part! Just mix and chill until firm. Easy-peasy!
So, if you want to impress friends and family or just want a sweet treat for yourself, try this keebler cheesecake recipe .
Whether it's a dinner party or a cozy night in, this cheesecake is your go-to dessert idea. whip it up, savor the creamy goodness, and enjoy every last bite! happy baking!
Keebler Cookie Crust Cheesecake Delight Card
⚖️ Ingredients:
- 2 cups (200g) Keebler cookies, crushed
- 1/2 cup (113g) unsalted butter, melted
- 3 (8 oz or 226g) packages cream cheese, softened
- 1 cup (200g) granulated sugar
- 3 large eggs
- 1 teaspoon vanilla extract
- 1 cup (240ml) sour cream
🥄 Instructions:
- Step 1: Preheat your oven to 325°F (163°C).
- Step 2: In a bowl, combine crushed Keebler cookies and melted butter until well mixed. Press the mixture firmly into the bottom of the springform pan.
- Step 3: Bake the crust in the preheated oven for 10 minutes, then let it cool while preparing the filling.
- Step 4: In a large mixing bowl, beat the softened cream cheese until creamy and smooth. Gradually add in granulated sugar, beating until well combined.
- Step 5: Add eggs, one at a time, mixing after each addition. Stir in vanilla extract and sour cream until just combined.
- Step 6: Carefully pour the cheesecake filling over the cooled cookie crust.
- Step 7: Bake for 50-60 minutes or until the center is set but slightly jiggly.
- Step 8: Turn off the oven and let the cheesecake cool in the oven with the door slightly ajar for 1 hour. Refrigerate for at least 4 hours or overnight before serving.
Previous Recipe: How to Make My Grandmother's Strawberry Earthquake Cake Recipe
Next Recipe: My Grandmother's Mexican Cornbread Recipe with Jiffy: 5 Delicious Twists