Decadent Butterfinger Balls
Looking for a sweet snack? My easy butterfinger balls recipe is a no-bake delight that will remind you of your favorite candy—perfect for any occasion!

- look into into Decadence: The Butterfinger Balls Recipe
- Your Ultimate Guide to Essential Ingredients
- Master the Art of Professional Cooking: Butterfinger Balls Recipe
- Pro Tips & Secrets for Butterfinger Balls Recipe
- Perfect Presentation
- Storage & Make-Ahead
- Creative Variations
- Complete Nutrition Guide
- Expert FAQ Solutions
- Recipe Card
look into into Decadence: The Butterfinger Balls Recipe
Have you ever had one of those days where you just crave something sweet? i sure have! one afternoon, i found myself rummaging through the pantry, hoping for something delightful.
That’s when a lightbulb went off: butterfinger balls ! these no-bake treats had me thinking of my childhood—when a butterfinger bar was the ultimate candy win.
So, i whipped up a batch, and let me tell ya, it was a game-changer! imagine that creamy peanut butter filling wrapped in a chocolate hug.
It’s like nostalgia wrapped in a ball.
Now, let’s talk about historical background . butterfinger, the candy bar we all love, was born back in the 1920s. this sweet treat has evolved, but the love for it is stronger than ever.
Nowadays, we’re all about those easy dessert recipes! it’s like we're living in the golden age of no-bake treats.
And don’t worry if you're not a pro in the kitchen. the butterfinger balls recipe is super straightforward. from start to finish, you’ll need just about 45 minutes , and that includes a chill time.
Pretty sweet, right? plus, the entire batch yields around 24 bite-sized desserts. get ready to impress friends without even breaking a sweat!
Speaking of impressing your crew, let’s break down some key benefits . first up, this recipe is a dream for those who want something quick yet indulgent.
Did you know? these balls are made from basic ingredients like peanut butter, powdered sugar, and graham crackers . they check all the boxes: delicious, no-bake, and kid-friendly! perfect for parties or even a potluck—these are bound to grab attention.
What i love most is the health angle . don’t roll your eyes just yet! while they’re definitely more on the indulgent side, you can still catch a bit of protein from that peanut butter.
Plus, these homemade butterfinger balls are a much better snack compared to a lot of processed sweets out there. chocolate peanut butter snacks like these can help satisfy a sweet tooth without diving into a whole chocolate cake.
Isn’t that a win?
Now, let’s not forget, the scoop on excitement ! sure, they’re great for thawing out on a hot summer day as chilled treats, but they can also bring the party vibes! want to jazz them up? use some dark chocolate for a twist.
Or, get the kiddos involved in the process. it can be their first venture into the world of fun recipes for kids.
Just imagine the giggles and the mess!
So, whether you’re serving them at a backyard bbq or stashing a few in the fridge for late-night cravings, these bites of bliss are sure to please everyone.
A bowl full of these creamy chocolate balls will make you the rock star at any gathering!
Ready to get your hands sticky? here’s a fun little note: the key to the perfect coating is simple— tips for melting chocolate come in handy! melt your chocolate in the microwave in short bursts.
Trust me, nobody wants a seized chocolate disaster.
Lines are definitely blurring between dessert and party snack with these little gems. you’re not just making a snack; you’re setting the mood for something delightful.
So, why not gather the gang and share in the process? a little bit of laughter, some sticky fingers, and a trippy treat to munch on? count me in!
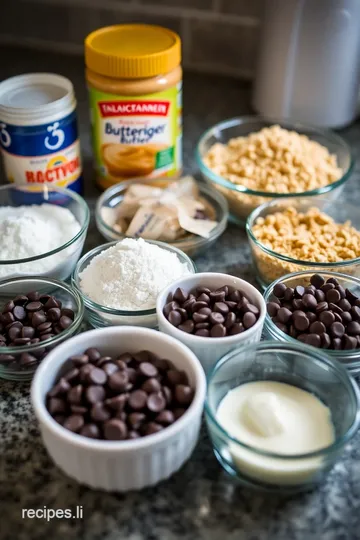
Let’s dig right into the ingredients you’ll need to start crafting your butterfinger balls . Here’s what you'll gather: perfect for making your snacking dreams a reality!
Your Ultimate Guide to Essential Ingredients
Hey there, lovely foodies! are you ready to dive into the world of essential ingredients ? whether you’re whipping up dinner for the family or throwing down some party snacks , knowing the right ingredients can make or break your dish.
This is all about giving you the lowdown on what you need in your kitchen. i promise it’ll be a game-changer for your cooking adventures.
Premium Core Components
First up, let's get into the premium core components . This means we’re chatting about those superhero ingredients that can transform your meals.
-
Measurements matter : always remember, cooking is kinda like science. when it comes to ingredients, you want to be exact.
For example, if you need 1 cup (250g) of creamy peanut butter for those butterfinger balls , get it right! but if you're more of a "just a pinch" person, no worries—cooking should feel good!
-
Quality indicators : not all ingredients are created equal. look for fresh produce , organic options, and brands you trust.
Trust me, this makes all the difference when you’re going for that delicious butterfinger dessert vibe.
-
Storage guidelines : so, how long can you keep that jar of peanut butter hanging out in your pantry? peanut butter can usually chill for about 6-12 months in a cool, dry place.
But once you open it? time to devour that goodness!
-
Freshness Tips : When picking stuff at the store, look for color and firmness. Fresh herbs should smell amazing, not wilted, and sad.
Signature Seasoning Blend
Now let’s spice things up a bit! When it comes to flavor, the secret lies in your signature seasoning blend .
-
Essential Spice Combinations : Got cumin and chili powder? Toss that into your next chili. Rosemary and thyme? You’re ready to take on roasted veggies.
-
Herb Selections : Fresh vs. dried herbs can really change the game. Use parsley for freshness and basil for that Italian flair. They pair like a dream!
-
Flavor Enhancers : Ever tried a splash of soy sauce or citrus juice ? They work wonders to elevate any dish. Just remember, go easy.
-
Regional Variations : Don’t shy away from spices that are new to you! Wing it with flavors from different regions and surprise your taste buds. You may just find a new favorite.
Smart Substitutions
Here’s my favorite part: smart substitutions . Sometimes, you find yourself knee-deep in a recipe and realize you’re missing a key ingredient. No stress!
-
Common Alternatives : No buttermilk? Mix milk and vinegar instead. Voila!
-
Dietary Modifications : Need to make it vegetarian or gluten-free? Easy peasy—just pick the right substitutes!
-
Emergency Replacements : Out of eggs? Applesauce can be your best buddy in a pinch.
-
Seasonal Options : Grab those in-season veggies and let Mother Nature help you out. Fresh produce packs in the flavor!
Kitchen Equipment Essentials
Last but not least, let’s chat about kitchen equipment essentials . Trust me; having the right tools makes everything smoother.
-
Must-Have Tools : A sturdy mixing bowl, proper measuring cups, and a good spatula are musts. They’re your best friends!
-
Alternative Equipment Options : Can’t find a baking pan? Use an oven-safe dish. Innovate, friends!
-
Preparation Tips : Always read ahead. The more you prep, the quicker dinner will come together. Prepping in advance is a secret weapon!
-
Storage Solutions : Invest in some clear containers to keep your pantry organized. It’ll save you so much time!
So now that you’re prepped and ready to roll, why not dive right into making those butterfinger balls ? i can hear the chocolate melting already! just think, creamy peanut butter, crunchy graham crackers, and that glorious chocolate coating.
It’s like a party in your mouth! so, let’s jump into the instructions and create some magic in the kitchen! trust me, these no-bake treats are going to be your new go-to for sweet snacks.
Master the Art of Professional Cooking: Butterfinger Balls Recipe
Cooking professionally can sound intimidating, right? it's all about having fun, creating something delicious, and enjoying every step. today, i want to share the essence of professional cooking by walking you through making the ultimate butterfinger balls recipe .
Trust me; these scrumptious no-bake treats will win over everyone's heart at your next gathering!
Essential Preparation Steps
Before we dive into the fun part, a little prep work goes a long way. Let's hit on the basics!
Mise en place is your best friend here. it means having everything ready before you start. measure out 1 cup of creamy peanut butter , 1 cup powdered sugar , 1 cup graham cracker crumbs , and 1/2 cup chocolate chips .
Feel like a pro by organizing your ingredients!
Timing is everything when you’re whipping up these no-bake chocolate recipes . set a timer! you need about 15 minutes for active prep and 30 minutes for chilling.
It’s the pause that means perfection.
Stay organized. Use a mixing bowl for the filling, and grab a baking sheet lined with parchment paper. This process can get messy, so have a clean space.
Safety first! When melting your chocolate (you will need 1 ½ cups of milk chocolate chips ), do it in short bursts in the microwave. You don’t want burnt chocolate—it's a tragedy!
Step-by-Step Process
Let's get to the main event! Here are clear instructions so you can nail this recipe:
-
Prepare the Sheet: Line your baking sheet with parchment paper right away. Keep it simple!
-
Make the filling: in a bowl, mix peanut butter and powdered sugar first. next, blend in graham cracker crumbs and chocolate chips until it sticks together like glue.
Seriously, use your hands for the final knead!
-
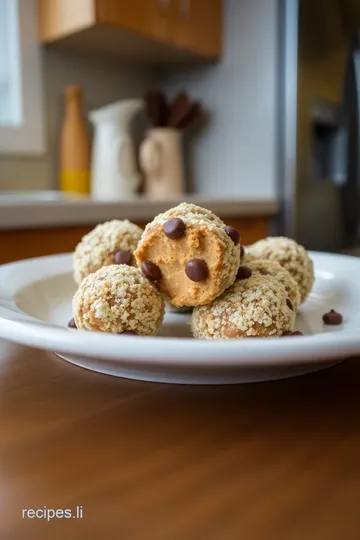
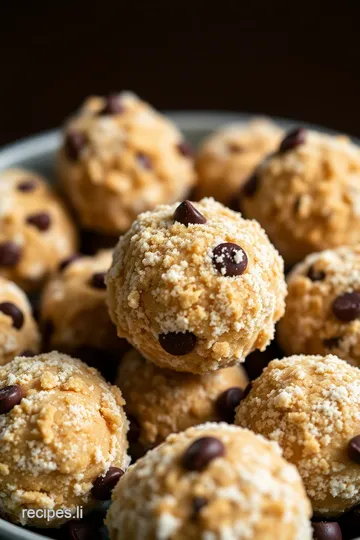
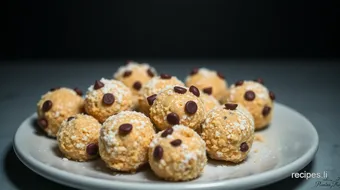
Form the Balls: Scoop out tablespoon-sized portions and roll them into neat balls. Place them on your prepared baking sheet.
-
Chill: Cover and refrigerate for at least 30 minutes . You want them firm before the chocolate bath.
-
Prepare the Coating: In a microwave-safe bowl, melt those milk chocolate chips with 1 tablespoon coconut oil (optional). Go for 30-second intervals , stirring in between until smooth.
-
Coat the Balls: It’s dunk time! Dip each ball into the melted chocolate and roll until fully coated. Don’t forget to place them back on the parchment paper.
-
Set: Let the chocolate harden at room temperature or toss them back in the fridge for a quicker result.
-
Serve: These bite-sized desserts are ready to rock your taste buds!
Expert Techniques
You’re doing great! Here are some pro tips to elevate your treat-making game:
-
Quality Checkpoint: Use quality chocolate for coating. It makes a huge difference in flavor.
-
Troubleshooting Tips: If your chocolate seizes up, it's overheated. Add a bit of coconut oil or a splash of milk to fix it!
Success Strategies
Want to ensure these treats are a hit? Watch out for common mistakes:
- Don’t skip the chilling step; it’s vital for firm balls.
- Always use fresh ingredients for a knockout flavor.
- For an indulgent flair, experiment with dark chocolate!
Oh, and if you’re super busy, consider make-ahead options . You can prepare the filling a day in advance and just coat them when you’re ready!
Additional Information
You've now mastered the art of making homemade butterfinger balls . these delicious treats are not just perfect for potlucks but also make great gifts, party snacks, and indulgent desserts on any day.
Ready to dive into candy-inspired recipes ? you might turn into a chocolate peanut butter snack-making machine! next up, i’ll share more on how you can tweak and twist this recipe into a variety of delightful versions, including nut-free and gluten-free options.
Let's keep the creativity flowing!
Pro Tips & Secrets for Butterfinger Balls Recipe
Oh my gosh, if you’re diving into this butterfinger balls recipe , let me share some golden nuggets of wisdom.
First off, it’s all about the simple treats for kids (and let’s be real, adults too). so, here are some pro tips straight from my kitchen to yours:
Chef's insights: when mixing the peanut butter, you want to go for the creamy variety. trust me, chunky is fun for sandwiches but not for these chocolate peanut butter snacks .
You’ll get a smooth filling that's to die for.
Time-saving techniques: use a handheld mixer for mixing all your ingredients. it cuts the time in half! plus, using your hands to knead the mixture gets it nice and compact, making that rolling part a breeze.
Flavor enhancements: consider adding a dash of vanilla extract or a sprinkle of salt to elevate the flavor. sweet and salty? count me in! and if you’re feeling fancy, a touch of cinnamon won’t hurt either.
Presentation advice: don’t underestimate how a bit of creativity can jazz things up! use colorful wrappers or fancy cupcake liners to create a storefront vibe at home.
It makes them look a little more gourmet , ya know?
Perfect Presentation
Let’s talk plating . These butterfinger balls are not just tasty; they can be a feast for the eyes too! Here’s how to get that visual appeal :
Plating techniques: arrange your bite-sized desserts on a nice platter. think of it like an art canvas! a mix of sizes can be super fun.
No one wants to eat the same-sized ball every time.
Garnish ideas: drizzling some melted chocolate over the top or sprinkling crushed graham crackers can add that final touch of pizzazz.
You could even throw on some caramel drizzle if you want to live your best life.
Color Combinations: Play with contrast! Nestle your chocolate-coated balls against a backdrop of bright fruits or nuts. The vibrant colors just pop and keep things fresh.
Storage & Make-Ahead
Now for the super practical stuff—storage. After popping these bad boys in the fridge, they’re good to go!
Storage Guidelines: Use an airtight container; I can’t stress this enough! It keeps them fresh and avoids any unwanted fridge odors.
Preservation Methods: These can last about one week in the fridge. For longer storage, pop them in the freezer ! Just make sure to separate layers with parchment paper.
Reheating Instructions: No need to heat these since they’re a chilled treat. But if you do want them softer, leave them at room temperature for five minutes before enjoying.
Freshness Duration: If they go in the freezer, they’re good for up to 3 months! Just remember to let them thaw in the fridge before digging in.
Creative Variations
Get your creativity flowing! Here are some fun recipes for kids and all those looking to spice things up with this butterfinger dessert :
Flavor Adaptations: Swap out regular peanut butter for almond or sunflower seed butter if you wanna mix it up.
Dietary Modifications: For a nut-free version, the sun butter swap works beautifully. Plus, if you’re gluten-free, go with gluten-free graham crackers.
Seasonal Twists: Toss in some seasonal spices—like pumpkin spice in the fall or ginger in the winter for a holiday vibe.
Regional Variations: Feeling adventurous? Try rolling them in coconut flakes for an island twist or add peppermint extract during the holidays!
Complete Nutrition Guide
Okay, time to chat about the healthy stuff (at least a little)! Here’s a quick breakdown:
Health Benefits: With peanut butter in the mix, you get protein and healthy fats. This is perfect if you’re aiming for snacks that aren’t just sugar bombs.
Dietary Considerations: If you’re keeping tabs on sugar intake, there are options to reduce it with sugar substitutes or lower the amount of powdered sugar.
Portion Guidance: Each ball is about 130 calories , so if you’re snacking, maybe just enjoy one or two. Don’t go all-in like I tend to!
Expert FAQ Solutions
Alright, here’s the scoop on those common kitchen conundrums:
Common Questions: “Can I double the recipe?” Absolutely! Just make sure you have enough fridge space.
Troubleshooting Guide: If your mix is too sticky, chill it longer. If it’s too dry, add a smidge of peanut butter.
Success Tips: Always taste-test after mixing! Adjust flavors to your liking as you go along. That’s half the fun, right?
Variations Explained: Don’t feel boxed in! It’s okay to get creative. These no-bake treats are your playground!
Wrapping this all up, i hope you feel ready to tackle the butterfinger balls recipe . they’re a breeze to make and a total crowd-pleaser.
Whether it's for a party or just a snack, you’ve got the tools to wow your friends and family. happy snacking!
Decadent Butterfinger Balls Card
⚖️ Ingredients:
- 1 cup creamy peanut butter
- 1 cup powdered sugar
- 1 cup graham cracker crumbs
- 1/2 cup chocolate chips
- 1 1/2 cups milk chocolate chips
- 1 tablespoon coconut oil (optional)
🥄 Instructions:
- Step 1: Line a baking sheet with parchment paper.
- Step 2: In a mixing bowl, combine the peanut butter and powdered sugar.
- Step 3: Stir in graham cracker crumbs and chocolate chips until fully combined.
- Step 4: Use your hands to knead the mixture until it forms a thick dough.
- Step 5: Scoop out tablespoon-sized portions of the mixture.
- Step 6: Roll each portion into a ball and place on prepared baking sheet.
- Step 7: Refrigerate the balls for at least 30 minutes until firm.
- Step 8: In a microwave-safe bowl, melt the milk chocolate chips and coconut oil (if using) in 30-second intervals, stirring until smooth.
- Step 9: Dip each chilled ball into the melted chocolate, ensuring even coverage.
- Step 10: Place back on the parchment-lined baking sheet.
- Step 11: Allow the chocolate coating to set at room temperature or refrigerate for faster results.
- Step 12: Enjoy your delicious butterfinger balls, or store in an airtight container.
Previous Recipe: My Grandmother's Easy Scarpaccia Recipe: 5 Delicious Tips to Try!
Next Recipe: How to Make My Grandmother's Strawberry Earthquake Cake Recipe