Chill Dino Jello Cups for Happy Kids
Looking for a colorful treat? Try my Chill Dino Jello Cups for Happy Kids! These fruity delights are a hit at parties or as a fun afternoon snack!

- Unleashing the Fun with Chill Dino Jello Cups for Happy Kids
- The Magic of Dino Jello Cups
- Why You’ll Love These Treats
- Beyond the Basic Noms
- A Quick Recap Before We look into in
- Essential Ingredients Guide to Dino Delight
- Wrapping it Up
- Professional Cooking Method
- Pro Tips & Secrets
- Perfect Presentation
- Storage & Make-Ahead
- Creative Variations
- Complete Nutrition Guide
- Expert FAQ Solutions
- Recipe Card
Unleashing the Fun with Chill Dino Jello Cups for Happy Kids
Remember when you were a kid, and snack time felt like a small adventure? i do! one of my favorite memories is making colorful treats with my buddies—sometimes messy, always fun.
Chill dino jello cups for happy kids whisk us back to those carefree days. who doesn’t love dinosaurs? combine that with fruity gelatin, and you have the ultimate treat! let’s dig into how to make these playful snacks that not only taste great but are super easy to whip up.
The Magic of Dino Jello Cups
These delightful cups are more than just a sweet snack; they carry a sprinkle of history! jello, that classic american favorite, dates back to the 19th century.
But put a dinosaur spin on it, and you get a whole new vibe. today, chill dino jello cups are not just for special occasions; they’ve exploded in popularity at birthday parties, summer picnics, and family gatherings.
They are seriously the talk of the playground!
Time-wise , you’re looking at just 15 minutes of prep and about 30 minutes to chill. sounds doable, right? this recipe is categorized as easy , so even if you’re not a seasoned chef, you can totally nail this one! plus, it’s super budget-friendly.
I mean, who can argue with a snack that yields six servings without breaking the bank?
Why You’ll Love These Treats
Now, let’s talk about the benefits ! first off, these colorful cups are a hit for healthy dessert alternatives . using fruit juice gives a tasty twist without too much added sugar.
Plus, these jello cups are a visual feast—all those bright colors and adorable gummy dinosaurs just draw kids in. it's like a mini jurassic park right in their hands!
Got a birthday coming up? perfect! these dino cups are fun kids desserts that will win over even the pickiest eaters.
Kids love quirky snacks, and these are no exception. they add a playful vibe to any gathering, making them a top choice for kids birthday party ideas .
And if you want to get creative, feel free to toss in some edible dinosaur decorations on top!
Beyond the Basic Noms
The beauty of chill dino jello cups lies in their flexibility. wanna switch up flavors? go for it! try gelatin dessert flavors like lime, cherry, or whatever tickles your fancy! if you're feeling adventurous, layering different colors creates a visual masterpiece.
You can even let the kids help pick their flavors—trust me, they love being part of the action!
Feeling health-conscious? you could even go with gummy candy alternatives made from real fruit! let’s be real, with the right varieties, you can find delicious offsets to keep the treat both fun and nutritious.
A Quick Recap Before We look into in
So, goal for the day: get your kids helping in the kitchen! they’ll feel like little chefs, mixing up those gelatin flavors and deciding on their gummy dinosaur treats .
And as you put them into the refrigerator to chill, you’ll see their eyes light up with excitement.
What’s not to love about these easy jello recipes that turn snack time into a dino-filled adventure? whether it’s for a summer bbq, a rainy afternoon, or a simple treat after school, chill dino jello cups are the way to go.
Now that you’re pumped about this recipe, let’s gather those ingredients and set the stage for some dino-mite fun!
Essential Ingredients Guide to Dino Delight
Welcome to the wonderful world of dino jello cups ! if you’re ready to dive into a playful and colorful kitchen adventure that’ll make the kiddos squeal with delight, you're in the right spot.
Seriously, who doesn’t love a snack that feels like a party in a cup? let’s walk through the essential ingredients you'll need, from the premium core components to a signature seasoning blend—all tailored for those jurassic-sized appetites!
Premium Core Components
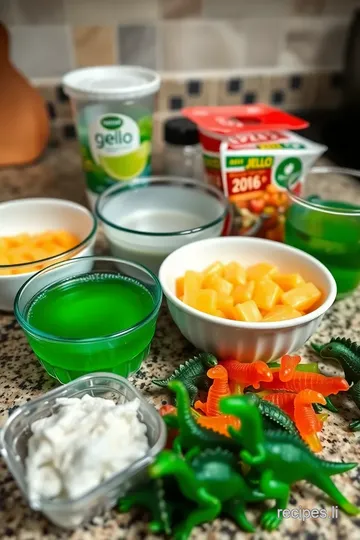
Let’s kick things off with the core ingredients you’ll need. For our Chill Dino Jello Cups for Happy Kids , you’ll need:
- 2 cups (480 ml) boiling water
- 2 packages (3 oz/85 g each) flavored gelatin (like berry or orange)
- 1 cup (240 ml) cold water
- 1 cup (240 ml) fruit juice (you can’t go wrong with apple or grape)
Quality indicators? Choose vibrant gelatin with no funky colors or artificial ingredients. Fresh juice is a bonus for taste and health, plus it keeps our fruity gelatin treats feeling authentic.
When it comes to storage, these ingredients are pretty forgiving. keep unopened gelatin in a cool, dry place, and juice in the fridge.
Once mixed, your cups can chill in the fridge for at least 30 minutes , but they’ll stay good for a couple of days if covered.
Signature Seasoning Blend
Now, while this recipe is simple, we can sprinkle in a bit of imagination. pairing gelatin flavors with juicy fruits can kick it up a notch.
Think about adding a little splash of lemon or lime juice for zing! you can even toss in mini gummy dinosaurs for added fun.
Sure beats a regular snack, right?
When you dive into your signature blend , consider regional variations. if you’re feeling adventurous, try using strawberry gelatin with fresh strawberries on top.
The point is to keep it refreshing, colorful, and oh-so-fun for the kiddos. mix it up!
Smart Substitutions
Sometimes, you need to get creative based on what you have. no problem! if you can’t find gummy dinosaurs, gummy bears or even fun-shaped fruit snacks work too! and if it’s a vegan situation , go for agar-agar instead of traditional gelatin for your fruity creations.
If you’re worried about sugar, use a sugar-free gelatin mix —it’s a solid way to indulge without overloading on sweets.
Feeling adventurous? try flavored sparkling water instead of juice for a fizzy twist that kiddos will adore.
Kitchen Equipment Essentials
Before you roll up your sleeves, gather your kitchen essentials. Here’s a quick list:
- Mixing bowl
- Whisk (get ready to whip that gelatin!)
- Measuring cups
- Clear plastic cups or small dessert dishes
- Refrigerator
Honestly, you don’t need a whole lot. Sometimes I find it fun to use unique cups—think themed cups for a dino-themed party to double the fun.
Getting Creative
The beauty of chill dino jello cups for happy kids lies in how you get creative! try layered jello cups or pair them with fun dino decorations.
You can even add a splash of cream on top for a fancy twist.
Shoutout to those parents busting out the kitchen creativity: you’re legends! holiday treats for kids are just around the corner, so why not test these out for an upcoming birthday bash or family gathering? kids love dino-themed party food , and these cups fit right in.
Wrapping it Up
So there you have it: your essential ingredient guide for making the cutest, tastiest dinosaur treats that’ll keep smiles on little faces.
Keep a lookout for mixing up those flavors and watching the kids’ faces light up as they dig into their fun kids desserts .
Next up, we’ll dive into the step-by-step instructions. grab your ingredients, and let’s get this dino party rolling!
Professional Cooking Method
When it comes to whipping up some tasty treats, like chill dino jello cups for happy kids , having a solid approach can make all the difference.
You want to ensure you're not just throwing ingredients around haphazardly but rather crafting something special. so, let’s get into the professional cooking methods that’ll take your culinary game to the next level, especially when you’re prepping those quirky dinosaur snacks.
Essential Preparation Steps
First up is mise en place , the fancy french term for "everything in its place." gather your ingredients, tools, and think ahead about your cooking process.
Imagine you’re prepping for a mini chef showdown. lay it all out: gelatin, hot water, cold water, fruit juice, and gummy dino decorations.
Time management is key, too. set a timer for your 30-minute chilling time right after you start, so you won't forget while you're dancing around the kitchen, makes everything way easier.
Organizing your workspace before cooking always saves you from those "where did i put that?" moments.
Oh, and don’t overlook safety considerations . Keep things clean, wash your hands, and remember how slippery that boiling water can be—definitely don’t want any scalded fingers!
Step-by-Step Process
Now, let’s break down the cooking like we’re assembling an awesome Lego set—clear and simple. Here’s how you craft those Dino Jello Cups:
-
Dissolve Gelatin
Boil 2 cups of water . Once it's rolling, mix in the gelatin until it’s all dissolved. This is where you get that jelly magic going! -
Add remaining ingredients
stir in 1 cup of cold water and 1 cup of fruit juice . this is your chance to get creative! want a berry blast? go for a berry gelatin. -
Set Up Cups
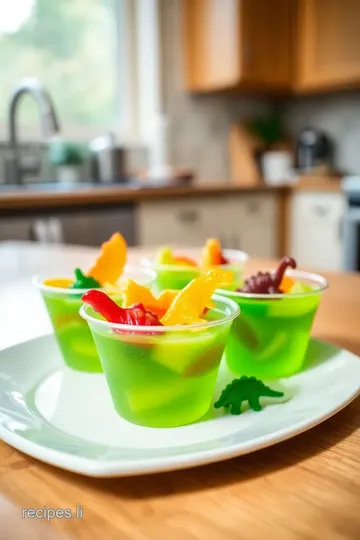
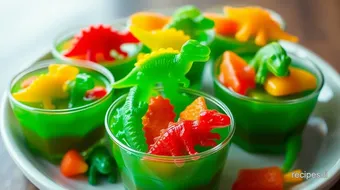
Pour that smiling mixture into clear cups, filling them just about three-quarters full. Trust me, the layers will look way cooler this way. -
Insert Dino Gummies
Here comes the fun part! Tuck a gummy dinosaur into each cup as it sinks instantly. No need to push too hard; we want them a little cushioned. -
Chill
Park those cups in the fridge for at least 30 minutes or till they're set. -
Serve
They're ready to serve after chilling! Present those little dino treats and watch the kiddos light up.
Expert Techniques
Let’s get a bit pro, shall we? for the best results, pay attention to temperature control . if your water isn't boiling hot enough, the gelatin won’t dissolve fully, and that’ll throw a wrench in your jello plans.
Oh, and timing is everything—if you take them out too early, the jello will be a goopy mess. Use a toothpick to check if it’s firm before you serve them.
Quality checkpoints ? maybe taste a little of the mix before it sets, just to ensure it's sweet enough. adjust if necessary! and hey, if it doesn’t set the way you imagined, no worries—just add more gelatin next time.
Success Strategies
Alright, let’s chat about common mistakes to avoid. Ever thought, “I can skip the chilling?” Well, don’t! Going too fast can ruin the texture. Quality assurance is vital here!
Want perfect results? keep an eye on those pesky little details—like measuring ingredients accurately. you know what they say, “a dash of this and a sprinkle of that” is just chaos when making jello.
For those who like to plan ahead, these dino jello cups are a breeze. you can make them the night before a birthday party, and trust me, it’ll save you a heap of stress.
Now there you have it! You’ve equipped yourself with professional methods to tackle fun edible crafts for kids, like those delightful Dino Jello Cups .
As we transition into a new phase—Additional Information—let’s explore some cool adaptations to these gelatin creations and dive deeper into ways to keep snack time fun and vibrant!
Pro Tips & Secrets
Alright, my fellow snack ensoiasts, let’s dive deeper into these chill dino jello cups for happy kids . first off, i’ll let you in on some chef’s personal insights .
If you’re going for that perfect jiggle, don’t rush the chilling process—give it at least 30 minutes . trust me, no one wants a wobbly mess.
Also, while you're at it, use boiling water to dissolve the gelatin. this helps it set perfectly!
Now, let’s talk time-saving techniques . if you’re throwing a dino-themed bash and need multiple flavors, you can prepare them all at once.
Just mix different colored gelatins in separate bowls, and then layer them in your cups. oh, the kids will go nuts for those colorful layers!
For a little flavor enhancement , consider adding some fruit juice like pineapple or mixed berry to shake things up.
If you want extra zing, squeeze a bit of lime in there. it’ll have your kids thinking they’re dining like little kings!
And as for presentation tips , don’t just set these cups on the table. Use a cute dino-themed tablecloth or some festive plates. It’s all in the details, my friends!
Perfect Presentation
When it comes to plating, keep it fun! use clear plastic cups so you can see those vibrant colors. it’s like a mini science experiment you can eat! and don’t forget about garnish ideas —a sprinkle of edible glitter or a sprig of mint can turn these cups into a masterpiece.
For color combinations , mix flavors that complement each other. you might want to blend a bright orange with a deep purple: it’s like a party for your eyes! and honestly, presenting these cups in a giant inflatable dinosaur could just up your game to legendary status.
Storage & Make-Ahead
Planning ahead can save your sanity! you can make these cups one or two days in advance , and store them in the fridge.
Just cover each cup with plastic wrap so they stay fresh and don’t pick up any funky fridge smells. for freshness duration , aim to consume them within 3-4 days.
Be warned, though: they might not last that long with the kids around!
If you're looking for ways to preserve these fruity gelatin treats, avoid freezing them. Freezing can mess with that delightful jiggle we love.
Creative Variations
Why stick with just the basic flavors? get creative with your flavor adaptations . you can whip up something festive like a pumpkin spice jello for halloween or even a watermelon jello for summer parties.
And speaking of seasons, think of your seasonal twists —red, white, and blue layers for the fourth of july, or pastel shades for easter! what's great about these jello cups is that they adapt so easily to your theme or dietary needs.
For those mindful of health, you can use sugar-free gelatin or fresh fruit purees instead. Nobody says fun kids desserts can’t be on the healthier side!
Complete Nutrition Guide
Okay, real talk, every parent wants to know what’s in that cup. the detailed breakdown tells you the fun stuff—like how each serving is only 80 calories .
Who knew delicious treats for toddlers could be so light? plus, using fruit juice adds in some vitamin goodness.
You might be wondering about dietary considerations —these cups dishing out just 1g of protein might not fill a kid up entirely, so pair them with something like cheese sticks or mini sandwiches.
And as for portion guidance , remember that kids love smaller servings—they feel like they're getting more!
Expert FAQ Solutions
Now, let’s tackle some common questions. if your jello isn’t setting, it’s usually because the water was too cold or you didn’t mix it well enough.
Always check your jello cup variations and see if they've held up! and for all you adventurous parents wondering about troubleshooting , a little more gelatin can sometimes save the day.
Need some success tips to keep those happy faces grinning? involve the kiddos in the process! let them pick flavors or help with layering.
Trust me; when they put their hands in, they own it!
So, there you have it! with these chill dino jello cups for happy kids , you’re not just serving a treat; you’re dishing out memories.
Snacks can be simple yet spectacular. whether it's for a dinosaur-themed birthday party or just a fun saturday afternoon, these cups check all the boxes.
Now, go ahead and get your gelatin wiggling! the kitchen is about joy and creativity, so get your little chefs involved and make some playful food for children.
Who knew sweets could be this fun? happy chilling, and let’s make some dino magic!

Chill Dino Jello Cups for Happy Kids Card
⚖️ Ingredients:
- 2 cups (480 ml) boiling water
- 2 packages (3 oz / 85 g each) flavored gelatin (such as berry or orange)
- 1 cup (240 ml) cold water
- 1 cup (240 ml) fruit juice (e.g., apple or grape)
- 1 package gummy dinosaurs
🥄 Instructions:
- Step 1: In a mixing bowl, combine the boiling water and gelatin, whisking until completely dissolved.
- Step 2: Stir in the cold water and fruit juice until well mixed.
- Step 3: Pour the jello mixture into clear plastic cups, filling them about three-quarters full.
- Step 4: Place one gummy dinosaur in each cup, pressing gently so it sinks slightly into the jello.
- Step 5: Refrigerate the cups for at least 30 minutes, or until set.
- Step 6: Once set, serve the Dino Jello Cups chilled and enjoy the smiles!
Previous Recipe: How to Bake Fluffy Bread Rolls in 35 Minutes – Amazing and Easy!
Next Recipe: How to Make Mixing Avocado Dip - Spicy & Creamy Delight: My Secret Twist