Nutty Whole Wheat Artisan Bread
Ever wondered how to bake Nutty Whole Wheat Artisan Bread today? This kitchen-tested loaf is fragrant, hearty, and perfect for any occasion!

- Baking Bread: A Soulful Journey to Nutty Whole Wheat Artisan Bread
- Essential Ingredients Guide for Nutty Whole Wheat Artisan Bread
- Mastering the Art of Professional Cooking: Your Guide to Success
- Pro Tips and Secrets for Nutty Whole Wheat Artisan Bread
- Perfect Presentation: Elevating Your Bread Game
- Storage and Make-Ahead: Keep Your Bread Fresh
- Creative Variations: Get Your Experiment On!
- Complete Nutrition Guide: The Good Stuff
- Expert FAQ Solutions: Your Questions Answered
- Conclusion: Get Baking!
- Recipe Card
Baking Bread: A Soulful Journey to Nutty Whole Wheat Artisan Bread
Oh my gosh, have you ever had one of those days when all you want is the warm, comforting whiff of freshly baked bread wafting through your kitchen? picture this: it's a chilly afternoon—perfect bread-baking weather.
I find myself hunched over my mixing bowl, grappling with the dough, chuckling at how messy it’s getting. and honestly, i wouldn't trade that moment for anything! it was in that chaos that i decided, “i need to bake nutty whole wheat artisan bread today! ” trust me, once you do, you’ll be hooked.
A Taste of History in Every Bite
Artisan bread has been around ages, ingrained in cultures and kitchens for centuries. originating from centuries-old techniques, artisan bread celebrates the craft of baking, where each loaf tells a story.
This whole wheat bread baking journey wraps you in the warmth of its hearty texture, thanks to robust ingredients like whole wheat flour and a medley of nuts.
Now, our nutty loaf recipe isn’t just some passing trend; people are falling in love with it now more than ever for its healthy bread recipes and the satisfaction from baking it at home.
Time-wise, you’re looking at about 15 minutes of active prep and, with a bit of resting time, around two hours total .
While it may sound daunting, don’t worry—making this bread is as easy as pie. well, maybe easier if pie isn’t your thing.
Plus, this loaf yields about 10-12 slices . so, if you’re like me and can easily polish off a few slices in one sitting, you’ll be stocked for the week!
Why This Bread is a Game Changer
What i adore about this nutty loaf recipe is not just the taste but the health benefits packed within! this bread is made from whole grain artisan bread , which means you’re indulging in loads of nutrients.
Whole wheat flour is rich in fiber—which aids digestion—and those mixed nuts and flaxseeds? talk about healthy fats and protein! seriously, it’s one of those warm bread recipes where every bite is guilt-free.
You can flex your creative muscles with this bread too. serve it during a cozy family brunch or slap on some avocado for a trendy toast creation—perfect for impressing friends! and let's not forget, it works great as a sandwich bread.
Just picture it: your favorite fillings snugly tucked between two slices of crisp, seeded bread . yum!
The Advantages Over Other Recipes
What sets this one apart from other bread recipes? it’s that rustic charm and crustiness that artisan bread is known for.
You’re not just following some basic instructions; you’re embracing true bread making techniques that honor history. this doesn’t just taste better; it feels more rewarding, too.
While gluten-free alternatives are available, the beauty of this nutty loaf recipe lies in its whole wheat glory, and the chewy texture coupled with crunchy nuts really hits home.
It's also a fantastic avenue to explore if you're venturing into the realm of cooking with whole grains .
Ready to Bake?
So, whether you need a hearty bread for a winter soup night or a canvas for your favorite spreads, this recipe has you covered.
You don’t need to be a kitchen wizard; just grab your ingredients and some ensoiastic spirit. let’s dive into the ingredients, and trust me, the aroma of this bread baking will make the effort absolutely worth it!
Get ready to transform your kitchen into a cozy haven, where nutrient-rich flavors meld together to create a gorgeous loaf of nutty whole wheat artisan bread .
Grab that apron; it's time to get our bake on!
Essential Ingredients Guide for Nutty Whole Wheat Artisan Bread
If you're ready to get your hands floury and bake some seriously delicious bread, you've come to the right spot! let’s break down how to whip up a nutty whole wheat artisan bread that has all the right flavors and crunch.
Perfect for sandwiches or just slathered with butter, this guide will share everything you need to know to make your own homemade artisan bread .
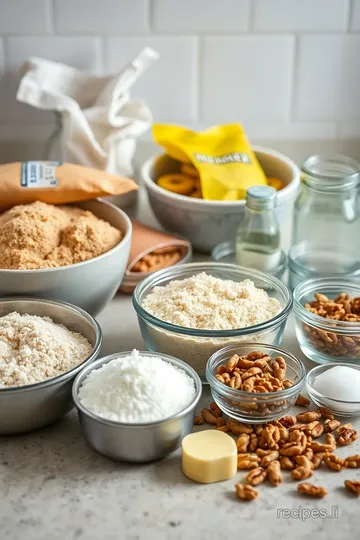
Premium Core Components
Before you dive into measuring and mixing, let’s talk about your core ingredients because that's where the magic begins!
Detailed Measurements
To make this amazing bread, you'll need:
- 3 cups (360g) whole wheat flour
- 1 cup (120g) all-purpose flour
- 1½ teaspoons (8g) salt
- 1 teaspoon (5g) active dry yeast
- 1½ cups (360ml) warm water (about 110° F/ 43° C )
Don’t sweat if you prefer metrics; all measurements are listed for your convenience!
Quality Indicators
Look for whole wheat flour that's 100% whole grain for the best flavor and nutrients. the all-purpose flour should be a fine grind.
When it comes to your mixed nuts and seeds, opt for unsalted varieties to control that salty kick.
Storage Guidelines
Store your whole wheat flour in a cool, dark place, ideally in an airtight container. it can last up to 6 months .
Mixed nuts? keep those in the fridge to maintain freshness for about 3 months . flaxseeds can stay good for roughly 1 year if kept in the right conditions.
Freshness Tips
Feast your eyes on your ingredients! When possible, choose organic flour and nuts for the best nutrition and flavor. Smell your flour — it should have a fresh, nutty aroma, not musty.
Signature Seasoning Blend
Now, let's get into the fun part — seasoning!
Essential Spice Combinations
While the beauty of the nutty whole wheat artisan bread recipe really shines through its ingredients, a touch of spice can enhance that flavor.
A pinch of black pepper or even some garlic powder can really elevate your loaf.
Herb Selection
Try adding some rosemary or thyme for an aromatic twist. They pair beautifully with the nuttiness of whole wheat flour.
Smart Substitutions
Life happens, right? So, let's say you run out of something — don't panic!
Common Alternatives
Don’t have whole wheat flour? you can use a mix of all-purpose flour with some oat flour for a slightly different texture.
No mixed nuts? use sunflower seeds or pumpkin seeds instead! got a nut allergy? just skip them and add more seeds.
Dietary Modifications
This recipe is basically a health bomb . if you're thinking of going gluten-free, swap in a gluten-free flour blend, but keep in mind you might need a binding agent like xanthan gum.
Kitchen Equipment Essentials
Alright, time to talk gear.
Must-Have Tools
You’ll need a large mixing bowl , wooden spoon , and a dutch oven (or a pizza stone works in a pinch).
If you can, grab a kitchen scale for precise measurements — it makes a difference in the outcome!
Preparation Tips
Mix your dough until it starts to come together; it should be a shaggy mass. And remember, you're not making a cake; it can be a little rough at this stage!
Getting Ready to Bake
You ready to dive into those baking instructions?
This is where i say, "bake nutty whole wheat artisan bread today!" you'll feel like a rockstar in the kitchen, letting the aroma of fresh bread wrap you like a warm hug.
And guess what? your friends and family will thank you for treating them to warm slices of artisan bread with that classic crustiness that makes every bite a delight.
Next up, I’ll guide you through each step so you can tackle whole wheat bread baking like a pro! Let’s get started on crafting the perfect loaf!
Mastering the Art of Professional Cooking: Your Guide to Success
When it comes to making great dishes in your own kitchen, having a handle on professional cooking methods can make all the difference.
Whether you’re looking to impress your friends or just want to level up your skills, understanding the detailed steps and techniques is key.
Let’s dive into some essentials that’ll elevate your home cooking to a whole new level!
Essential Preparation Steps
Mise en Place: The Foundation of Cooking
Alright, first things first— mise en place . french for “everything in its place,” it’s about prepping your ingredients before you start cooking.
This means chopping onions, measuring out spices, and laying out everything you'll need. it’s like laying the groundwork for a house; you wouldn’t build without a solid foundation, right?
Time Management Tips
Managing your time while cooking can save you from chaos. set a timer for tasks like chopping or simmering. for example, give yourself about 15 minutes for chopping veggies or getting your ingredients ready.
And remember, if you’re cooking multiple dishes, overlap tasks whenever you can. cooking isn’t just an art; it’s a dance, baby!
Organization Strategies
Always keep your workspace tidy. dirty dishes can pile up fast and lead to frustration. a quick wipe-down between tasks can do wonders.
Keep a trash bowl handy too—it makes cleaning up a breeze. trust me, working in a clutter-free zone gives you room to think and create.
Safety Considerations
Don't forget about safety! using sharp knives? always cut away from yourself and keep your fingers tucked. when cooking with heat, use long-handled utensils and don’t leave the stove unattended; it happens to the best of us, but it's best to be proactive.
Step-by-Step Process
-
Prepare your dough: combine your ingredients in a large bowl. for our nutty whole wheat artisan bread, mix 3 cups of whole wheat flour, 1 cup all-purpose flour, 1½ teaspoons salt, and 1 teaspoon active dry yeast .
Add 1½ cups of warm water (about 110° f) and stir until you have a shaggy dough.
-
Knead and Rise: Kneading helps build gluten. Do it for about 10 minutes . Once done, cover it for the first rise— 1 hour should give you a good start.
-
Temperature Control: When you head to bake, preheat your oven to 450° F . If you use a Dutch oven, place it inside to heat up.
-
Baking magic: cover your bread after shaping and let it rise for another 30- 45 minutes . bake covered for 30 minutes , then uncover and bake for more 10- 15 minutes until golden brown.
-
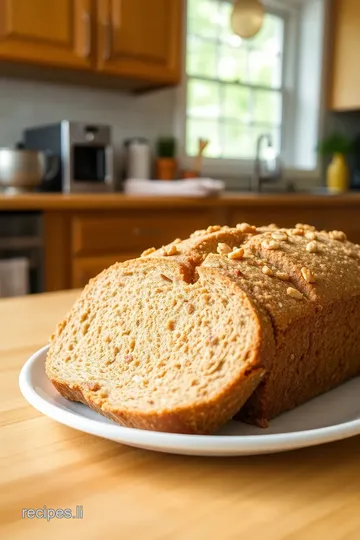
Visual Cues for Doneness: You’ll know it’s ready when it’s golden and sounds hollow when tapped on the bottom—talk about baked perfection!
Expert Techniques
Professional Methods
There’s an art to lightly folding in your nuts and seeds without deflating your dough. Take your time! This method enhances texture and flavor—those mixed nuts in bread aren’t just there to look pretty!
Quality Checkpoints
Check your crust! a good artisan bread should have a nice crustiness outside but a soft, chewy inside. use a thermometer if you must—bread should be around 195° f to 205° f at the center.
Troubleshooting Tips
What if your dough isn’t rising? it might be due to cold temperatures. try moving it to a warmer corner in your house.
If your bread ends up too dense, give a little more time for the yeast to work its magic next time.
Success Strategies
Common Mistakes to Avoid
Overmixing can ruin the texture; keep things gentle. And don’t skip the proofing time! Your bread needs that rise to get all those flavors in there.
Quality Assurance Tips
If you're using whole wheat flour , remember it absorbs more water. Adjust your liquid levels based on how your dough feels.
Make-Ahead Options
Want to prep ahead? you can make this nutty whole wheat artisan bread dough and store it in the fridge for up to 3 days.
Just bring it back to room temp and let it double before baking.
So, are you ready to bake nutty whole wheat artisan bread today! ? this journey into professional cooking isn’t just about skill; it’s about enjoying the process.
Plus, once you experience that warm, nutty smell filling your kitchen, you’ll be hooked for life!
And before we wrap up, let’s move on to some Additional Information that can help you further explore delicious bread-making!
Pro Tips and Secrets for Nutty Whole Wheat Artisan Bread
Oh my gosh, if you want to bake nutty whole wheat artisan bread today, let me share some of my insider tips and tricks.
First, let's talk time-saving techniques. you can easily make the dough the night before. just mix everything, cover it up, and let it do its thing overnight.
The next day, you'll have a beautifully fermented dough waiting for you. i swear, it’s life-changing!
Now, for the flavor enhancement tips : consider adding a handful of chopped herbs like rosemary or thyme to the dough.
They’ll boost that complex, rich flavor we all crave. also, sprinkling a bit of sea salt on top before popping it in the oven? yes, please! it creates a crust that’s to die for.
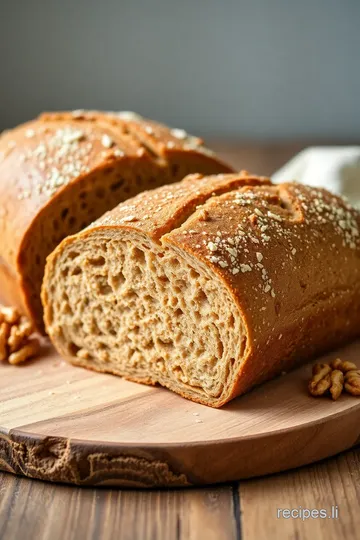
When it comes to presentation advice, let’s get fancy. after your loaf cools, slice it on the diagonal for those beautiful, rustic cuts.
It really makes a difference when you’re impressing guests, or even just yourself when devouring a slice with some olive oil.
Perfect Presentation: Elevating Your Bread Game
Now, let’s chat about plating techniques. i mean, we eat with our eyes first, right? serve your artisan bread on a wooden cutting board.
It just screams "homemade," and adds that cozy, rustic vibe.
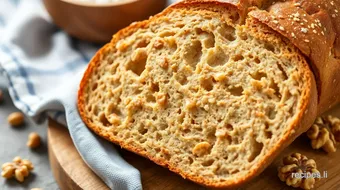
For a touch of glam, add a garnish of fresh herbs like parsley or basil around the loaf. talk about instagram-worthy! and don’t forget the color combinations; if you’ve got those mixed nuts in bread, their vibrant hues will pop against the warm, golden crust.
And hey, visual appeal tips don't stop there! try pairing your bread with a colorful jam or butter. it's like art on a plate.
Honestly, you could win an award for the prettiest breakfast if you really wanted to!
Storage and Make-Ahead: Keep Your Bread Fresh
Here’s a little secret: storage guidelines are crucial if you want your bread to last. wrap it in a clean kitchen towel, then pop it in a paper bag.
This helps maintain moisture without making the crust soggy.
As for the freshness duration, homemade artisan bread is best enjoyed within 3 days. however, if you're like me and always have a slice lying around, freeze the leftovers.
Just slice it up before freezing. that way, you can grab a piece whenever the craving hits!
To reheat, place slices in a toaster oven or on a hot skillet for a minute or two. You’ll get that warm bread nostalgia with every bite.
Creative Variations: Get Your Experiment On!
Don’t be afraid to get a little wild with your cooking! there are so many flavor adaptations for this nutty loaf recipe.
Feel like being tropical? toss in some chopped dried pineapple or coconut flakes.
If you’re into dietary modifications, swap out whole wheat flour for a gluten-free kind. Just keep an eye on your mix-ins; flaxseed benefits are still great no matter the flour!
Seasonal twists are also fun—like adding pumpkin spice mix in the fall or sun-dried tomatoes in the summer. Get a little regional too; why not try Italian herbs or even beer for a unique take?
Complete Nutrition Guide: The Good Stuff
So, the nutrition part—the part we don’t often like to think about but need to! this nutritional whole grain bread is packed with whole wheat flour uses you can feel good about.
Not only is it delicious, but it’s also full of fiber and protein to keep you full longer.
Dietary considerations include being naturally richer in minerals if you're using whole grains. If health is your jam, knowing there’s no added sugar (unless you opt for honey or maple syrup) feels great, right?
When serving, keep portion guidance in mind. Trust me—one slice is often enough when topped with nut butter or hummus!
Expert FAQ Solutions: Your Questions Answered
I know you have questions about this recipe, so let’s tackle a few. first, if your bread isn't rising properly, it might be a yeast issue.
Always check that your yeast is fresh! for common questions, just remember that bread proofing techniques vary; sometimes it just needs more patience.
If your loaf comes out too dense, you might need more warm water or a longer finishing proof. and for variations explained: don't hesitate to get creative with nuts! the best nuts for baking include walnuts, pecans, or even peanuts for that extra crunch.
Conclusion: Get Baking!
Honestly, i can’t stress enough how much fun you’ll have baking this nutty whole wheat artisan bread today. it’s all about enjoying the process and creating something beautiful! so roll up those sleeves and dive in, friend.
Embrace the flour, love the dough, and let the aroma fill your kitchen. your journey into making homemade artisan bread is just beginning, and i can’t wait for you to dive in!
Nutty Whole Wheat Artisan Bread Card
⚖️ Ingredients:
- 3 cups (360g) whole wheat flour
- 1 cup (120g) all-purpose flour
- 1 ½ teaspoons (8g) salt
- 1 teaspoon (5g) active dry yeast
- 1 ½ cups (360ml) warm water (about 110°F/43°C)
- ½ cup (50g) mixed nuts (e.g., walnuts, almonds, pecans), coarsely chopped
- ¼ cup (30g) sunflower seeds
- ¼ cup (30g) flaxseeds
- 1 tablespoon honey or maple syrup (optional)
🥄 Instructions:
- Step 1: In a large bowl, combine whole wheat flour, all-purpose flour, salt, and yeast.
- Step 2: Add warm water; stir until a shaggy dough forms.
- Step 3: Fold in the mixed nuts, sunflower seeds, and flaxseeds until evenly distributed.
- Step 4: Cover the bowl with a kitchen towel or plastic wrap; let it rest for 1 hour at room temperature until it has doubled in size.
- Step 5: Lightly flour a surface; turn the dough out onto it. Shape the dough into a round or oval loaf.
- Step 6: Place the shaped loaf on parchment paper; cover it and let rise for another 30-45 minutes.
- Step 7: While the dough is rising, preheat the oven to 450°F (230°C); place a Dutch oven inside to heat.
- Step 8: Once risen, carefully remove the hot pot from the oven. Place the loaf (with parchment) inside the pot.
- Step 9: Cover with the lid and bake for 30 minutes. Remove the lid and bake for an additional 10-15 minutes until golden brown.
- Step 10: Transfer the bread to a cooling rack. Allow to cool for at least 30 minutes before slicing.
Previous Recipe: How to Bake Classic Chocolate Layer Cake Delightfully: 5 Tips for a Rich Indulgence
Next Recipe: How to Bake Delicious Pastry with Frosting & Jelly: My Grandmother's Secret Recipe