Spooky Chocolate Cake for Halloween
Looking for a fun Halloween treat? Bake Delightful Chocolate Cake This Halloween with my easy recipe. It’s rich, moist, and perfect for spooky celebrations!

- look into into Halloween Baking: The Ultimate Chocolate Cake
- Your Ultimate Essential Ingredients Guide for Halloween Baking
- Unlocking Professional Cooking: Your Guide to Decadent Bakes
- Pro Tips & Secrets
- Perfect Presentation
- Creative Variations
- Storage & Make-Ahead
- Expert FAQ Solutions
- In Conclusion
- Recipe Card
look into into Halloween Baking: The Ultimate Chocolate Cake
Oh my gosh, halloween is just around the corner! i can already picture the kids running around in their costumes, haunting the neighborhood like little goblins.
And what's a better way to celebrate this spook-tacular holiday than with a cake that looks as hauntingly delicious as it tastes? that's right! it’s time to bake delightful chocolate cake this halloween .
Trust me, this cake will not only satisfy your sweet tooth but also make you the star of the party!
A Slice of History
Chocolate cake has been around for ages, but did you know it really took off in america in the 19th century? people went crazy for this rich dessert, and it evolved into the moist, fluffy masterpieces we enjoy today.
When halloween comes around, this dessert transforms into a spooky treat that captures the spirit of the season. today, chocolate cake recipes have become favorites everywhere, especially in family kitchens.
Let’s face it, there's something about a chocolate cake that just feels right when celebrating holidays.
When you decide to whip up this cake, you'll need about 20 minutes of prep and 30 minutes of baking time.
So, in just a little over an hour, you can serve up a glorious centerpiece for your festive table. plus, it yields 12 generous servings.
Talk about a bang for your buck!
Why This Cake Rocks
This moist chocolate cake, with a pinch of espresso for depth, isn't just tasty—it’s packed with love and creativity. it's a perfect dessert for kids and adults alike.
The best part? you can decorate it with all sorts of spooky dessert decorations —think gummy worms, candy eyes, and eerie sprinkles! not only is it a family-friendly dessert , but it also lends itself brilliantly to creative halloween cakes and spooky treats for halloween.
Nutritionally speaking, it has a balance of flavors and textures that will keep you coming back for more. With just under 400 calories per slice , it’s a little indulgent—but hey, it's Halloween! And what's Halloween without some rich chocolate desserts to drool over?
What's in It for You?
Apart from being downright delicious, this cake is also versatile. looking for unique halloween recipes ? you can easily bump it up a notch with substitutions like adding mint or orange flavoring for a twist.
Want to go full blast on the gluten-free trend? swap the flour and secure all the fluffy goodness without missing a beat!
This cake is fitting for any occasion—like an epic Halloween party or a cozy family gathering on a chilly October night. It's a crowd-pleaser, for sure!
Your Next Steps in Treat-Making
Are you ready to get started? before we dive into the ingredients, soak in this little nugget: using room temperature ingredients will make your batter smoother and help your cake rise beautifully.
So, for a slice of heaven this halloween, gather your baking supplies, and let’s get ready to unleash some spooky, sweet magic in the kitchen!
Now, let’s pull together all those Halloween baking supplies and get cracking on the full Halloween cake recipe that’s gonna leave your guests screaming for more. You've got this!
Your Ultimate Essential Ingredients Guide for Halloween Baking
Oh my gosh, friends! halloween's creeping up and that means it's time for spooky treats for halloween . who doesn’t want to indulge in rich chocolate desserts while trick-or-treating with the fam? today, we are diving into an essential ingredients guide for making the best halloween dessert recipes ever, including how to bake delightful chocolate cake this halloween .
It’s gonna be a blast!
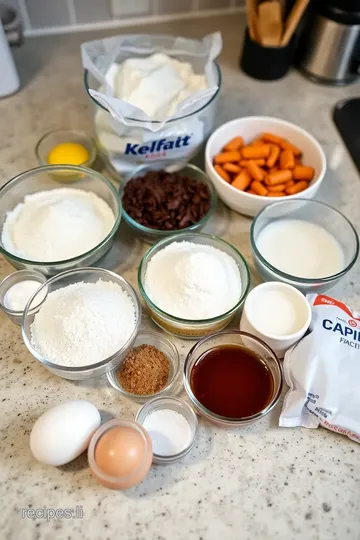
Premium Core Components
First things first—let’s get our core ingredients lined up. You’ll need the right amounts to achieve that moist chocolate cake everyone loves.
Start with 1 ¾ cups (220 g) all-purpose flour . It’s gotta be fresh, man! Check the expiration date when you shop.
Also, grab 1 ¾ cups (350 g) granulated sugar . Quality sugar gives your cake that lovely sweetness. Store it in a cool, dry place to keep it from clumping.
For those chocolatey vibes, don't skip on ¾ cup (65 g) unsweetened cocoa powder . Look for a deep brown powder; it should smell heavenly!
Don’t forget 1 ½ teaspoons (6 g) baking powder and 1 ½ teaspoons (6 g) baking soda for that rise, and 1 teaspoon (5 g) salt to balance all that sweetness.
Finally, here’s a pro tip: store your baking essentials in labeled containers. A neat and organized pantry will save you time during those last-minute easy Halloween baking sessions!
Signature Seasoning Blend
Now let’s chat about that signature seasoning blend . For our Halloween cake, you might not think of spices much, but let’s get a little creative!
A hint of espresso powder (around 1 teaspoon (5 g) ) can elevate the chocolate flavor like nobody's business. and while you're at it, try incorporating some cinnamon or nutmeg for a warm, festive feel—it’s like a hug in cake form.
When teaming up with herbs, pair that cake with mint leaf decorations for a vibrant contrast. Throw in some Halloween-themed sprinkles , and you’re judging up your presentation game like a pro.
Smart Substitutions
Life happens, and sometimes you just don’t have all the ingredients on hand. No worries; I’ve got your back.
If you're out of cocoa powder, try swapping it with melted unsweetened chocolate . You’ll need about 3 ounces , and just melt it down before mixing.
For those looking for a gluten-free option, reach for a 1:1 gluten-free flour blend—it works wonders!
If you’re working with allergies, those eggs can go bye-bye, thanks to a flax substitute (1 tablespoon of ground flaxseed + 2.5 tablespoons of water = magic!).
Kitchen Equipment Essentials
Alright, let’s gear up for baking. You’ll need some must-have tools: two round 9-inch (23 cm) cake pans and a trusty electric mixer .
A rubber spatula is your bestie for folding in ingredients—trust me, you don’t want that cake batter to turn tough.
And measuring cups? absolutely essential! plus, remember to use room temperature ingredients for an even batter—no one wants a lumpy cake!
As for storage, I love using airtight containers for my baked goods. Keep that chocolate frosting and decorated treats fresh for the haunting season!
Final Thoughts
So, now that you have your essentials, you're ready to bake delightful chocolate cake this halloween . trust me, this cake isn’t just any ordinary chocolate cake recipe; it’s going to be the star of your halloween party food ideas.
Stay tuned for the step-by-step instructions to craft your Spooky Chocolate Cake: A Halloween Delight ! You’ll lead the ghoulish party with the best creations this holiday season!
Unlocking Professional Cooking: Your Guide to Decadent Bakes
When it comes to whipping up delicious treats, especially those rich chocolate desserts that make your taste buds dance, knowing some professional cooking methods can level up your game.
Today, let’s chat about how to bake delightful chocolate cake this halloween while still having a blast in the kitchen!
Essential Preparation Steps
Mise en place —it sounds fancy, right? but really, it just means having everything ready to go before you start.
For your halloween cake, measure out your ingredients first. dust off that measuring cup and grab your flour, cocoa powder, and sugar.
Trust me, it saves time and keeps your kitchen from looking like a tornado hit it halfway through mixing.
Now, let’s talk time management . this cake takes about 20 minutes to prep and 30 minutes to bake . so, pace yourself! use a timer to keep track.
Put on your favorite tunes and dance around while you mix! baking is an art, but it should feel like fun, too!
Next up is organization . keep your kitchen tidy. use a clean bowl for each ingredient until you’re ready to mix.
And remember to wash your hands! safety is huge—especially when you're working with hot ovens. always set your oven to a nice 350° f ( 175° c) ; it makes all the difference in how our cake rises.
Step-by-Step Process
Okay, here we go! Follow these straightforward steps and, I promise, you’ll have a gorgeous cake in no time.
- Preheat your oven to 350° F ( 175° C) and grease your cake pans.
- Combine your dry ingredients : flour, sugar, cocoa, baking powder, baking soda, and salt in a large bowl. Whisk until they’re nicely blended.
- Mix wet ingredients : in another bowl, combine your eggs, milk, oil, and vanilla. This is where we start to make that cake magic happen.
- Gradually add that wet mix to your dry mix, just don’t overdo it. We want things combined but not overbeaten—keep that fluffiness alive!
- Bring on the boiling water and stir it in. Don’t be alarmed if the batter looks thin; that’s just the secret to that moist chocolate cake we all crave!
- Pour the batter into your prepared pans and let them bake for about 30 minutes ; check for doneness with a toothpick.
- Once baked, cool the cakes for 10 minutes in their pans, then let them chill out on a cooling rack.
Expert Techniques
Want to make sure you’re serving the best Halloween cake around? Follow these expert tips:
- Quality checkpoints : Always taste your frosting as you make it! You want that perfect balance of sweetness and cocoa flavor.
- Visual cues : Look for that perfect dome shape in your cake layers. They should spring back when touched!
- Troubleshooting tips : If your cake is dry, you probably overbaked it! Set that timer early next time.
Success Strategies
Even the most seasoned bakers have mishaps. Here are a few common mistakes to avoid :
- Mixing too much can lead to a dense cake. No one wants that!
- Not using room temperature ingredients can mess up your batter consistency. So, a little tip: take those eggs and milk out beforehand.
- Not chilling your cakes completely before frosting can lead to a gooey disaster. You want that frosting on a stable base!
Pro tip: If you need to make it ahead, this cake stores beautifully. Just cover it properly, and it’s good to go for a day or two.
Wrapping It Up
So there you have it! with these professional cooking methods under your belt, you're set to create a stunning and delicious chocolate cake that will wow everyone this halloween.
Remember that practice makes perfect, so don’t sweat the small stuff. have some fun with spooky decorations—make those gummies wiggle on top, or throw some edible eyes around for extra flair!
Now you’re ready to dive deeper into this whole spooky season of culinary creativity. Stay tuned for some Additional Information on creative ways to decorate and serve, making your cake the centerpiece of your Halloween festivities!
Pro Tips & Secrets
Let’s dive into the world of baking that bake delightful chocolate cake this halloween opens up! first things first, if you want to elevate your halloween dessert recipes , remember my golden rule: use room temperature ingredients .
Seriously, it makes a huge difference in your cake’s texture. you want it moist and fluffy, right?
I've been there, forgetting to set my butter out to soften. the result? a lumpy mess that even frosting couldn’t save! so, trust me, prep ahead so you won’t be chasing down cold eggs like a mad scientist.
For those of you tight on time, here’s a time-saving technique : if you know you’re making this chocolate cake recipe , whip up a double batch of the batter and freeze one for later! just keep in mind to let it thaw overnight in the fridge before baking.
You’ll thank yourself when you're knee-deep in halloween prep.
Flavor tip : a little espresso powder takes this cake from basic to "ah-mazing!" it enhances that rich chocolate taste without making your cake taste like coffee.
Just a tiny bit is needed—don’t go overboard!
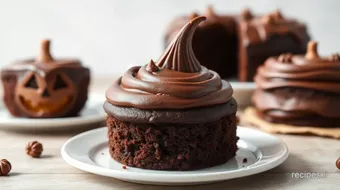
Finally, let’s talk presentation. Make garnishing your cake unique a fun part of baking! Think of ghoulish decorations—your favorite creepy sprinkles, gummy worms, or even some edible glitter for that extra razzle-dazzle.
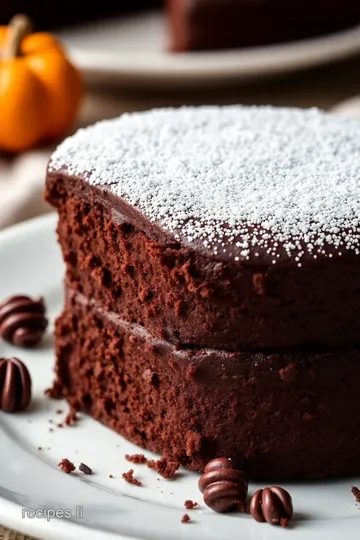
Perfect Presentation
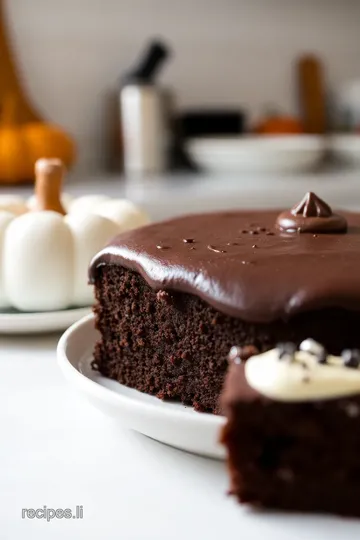
Presentation is everything when it comes to your halloween-themed baking ! start with slicing your cake neatly—an equal number of layers gives a polished look.
To really wow your guests, try a plating technique that speaks volumes.
Add a drizzle of chocolate ganache around the base of the cake, or create a color contrast by serving it on a bright orange plate.
For garnish ideas , consider creating a graveyard scene with crushed chocolate cookies as dirt and mini halloween figurines sticking out for that spooky vibe.
Mix and match colors! deep browns of the chocolate cake look superb with pops of bright green or orange from your decorations.
Trust me, your cake should be as much of a conversation starter as it is a delicious dessert.
Creative Variations
Let’s talk creativity! The best chocolate cake for Halloween is not just one flavor—it can morph into so many exciting versions! Want a punch of seasonal flair ? Add pumpkin spice to the batter, or maybe even zip in some cocoa cake variations !
For those health-conscious friends, why not try gluten-free options? there are amazing gluten-free flour blends available! if you want to go vegan, switch those eggs out for a flaxseed mixture—totally kid-friendly and perfect for those cute kids halloween treats .
And how about that rich chocolate cake? Mix in some berries or other fruits for a fresh twist! These little twists make your cake stand out at any Halloween party.
Storage & Make-Ahead
Once you’re done impressing your guests with the moist chocolate cake , you might have some leftovers. don't worry! this cake freezes beautifully.
Just wrap it tightly in plastic wrap, then in foil to avoid freezer burn. it’ll stay good for up to three months .
When you’re ready to enjoy it again, let it thaw in the fridge overnight.
Want to make it in advance? this cake holds its flavor well for a couple of days at room temperature.
Just keep it in an airtight container; i swear the flavors deepen overnight!
Expert FAQ Solutions
You might have some burning questions as you bake your masterpiece. Don’t fret!
- Why did my cake not rise? You probably overmixed the batter, which can create a dense cake instead of a fluffy one.
- My frosting is too runny. What do I do? Just refrigerate it for about 15 minutes to firm up. You can also add a bit more powdered sugar to thicken it up.
- What if I want it richer? Add an extra tablespoon of cocoa powder to the frosting!
Baking is all about experimenting and having fun with flavors and techniques, and it’s perfectly okay to go off the beaten path.
In Conclusion
So, as you gear up to bake delightful chocolate cake this halloween , remember that it’s not just about the cake.
It’s about the great vibes, spooky decor, and those delicious moments shared with family and friends. whether you whip this up as a centerpiece for a party or for a cozy night in, it’s bound to be a hit.
Happy baking, my friends!
Spooky Chocolate Cake for Halloween Card
⚖️ Ingredients:
- 1 ¾ cups (220 g) all-purpose flour
- 1 ¾ cups (350 g) granulated sugar
- ¾ cup (65 g) unsweetened cocoa powder
- 1 ½ tsp (6 g) baking powder
- 1 ½ tsp (6 g) baking soda
- 1 tsp (5 g) salt
- 2 large eggs, at room temperature
- 1 cup (240 ml) whole milk, at room temperature
- ½ cup (120 ml) vegetable oil
- 2 tsp (10 ml) pure vanilla extract
- 1 cup (240 ml) boiling water
- 1 tsp (5 g) instant espresso powder (optional)
- 1 cup (230 g) unsalted butter, softened
- 3 ½ cups (440 g) powdered sugar
- ½ cup (50 g) unsweetened cocoa powder
- 1 tsp (5 ml) pure vanilla extract
- 2-4 tbsp (30-60 ml) heavy cream
- Halloween-themed sprinkles and edible decorations (e.g., gummy worms, candy eyes)
🥄 Instructions:
- Step 1: Preheat the oven to 350°F (175°C). Grease and line the cake pans with parchment paper.
- Step 2: In a large bowl, whisk together the flour, sugar, cocoa powder, baking powder, baking soda, and salt.
- Step 3: In another bowl, combine the eggs, milk, vegetable oil, and vanilla. Mix until well blended.
- Step 4: Gradually add the wet ingredients to the dry ingredients, mixing until just combined.
- Step 5: Carefully stir in the boiling water and espresso powder until smooth; the batter will be thin.
- Step 6: Divide the batter evenly between prepared pans and bake for 30 minutes, or until a toothpick inserted comes out clean.
- Step 7: Let the cakes cool in the pans for 10 minutes, then transfer to a cooling rack to cool completely.
- Step 8: Beat the softened butter until creamy, then gradually add the powdered sugar and cocoa, alternating with cream until fluffy.
- Step 9: Place one layer on a serving plate, frost with a layer of frosting, then top with the second layer and frost the top and sides.
- Step 10: Add Halloween-themed decorations as desired.
Previous Recipe: How to Bake Apple Oatmeal Cake for Cozy Moments: A Delicious Treat
Next Recipe: How to Make Easy Cornstarch Pudding: Creamy Delight in 5 Simple Steps