Delicious Vanilla Butter Cake: A Simple Favorite
Wondering how to bake the perfect Vanilla Butter Cake? My grandmother's recipe is easy, delightful, and so rewarding! Bake Delicious Vanilla Butter Cake Today!

- Bake Delicious Vanilla Butter Cake Today!
- Recipe Overview
- Key Benefits
- The Transition to Ingredients
- Essential Ingredients Guide for the Perfect Vanilla Butter Cake
- Mastering the Art of Professional Cooking
- Pro Tips & Secrets for Baking Success!
- Perfect Presentation
- Storage & Make-Ahead Tips
- Creative Variations Worth Trying
- Complete Nutrition Guide
- Expert FAQ Solutions
- Conclusion: A Sweet Journey Awaits
- Recipe Card
Bake Delicious Vanilla Butter Cake Today!
Oh my gosh, let me tell you about the time i first baked a vanilla butter cake for my family's sunday get-together.
Picture this: i'm in the kitchen, flour everywhere, and the aroma of butter and sugar swirling around. as i pulled my cake out of the oven, the whole family gasped.
It looked perfect! well, mostly. it was a bit lopsided, but you know what? they didn’t care. that buttery goodness had everyone begging for seconds.
This experience made me realize that baking a moist butter cake like that can really bring people together. so, why not bake delicious vanilla butter cake today and create your own sweet memories!
Recipe Overview
The vanilla butter cake recipe has quite a history. it’s been around since the late 19th century, and let me tell you, it has stood the test of time! this cake became popular as home bakers sought to whip up something easy yet satisfying.
Today, it’s a staple at birthday parties, weddings, and even cozy weekday afternoons with a cup of tea.
What i love about this cake is how easy it is to make. you don’t need a culinary degree to master it.
Prep takes about 15 minutes and, after just 30 to 35 minutes in the oven, you’re in cake paradise.
Talk about a win! plus, you can usually whip up this simple cake recipe for about $10, and it serves a family of eight.
Perfect for gatherings or just treating yourself!
Key Benefits
Let’s chat about why you’ll want to bake this cake. first off, it’s packed with buttery goodness and pure flavor.
The use of pure vanilla extract elevates the taste, making it feel like an indulgent treat without an extravagant price tag.
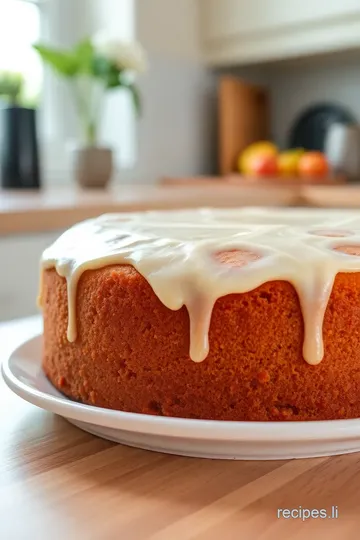
You can serve it plain or jazz it up with a chocolate glaze for the cake or a dollop of whipped cream topping.
Speaking of toppings, how about fresh berries? they add a lovely, bright touch!
Nutritious aspects? well, it’s made mostly from simple ingredients: butter , sugar , eggs , and milk . sure, it’s a treat, but every now and then, we all deserve to indulge a little, right? you won’t find those supermarket cakes here, full of mystery ingredients.
Just good ol’ homemade vanilla cake made with love!
This cake is perfect for all occasions, from festive celebrations to cozy family dinners. trust me, bringing out a delicious vanilla butter cake at your next gathering will have folks singing your praises.
I mean, who wouldn’t love it?
The Transition to Ingredients
Ready to make this masterpiece? let’s dive into the ingredients you’ll need to bake delicious vanilla butter cake today . gather up your essentials, and you’ll soon be on the path to creating that fluffy butter cake you’ve always dreamed of.
Remember, the key is in using quality- you’ll find that your cake with glaze will taste so much better. so grab your spatula, and let’s get baking!
Essential Ingredients Guide for the Perfect Vanilla Butter Cake
Baking a delicious vanilla butter cake at home may sound daunting, but it’s honestly one of the easiest classic cake recipes you’ll ever try! trust me; i've had my fair share of baking disasters, but once you nail down these essential ingredients and tips, you'll be whipping up moist butter cakes like a pro before you know it.
So let’s dive into the nitty-gritty!
Premium Core Components
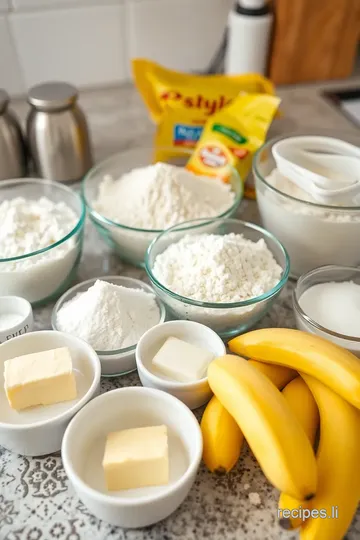
First things first, let’s talk about your premium core components . Here’s a quick rundown of what you need for the best vanilla cake:
- Unsalted Butter: 1 cup (227 grams), softened. Quality Indicator: Look for a pale yellow color; that means it's fresh!
- Granulated Sugar: 2 cups (400 grams). Storage: Keep it in a cool, dry place.
- Eggs: 4 large. Freshness Tip: Check for the float test—if it sinks, it's fresh!
- All-Purpose Flour: 3 cups (360 grams). Selection Criteria: Go for unbleached; it’s just better for cakes.
These are the backbone of your cake, so make sure you’ve got quality ingredients. You'll be amazed at how they all come together.
Signature Seasoning Blend
Now, for the signature seasoning blend ! While you may not think of cake as needing spices, a simple addition can make your homemade vanilla cake truly special.
- Pure Vanilla Extract: 1 tablespoon. This is your flavor booster! The real deal, please—no imitation.
- Baking Powder: 1 tablespoon and Salt: 1/2 teaspoon. These guys help your cake rise beautifully.
Incorporating these flavor enhancers will have your cake tasting like a slice of heaven. Oh, and I always toss in a bit of lemon zest sometimes. It adds such a refreshing twist!
Smart Substitutions
Life happens, and if you’re in the middle of baking and realize you’re out of an ingredient, don’t panic! Let’s go over smart substitutions :
- Butter Substitute: Coconut oil works in a pinch, especially if you're looking for a dairy-free option.
- Egg Replacement: For vegan bakers, mix 1 tablespoon of ground flaxseed with 2.5 tablespoons of water to replace one egg.
These alternatives will help ensure you can get a slice of that fluffy butter cake regardless of dietary needs!
Kitchen Equipment Essentials
Alright, let’s wander into the land of kitchen equipment essentials . You don’t need fancy gadgets, just a few basic tools to achieve that perfect cake texture.
- Mixing Bowls: Get a couple of good-sized ones. You’ll need them.
- Electric Mixer: This is a game-changer. But hey, arm power with a whisk works too!
- Cooling Rack: It prevents soggy bottoms. We want a cake, not a soup!
These tools will help make your life easier and your baking experience way more enjoyable. remember to keep everything clean and organized.
Chaos in the kitchen can lead to cake failures, and we don’t want that!
Baking Tips & Tricks
Before I wrap up, here are some quick baking tips for beginners:
- Room Temperature Ingredients: Make sure your butter and eggs are at room temperature. It helps them mix better for that perfect cake texture.
- Don’t Overmix: A quick mix is all you need. Overmixing can turn your cake into a brick!
- Bake at 350 degrees: It’s the sweet spot for baking classic cakes like this one.
After you bake your cake, try letting it cool before frosting. It’s like the difference between a hug and a bear hug—let’s stick to the former, shall we?
Conclusion
So, there you have it, the essentials of crafting a moist butter cake that’ll have everyone at your next gathering begging for seconds.
Just remember, baking delicious vanilla butter cake today starts with these ingredients and tips! get your apron on, gather those supplies, and let’s get baking.
Soon, you'll be slicing into your delectable creation and enjoying personal triumphs with every bite! stay tuned for the step-by-step instructions coming up next!
Mastering the Art of Professional Cooking
When it comes to whipping up a killer dish, it all starts with the fundamentals . and oh boy, the feeling of nailing that perfect vanilla butter cake is unmatched! in this section, we’re diving deep into essential preparation steps that will put you on the path to success in the kitchen.
Essential Preparation Steps
First up, let’s talk about mise en place . yes, it sounds fancy, but it simply means "everything in its place.
" before you even crack an egg, make sure you have all your vanilla cake ingredients measured out and ready to go.
This way, you're not fumbling around mid-recipe, and trust me, that moment of panic when you can’t find your baking powder? not fun!
Next, it's all about time management . figure out what steps can run concurrently. while your butter and sugar cream together, start measuring out your flour and other dry ingredients .
Oh, and here’s a tip: set a timer for those critical moments, like when you’re baking at 350° f —the aromas will envelop your kitchen, but don’t get lost in the allure and forget to check back!
A little organization won’t hurt either. arrange your workspace! a clean counter helps reduce stress and makes it easy to find your mixing bowls or spatulas.
And let’s not skip safety considerations—always use oven mitts, and don’t forget to keep a fire extinguisher nearby, just in case you get a bit overzealous with that baking.
Step-by-Step Process
Now that we have our house in order, let’s jump into the step-by-step process :
- Preheat the Oven : Crank that baby up to 350° F .
- Cream Together Butter and Sugar : Beat it well until it's light and fluffy—think 3- 5 minutes .
- Add Eggs and Vanilla : One at a time, mix them in. This isn’t Speedy Gonzales; take your time to let them blend well.
- Combine Dry Ingredients : Whisk together flour, baking powder, and salt in another bowl. It’s like giving them a little workout!
- Mix Dry and Wet Ingredients : Alternate adding them in, starting and ending with the flour mixture. Overmixing is a big no-no, so go easy here!
- Divide and Bake : Pour into your cake pans (you’ve already greased and floured them, right?) and bake for 30- 35 minutes . Use the toothpick test; a clean pick means you’re good to go.
Expert Techniques
Now, let’s talk expert techniques . this is the juicy stuff that separates the pros from the home bakers! always check for temperature control .
If your butter isn’t softened enough, you won't get that beautiful moist butter cake that melts in your mouth. and about those timing precision points? it’s all about getting that perfect texture—too long, and you’re looking at a dry disaster.
Be aware of visual cues for doneness . the edges should be nicely golden, a slight dome at the top, and a clean toothpick should do the trick.
And if you notice that it’s browning a bit too fast, simply cover it with foil halfway through.
Success Strategies
Alright, on to the success strategies . Here’s where you can avoid some common pitfalls.
- Don’t rush! Give your butter and sugar time to cream; it makes a world of difference.
- Ensure that your ingredients are at room temperature . Cold ingredients lead to a dense cake. No one wants a rock-hard dessert!
- When it comes to troubleshooting, if your cake doesn’t rise as expected, revisit the baking powder quality. Old leavening agents can be the sneaky culprits behind a flat cake.
And if you want to level up and ensure those perfect results, consider make-ahead options . you can easily bake your cakes a day in advance, wrap them well, and store them in the fridge.
Transition to More Fun
So there you have it! you’re now equipped with the skills to bake delicious vanilla butter cake today! but wait—there’s more! if you’re looking for additional hints, tricks, or further baking adventures, stick around! you won’t want to miss our next section where we dive into additional information to help you along your baking journey.
Grab that apron, and let’s keep this fun train rolling!
Pro Tips & Secrets for Baking Success!
Oh my gosh! if you're thinking about how to bake that perfect homemade vanilla cake , i’ve got a treasure trove of tips just for you.
You know, when it comes to baking, little adjustments can make all the difference.
Chef's Insights
First off, always use room temperature ingredients . trust me, your butter and eggs will blend better, creating that fluffy butter cake texture we all crave.
And, if you’re using pure vanilla extract , splurge a bit! it’s worth it for that oh-so-delicious flavor boost.
Time-Saving Tips
Feel like time is slipping away? try this: whisk together your dry ingredients while your butter and sugar are creaming.
It cuts down on prep time, and honestly, it feels like you’re winning at baking! if you're short on time but wanting to impress, just skip the glaze and dust it with powdered sugar instead.
It’s quick, easy, and still looks fancy!
Flavor Enhancements
Want to kick it up a notch? add a splash of almond extract to your batter or fold in some chocolate chips.
Bam! you’ve got yourself a cake that’ll have everyone saying, “yum!”
Presentation Ideas
Talking about impressing guests, let's chat presentation. plating techniques can elevate your cake from basic to spectacular. use a cake stand for height.
It draws the eye, and who doesn’t love a little drama? got fresh berries lying around? scatter those on the plate or serve them alongside the cake.
Strawberries and blueberries are especially vibrant against that golden butter cake.
Perfect Presentation
Plating Techniques
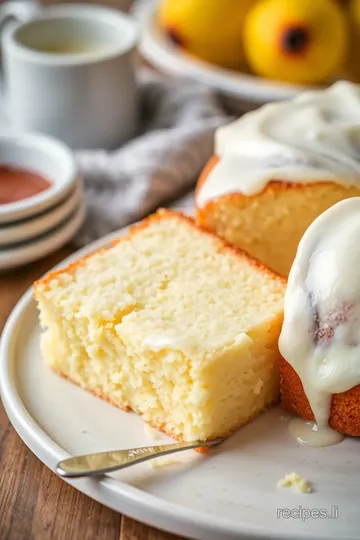
When you’ve baked that moist butter cake , the way you serve it matters! consider slicing it into wedges like a pie instead of your usual square pieces.
It just gets a little more fancy, ya know?
Color Combinations
Colors play tricks on our minds. so, pair your cake with colorful sides! whipped cream topping not only tastes divine but also looks great.
Add a mint leaf or a dusting of cocoa powder for that final touch.
Storage & Make-Ahead Tips
The best cakes stay fabulous with proper storage. cool your cake completely before wrapping it, or else you risk a soggy mess.
Store it in an airtight container at room temperature for about 2-3 days. if you want to keep it longer, toss it in the freezer—just make sure to wrap it well.
When you’re ready to indulge again, let it thaw naturally at room temp, and it’ll taste as fresh as the day you baked it.
Creative Variations Worth Trying
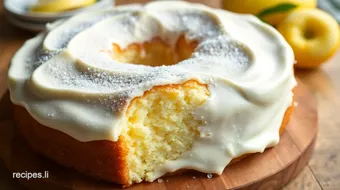
Just a little twist can turn your easy vanilla cake into something special. for a seasonal flair, throw in some pumpkin spice in the fall or fresh lemon zest in the summer.
How about a gluten-free vanilla cake ? swap the all-purpose flour for a gluten-free blend and you’re set!
Got a dietary restriction? Use unsweetened applesauce in place of eggs. It’ll keep the moisture, trust me!
Complete Nutrition Guide
Now i’m talking about keeping those calories in check. if you're enjoying a slice, keep it in moderation. this cake for celebrations may be 350 calories per slice, but it’s worth every single bite when shared with friends.
Health Benefits
While we’re not exactly talking health food here, remember that butter cake can bring joy, and sometimes a little sweetness is good for the soul! just balance it with fruits or a light salad on the side.
Expert FAQ Solutions
Got questions? i'll cover a few common ones! many folks worry about that cake turning out dry or dense. here's the golden nugget : do not overmix your batter! just combine until you don’t see flour anymore.
And don’t open that oven door early—let that cake do its thing.
Here’s a pro tip: If you find your cake has domed too much, a little trim with a serrated knife can create that perfectly flat top.
Conclusion: A Sweet Journey Awaits
So, whether you decide to bake delicious vanilla butter cake today or take a spin on a classic, the joy of baking is in the process and the love you put into it.
Look into into those flavors, experiment with your own variations, and don't forget to share a slice with someone you love.
Happy baking, my friend!
Delicious Vanilla Butter Cake: A Simple Favorite Card
⚖️ Ingredients:
- 1 cup (227 grams) unsalted butter, softened
- 2 cups (400 grams) granulated sugar
- 4 large eggs
- 1 tablespoon pure vanilla extract
- 3 cups (360 grams) all-purpose flour
- 1 tablespoon baking powder
- 1/2 teaspoon salt
- 1 cup (240 ml) whole milk
- 1 cup (120 grams) powdered sugar (optional glaze)
- 2 tablespoons (30 ml) milk (optional glaze)
- 1/2 teaspoon vanilla extract (optional glaze)
🥄 Instructions:
- Step 1: Preheat the oven to 350°F (175°C). Grease and flour two 9-inch round cake pans or line with parchment paper.
- Step 2: In a large mixing bowl, cream together the softened butter and granulated sugar until light and fluffy (about 3-5 minutes).
- Step 3: Beat in the eggs one at a time, followed by the vanilla extract. Mix until well combined.
- Step 4: In a separate bowl, whisk together the flour, baking powder, and salt.
- Step 5: Gradually add the dry mixture to the butter mixture, alternating with the milk, starting and ending with the flour mixture. Mix until just combined.
- Step 6: Divide the batter evenly between the prepared cake pans.
- Step 7: Bake for 30-35 minutes, or until a toothpick inserted in the center comes out clean, and the edges are golden brown.
- Step 8: Remove from the oven and allow to cool in the pans for 10 minutes. Then, transfer to a wire rack to cool completely.
- Step 9: Whisk together powdered sugar, milk, and vanilla extract in a small bowl until smooth. Drizzle over cooled cakes if using.
- Step 10: Slice and serve the cake, garnished as desired.
Previous Recipe: How to Make Easy Slow Cooker Beef Pasta Delight: A Cozy Family Favorite
Next Recipe: How to Create an Amazing Edamame Egg Delight Salad in 20 Min