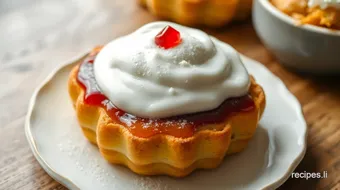
Decadent Pastry Puffs with Frosting & Fruit Jelly
Looking for a delightful treat? Try baking delicious pastry with frosting & jelly! It’s a family favorite that brings cozy memories to life.

- A Sweet Journey Begins: Bake Delicious Pastry with Frosting & Jelly
- The Sweet History of Pastry Puffs
- Why You Should Try This Recipe
- Ingredients
- Essential Ingredients Guide: Pastry Puffs Like a Pro
- Mastering Professional Cooking: The Dough of the Day
- Pro Tips & Secrets for Pastry Perfection
- Perfect Presentation: Plating Like a Pro
- Storage & Make-Ahead Tips
- Creative Variations to Wow Your Family
- Complete Nutrition Guide
- Expert FAQ Solutions
- Wrap It All Up
- Recipe Card
A Sweet Journey Begins: Bake Delicious Pastry with Frosting & Jelly
Oh man, let me tell you a little secret. the first time i attempted to bake delicious pastry with frosting & jelly , i almost set my kitchen on fire.
It was a disaster, really—dough everywhere, frosting that went rogue, and my dog decided it was the perfect time to join the chaos.
But that flopped attempt turned into a sweet obsession—and now, i whip up these flaky pastry dough delights like a pro.
Why do i share this? because cooking should be fun and a bit messy! these fruit-filled pastries are a journey, and trust me when i say, it's worth every little misstep to get to the glorious pastry puffs that await you.
These pastries are perfect for impressing your friends at brunch or simply treating yourself after a long week.
The Sweet History of Pastry Puffs
Did you know that pastries date back to ancient cultures? it’s said that even the egyptians made some kind of flaky dough! it's amazing how this little treat has evolved over the years.
Today, the european pastry desserts inspiration shines through in our modern take. once a fancy treat for the elite, now they can create a party vibe at your weekend get-togethers or cozy afternoon teas.
Now let’s break down the process for you. making perfect pastry puffs is a mix of art and science. the difficulty level is basically medium , so don’t sweat it too much if you’re not a master chef yet.
It takes about an hour and twenty minutes to get everything ready and baked, but you’ll feel like a culinary genius when you pull those golden puffs from the oven.
And the best part? you’ll yield about a dozen creamy, dreamy pastries filled with fruit goodness.
As for the cost? Honestly, the ingredients are super affordable. A couple of cups of flour, some butter, and your favorite jelly—boom, you’re already halfway there!
Why You Should Try This Recipe
When it comes to health benefits , these pastry puffs might not make the superfood list, but they’re balanced, and you can control the sweetness.
Plus, they’re perfect for those special occasions: birthdays, holidays, or even just a casual saturday because you deserve it!
What’s cool about making these pastries from scratch is you can play around with flavors. you could go wild with recipes with chocolate frosting or even swap the jelly for something unexpected like peanut butter and jelly—you know, classic american style .
The versatility is endless: serve them warm for parties or as delightful afternoon tea snacks .
Before we dive into the nitty-gritty of the ingredient list, let me share a little scoop on making that homemade frosting .
It’s super easy! you’re going to want to whip up a batch of fluffy frosting to drizzle over your warm pastry puffs that’ll take them from good to wow! just imagine those fresh pastries with warm, melted frosting adding a sweet touch that’ll make your mouth water.
So, are you ready to get baking? Let’s gather our supplies and get started on these decadent pastry puffs—your friends and taste buds will thank you! Here’s what you need…
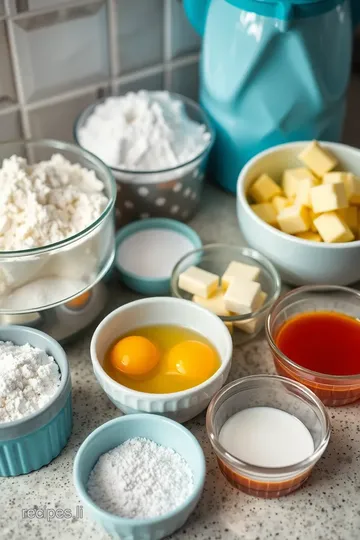
Ingredients
For the Dough:
- 2 cups all-purpose flour
- 1/2 teaspoon salt
- 1 cup unsalted butter, cold and cubed
- 1/4 cup ice water
For the Filling:
- 1/2 cup fruit jelly (raspberry, apricot, or whatever makes your heart sing!)
- 1 large egg for that shiny egg wash
For the Frosting:
- 1 cup powdered sugar
- 2 tablespoons cocoa powder (if you’re feeling extra!)
- 2-3 tablespoons milk
- 1 teaspoon vanilla extract to tie it all together
Now that we’ve got our ingredients, let’s roll up those sleeves and create something delicious! stay tuned for the step-by-step instructions, and remember: every great pastry begins with a little love and a dash of imagination.
Happy baking, friends!
Essential Ingredients Guide: Pastry Puffs Like a Pro
Oh boy, if you want to bake delicious pastry with frosting & jelly , let’s break down the essential ingredients you’ll need! pastry-making can seem like climbing mount everest, but with the right tools and ingredients, you’ll feel like a baking superstar in no time.
Premium Core Components
First things first, measuring your ingredients is crucial. for the dough, you need 2 cups of all-purpose flour (250g) and 1 cup of cold, unsalted butter (227g) .
If you’re a fan of the metric system, just remember that 1 cup is about 240ml of liquid . so when you’re eyeballing that ¼ cup of ice water (60ml) , grab a measuring cup because every drop counts!
Quality indicators are key, too! when selecting your butter, go for a brand that’s creamy with a rich flavor. if it’s less than perfect, your flaky pastry dough might fall flat.
Make sure to check that expiration date.
Storage guidelines ? keep your flour in a cool, dry place and your butter in the fridge until you’re ready to make your pastry masterpiece.
Whole butter has a shelf life of about 6 months in the freezer, which is awesome for those late-night baking cravings.
Signature Seasoning Blend
Now let’s get to the fun part: the flavor! while the dough is foundational, it's the fillings and toppings that really make these pastry puffs sing.
Essential spice combinations depend on your vibe. for the frosting, i usually stick with a pinch of vanilla extract , which works like magic.
As for the jelly, don’t just settle for the first one you find. go for luscious fruit-filled pastries by hunting down raspberry or apricot jelly —these are always a hit.
Trust me; choosing the right filling is like picking the best song for a party. it sets the mood!
Smart Substitutions
Sometimes you gotta get creative in the kitchen. no jelly? no problem! swapping it out for a fruit jam filling or even fresh fruits works wonders too.
For folks watching their sugar, you can substitute honey or agave nectar in the frosting. don’t fret if you’re missing a key ingredient.
You can always replace items with what you have on hand, like using milk instead of cream in your frosting!
Kitchen Equipment Essentials
Listen up, you don’t need an armory of fancy gadgets to pull this off. must-have tools ? grab a good mixing bowl, rolling pin, and a trusty pastry brush .
The pastry brush is your best friend when it comes to egg washes. if you don’t have one? use a clean paintbrush (seriously, just ensure it’s clean!).
If you’ve never made flaky pastry dough from scratch, you’ll want to roll that dough to about 1/8-inch thickness . this helps create those delightful layers you love.
But if rolling dough isn't your jam? even a store-bought puff pastry can save the day.
Thoughtful Tips for Perfect Pastries
- Butter is Queen : Keep your butter cold! It’s the secret to that gorgeous, flaky texture. If your butter melts into your dough, you won't get the layers you’re after.
- Chill That Dough : Seriously, don’t rush this step. It relaxes the gluten and makes the dough so much easier to work with.
- Watch the Oven : Ovens can be unpredictable. Keep an eye on your pastries; we don’t want them to become little burnt soldiers.
- Experimentation Rocks : Everyone has a slightly different taste. Add spices or change up the fillings to find your flavor groove!
With these essential ingredients and trusty tips, you’re ready to dive into creating your decadent pastry puffs with frosting & fruit jelly .
Up next, i’ll lay out all the step-by-step instructions to transform your kitchen into a pastry wonderland. trust me, you’re going to impress everyone with your baking skills!
Mastering Professional Cooking: The Dough of the Day
So, you’re ready to bake delicious pastry with frosting & jelly ? awesome! let’s dive into some professional cooking techniques that’ll help you whip up those fruit-filled pastries that are flaky, buttery, and downright drool-worthy.
Whether you’re a novice or a more seasoned kitchen warrior, these essential steps will have you baking like a pro in no time!
Essential Preparation Steps
Before we get all floury, let’s talk about mise en place . i know, fancy french term! it just means putting everything in its place.
Gather your ingredients for that pastry puff recipe , chop your fruits, and measure out your baking staples. no one wants to run around searching for stuff when you’re knee-deep in flour!
Next up, time management . trust me, having a game plan is crucial. you should aim to preheat your oven to 400° f ( 200° c) while rolling out that dough.
Makes everything smoother, right? a quick tip: divide your tasks by timing. for instance, during your 30 minutes of chill time for the dough, why not prep your frosting? boom, multitasking like a pro!
Now, let’s talk organization. keep your workspace tidy! use bowls or containers for your ingredients. it makes for a smoother flow and fewer messes.
Oh, and don’t forget about safety! hot oven? check. sharp knives? double check. always be aware of your surroundings to avoid any kitchen mishaps.
You got this!
Step-by-Step Process
Okay, let’s break it down. Follow these steps, and you’ll have your butter pastry recipe ready in no time:
-
Make the dough: mix 2 cups of all-purpose flour with 1/2 teaspoon salt . cut in 1 cup of cold butter , and gradually mix in 1/4 cup ice water until it forms a dough.
Wrap it up and chill for 30 minutes.
-
Roll and Cut: Roll it out to about 1/8-inch thick. Ever tried puff pastry variations? It’s fun! Cut into squares or circles.
-
Fill with jelly: place a small spoonful of fruit jelly in the center of each piece. fold and seal with a fork.
A little tip: brush the tops with an egg wash for that golden look!
-
Bake Your Pastries: Bake in your preheated oven for 25- 30 minutes . You'll know they're done when they turn a lovely golden brown.
-
Frost Like a Boss: Whip up that frosting! Just mix 1 cup powdered sugar , 2-3 tablespoons milk , and 1 teaspoon vanilla extract until smooth. Drizzle it on your cooled pastries.
Expert Techniques
Wanna know the secret to that flaky pastry dough ? it’s all about keeping the butter cold. seriously, cold butter and a hot oven equal flaky goodness.
Also, make sure you’re monitoring the temperature like a hawk. allow those pastries to lovely golden brown—nobody wants burnt edges, am i right?
If you find some pastries not rising as they should, check your oven temperature. every oven is different. invest in a good thermometer if you have to.
It could save your pastry game.
Success Strategies
Don’t limit yourself to just one type of filling. experiment with fruit jam fillings , and don't hesitate to add spices or zests for flavor! also, let’s talk mistakes.
A big one? rolling the dough too thin. it can lead to chewy rather than flaky pastries.
And for all my make-ahead peeps: You can prepare the dough in advance! Freeze it before rolling, so when that holiday party comes around, you’re already ahead of the game.
Wrap-Up: Additional Information
So there you have it! with just a few pro tips, you’re ready to tackle european pastry desserts and impress your friends at your next tea party.
Take your time, enjoy the process, and before you know it, you’ll be serving up delightful pastries that are perfect for any occasion.
From classic to creative, the world of baking is your oyster. next up, we’ll talk about some sweet decoration and plating ideas to elevate your baked treats.
Happy baking!
Pro Tips & Secrets for Pastry Perfection
Alright, let's spill the beans! if you want to bake delicious pastry with frosting & jelly , you’re gonna want some insider tips.
First, keep your butter cold ; it’s essential for that flaky pastry dough we all crave. when you cut the butter into the flour, do it quickly—almost like you’re in a race.
You wanna see little pea-sized pieces of butter. this helps create the layers we all love in pastry puffs !
Also, don't overlook the chilling time. it's not just a suggestion; it's a must! chilling the dough for about 30 minutes makes it much more manageable to roll out.
This little step is something i wish i could go back and tell my early baking self. trust me, i’ve had my share of sticky disasters!
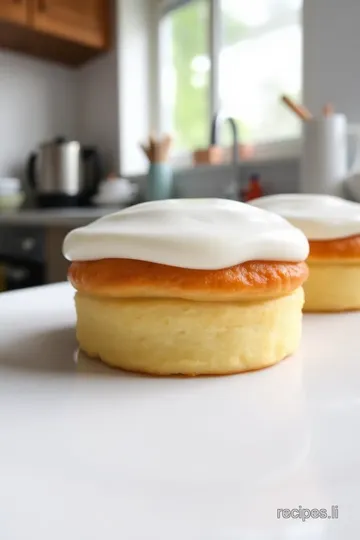
Perfect Presentation: Plating Like a Pro
Now, let’s chat about presentation because we eat with our eyes first, right? when those flaky pastry dough wonders come out of the oven, they should look as good as they taste! plating is easy.
Just stack a few of those pastry puffs in a neat pile, and drizzle a bit of homemade frosting over the top.
You can use a pastry brush to create that lovely, artistic effect.
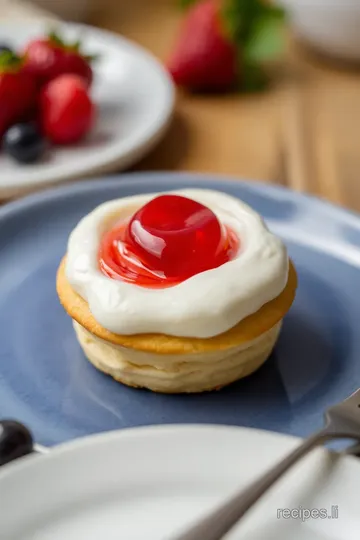
And for a pop of color? toss a few fresh fruits around the platter—think strawberries or blueberries. they not only look great but can also be included in your sweet pastry treats .
If you're feeling fancy, a mint leaf here or there gives that nice touch.
Storage & Make-Ahead Tips
You might be wondering: “can i make these ahead?” absolutely! you can prep the pastry making and even freeze them.
Just assemble the pastries, pop them in the freezer, and bake them straight from the freezer when you’re ready.
If you do have leftover pastries, store them in an airtight container at room temperature. they’re best eaten fresh, but if you must reheat, just pop them in the oven for a few minutes at 350° f ( 175° c).
No soggy goodness here!
Creative Variations to Wow Your Family
Feeling adventurous? Let’s shake things up! Try using different flavors for pastry fillings . Instead of jelly, why not stuff them with whipped cream and fresh fruits? Or go savory with some cheese and herbs; who says fruit-filled pastries can’t be rich and complex too?
You could also get seasonal. for autumn, think of pumpkin pie filling. trust me, your friends will go nuts when you bring those out! each season offers new possibilities, so don’t hesitate to experiment.
Complete Nutrition Guide
Now, i know we love sweet treats, but let’s take a peek at the nutrition side too. each pastry puff packs about 210 calories .
Not too shabby, right? they can fit into most diets if enjoyed in moderation. plus, the homemade frosting can be adjusted.
You could easily swap out ingredients for healthier alternatives—like using a sugar substitute or coconut milk.
And if you’re serving these beauties for a party, consider portion sizes. cutting them into smaller pieces means more guests can try when you’re serving a crowd.
It’s all about gathering everyone around the dessert table!
Expert FAQ Solutions
I get it; baking can feel overwhelming! if you’re asking yourself questions like, “why is my dough too sticky?” or “how do i fix my overcooked pastries?”—don’t sweat it! the dough should feel slightly tacky but not sticking all over your fingers.
If it is, add a bit of flour.
Also, remember that different ovens can run hot or cool. if you suspect yours is baking too quickly, rotate the trays halfway through cooking.
The key is adjusting and learning as you go—every bake is a new experience!
Wrap It All Up
So there you have it, my dear baking buddies! learning to bake delicious pastry with frosting & jelly can be a delightful journey filled with patience and creativity.
Use these tips and enjoy the process! whether it’s a casual saturday afternoon or a holiday gathering, homemade pastries are your ticket to impress.
Look into in and give it a whirl—trust me, it’s worth it. happy baking!
Decadent Pastry Puffs with Frosting & Fruit Jelly Card
⚖️ Ingredients:
- 2 cups all-purpose flour (250g)
- 1/2 teaspoon salt
- 1 cup unsalted butter, cold and cubed (227g)
- 1/4 cup ice water (60ml)
- 1/2 cup fruit jelly (e.g., raspberry, apricot) (120g)
- 1 large egg (for egg wash)
- 1 cup powdered sugar (120g)
- 2 tablespoons unsweetened cocoa powder (optional) (15g)
- 2-3 tablespoons milk (30-45ml)
- 1 teaspoon vanilla extract
🥄 Instructions:
- Step 1: Combine flour and salt in a mixing bowl.
- Step 2: Cut in the cold butter until the mixture resembles coarse crumbs.
- Step 3: Gradually mix in ice water until a dough forms.
- Step 4: Shape into a disk, wrap in plastic wrap, and chill for 30 minutes.
- Step 5: Preheat the oven to 400°F (200°C).
- Step 6: Roll out the chilled dough on a floured surface to about 1/8-inch thickness.
- Step 7: Cut into squares or circles using cookie cutters.
- Step 8: Place a small spoonful of jelly in the center of each pastry piece.
- Step 9: Fold over the dough to create pockets, sealing the edges with a fork.
- Step 10: Brush the tops with egg wash.
- Step 11: Line a baking sheet with parchment paper and arrange the pastries.
- Step 12: Bake for 25-30 minutes, or until golden brown.
- Step 13: In a bowl, whisk together powdered sugar, cocoa powder, milk, and vanilla until smooth.
- Step 14: Adjust the consistency with more milk or powdered sugar as needed.
- Step 15: Drizzle frosting over cooled pastry puffs.
- Step 16: Allow frosting to set before serving.
Previous Recipe: Bake Nutty Whole Wheat Artisan Bread Today: My Grandmother's Secret Recipe!
Next Recipe: Easy & Delicious: Mixing Zesty Salad Dressing in 15 Minutes