Magical Disney Cookies in Just 25 Minutes!
Wondering how to bake delicious Disney cookies in 25 minutes? These soft, colorful treats will delight everyone, bringing a sprinkle of magic to your kitchen!

- Let's Bake Delicious Disney Cookies in 25 Minutes!
- A Little History Behind the Magic
- The Lowdown on Time and Cost
- Key Benefits of These Magical Cookies
- Ready to Get Baking?
- Essential Ingredients Guide
- Unlocking the Art of Professional Cooking: A Guide to Get You Started
- Pro Tips & Secrets
- Perfect Presentation
- Storage & Make-Ahead
- Creative Variations
- Complete Nutrition Guide
- Expert FAQ Solutions
- Recipe Card
Let's Bake Delicious Disney Cookies in 25 Minutes!
Oh my gosh! have you ever felt that rush of excitement when you see your favorite disney character come to life? well, i felt that same thrill the day i made my first batch of disney cookies .
It was a rainy saturday afternoon, and i found myself craving something sweet. now, you know me—i couldn’t just go for any old cookie.
I wanted something that captured that magical disney spirit, and honestly, who doesn’t love a soft and chewy cookie?
That’s when the idea struck me: bake delicious disney cookies in 25 minutes ! i grabbed my mixing bowls, and before i knew it, i was knee-deep in flour, chocolate chips, and a whirlwind of magical baking energy.
Trust me, if you’re looking for quick cookie recipes that pack a punch of nostalgia and joy, then this is the one for you!
A Little History Behind the Magic
So, what’s the deal with these disney cookies? well, they have a bit of a whimsical history, inspired by the colorful world of disney characters.
People have been baking character-themed cookies for years, bringing their favorite films to life in the sweetest way possible.
These cookies aren’t just a nostalgic throwback; they’re super relevant in today's baking world! kids baking recipes are popping up everywhere, making baking a family-friendly bonding activity.
Honestly, there’s something so joyful about baking together, despite the potential flour explosion!
The Lowdown on Time and Cost
Now let’s get real—time and money matter! this easy baking recipe takes about 25 minutes in total: 10 minutes to prep and 15 to bake.
And here’s the kicker: it yields around 24 cookies ! perfect for movie night or party dessert ideas. when it comes to costs, you’re not breaking the bank either.
Just standard pantry staples like sugar, butter, and some chocolate chips or colorful candy melts if you want that extra disney flair.
Key Benefits of These Magical Cookies
Why should you whip up these beauties instead of the usual suspects? Well, let me throw a few benefits your way:
-
Health-wise : okay, these are cookies, so let’s not pretend it’s health food. but hey, homemade cookies are generally better than store-bought options loaded with preservatives.
You can control what goes in, and those familiar flavors are hard to beat!
-
Family fun : these are more than just sweet treats for movie night . they create magical moments! involving kids in the kitchen with fun baking activities not only ups the fun factor but also builds skills for the future.
-
Flexibility : feel like experimenting? go ahead! you can try chocolate chip cookie variations by adding nuts, dried fruit, or swapping in different flavors of chocolate.
The options are endless, so let your creativity run wild!
-
Occasions : These cookies are perfect for special occasions! Birthdays, family get-togethers, or even just a random Tuesday. Who can resist a whimsical dessert ?
Ready to Get Baking?
So, are you pumped to get started? just remember, whether you’re a baking newbie or a seasoned pro, this disney cookie recipe is achievable.
And let’s be honest, we all want to dive into a plate of these soft and chewy cookies adorned with dreamy decorations, don’t we?
Next up, we’ll walk through the ingredient list so you can gather everything you need. it’s time to turn up the magic in your kitchen! trust me; you won't regret it when the smell of freshly baked cookies wafts through your home.
It’s truly a magical treat idea that you and your family will cherish.
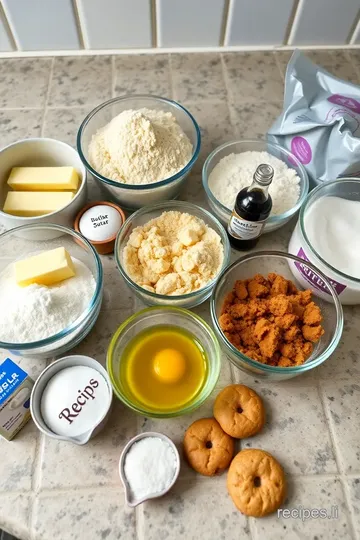
Essential Ingredients Guide
Baking can be a bit like magic. you sprinkle in some ingredients, and voilà! you’ve got sweet treats that delight everyone.
But knowing the right ingredients is key to making those cookies cloud-like and delicious. so, buckle up, and let’s dive into the essentials you need to bake mouthwatering cookies, like bake delicious disney cookies in 25 minutes !
Premium Core Components
When you’re baking, using quality ingredients makes all the difference. Let’s break down some premium components you’ll want to stock in your pantry.
-
Butter : aim for unsalted. you’ll need 1 cup (226g) , softened. when buying butter, look for creams that have a rich, creamy texture.
Store it in the fridge; it lasts about 1-3 months .
-
Sugars : you’ll need 1 cup (200g) of granulated sugar and 1 cup (220g) packed brown sugar . check for moisture, indicating freshness.
Keep these in airtight containers to fend off pests—who needs extra ingredients, right?
-
Flour : the backbone of any cookie, you need 3 cups (360g) of all-purpose flour. make sure it’s fresh for that perfect rise.
Store it in a cool, dry place, and it should last about 6-8 months .
Signature Seasoning Blend
When you’re whipping up those magical cookies, don’t forget the sprinkles of flavor!
-
Vanilla Extract : Just 1 teaspoon (5ml) will elevate your cookies. Go for pure vanilla over artificial for that rich taste.
-
Baking Soda : You’ll need 1 teaspoon (5g) to make your cookies rise and get that perfect soft and chewy texture.
-
Salt : Just a pinch— ½ teaspoon (3g) —will balance the sweetness and enhance flavors. Always grab the kosher variety for a better taste.
Smart Substitutions
Baking shouldn’t feel like a prison sentence. Here are some ways to make sure you can whip up those dreamy cookies, even if you’re missing a thing or two!
-
Butter Alternatives : If you're out of butter, coconut oil or margarine works fine! Just match the volume.
-
Egg Substitution : Need to skip the eggs? Use ¼ cup applesauce per egg for a vegan option that keeps things moist.
-
Gluten-Free : Swap out all-purpose flour for a gluten-free mix. Just check that it has the right texture.
Kitchen Equipment Essentials
Alright, let’s talk tools! They’re your magic wands in the baking kingdom.
-
Baking Sheet : A good-quality baking sheet is non-negotiable. Line with parchment paper to prevent sticking.
-
Mixing Bowls : You’ll need a couple of these. Glass bowls are great because you can see when everything’s mixed right.
-
Cookie Scoop : This handy tool will help you portion dough evenly. No more crazy shapes!
Tips and Tricks for Baking Nirvana
Here’s the scoop on some baking tips.
-
Room Temperature Ingredients : Let your butter and eggs chill out together before mixing. It guarantees smoother dough.
-
Don’t Overbake : Trust me, pulling those cookies out when they’re just golden around the edges ensures a soft center.
-
Chill Dough : If you have time, chilling the dough for 30 minutes deepens the flavor. Totally worth it!
-
Experiment with Add-ins : Try adding nuts or colorful candy melts for kid-friendly fun! You can even create character-themed cookies inspired by iconic Disney characters.
Now that you’re armed with all the right ingredients and tools, it’s time to jump into the fun part— baking your magical Disney cookies ! Get ready for some seriously sweet treats that could make any movie night or celebration shine, bringing a touch of Disney magic right into your kitchen! Let’s get rolling!
Unlocking the Art of Professional Cooking: A Guide to Get You Started
So, you’ve decided to dip your toes into the world of professional cooking? amazing choice! whether you're just looking to impress your pals or dreaming of a fancy career in the culinary arts, getting the basics down can make a huge difference in your cooking game.
Let’s dive into some pro methods, starting with the essential preparation steps.
Essential Preparation Steps
Alright, let's break this down. mise en place might sound all fancy, but it just means getting everything ready before you start cooking.
Trust me, nothing is worse than being knee-deep in a recipe and realizing you forgot to chop that onion. gather your ingredients, pre-measure them, and have all your utensils at hand.
It’s like having your own kitchen command center!
And hey, time management is key. i know it can feel a bit chaotic. set a timer for each task.
For example, if you’re prepping for a dish that needs to simmer for 20 minutes , don’t just do other things haphazardly.
Keep an eye on that timer for best results.
Next, let’s chat about organization strategies . group your ingredients together. have your dry ingredients in one bowl and wet in another.
And for the love of all things delicious, keep your workspace clean . safety first—make sure to use sharp knives properly, and always have a first aid kit handy.
Step-by-Step Process
Now, let's jump into the nitty-gritty with a clear, numbered instruction process that’s as easy as pie (or cookie dough, if you will).
- Gather Ingredients : Measure everything ahead of time. Remember, it saves you from last-minute panic.
- Preheat the Oven : If you’re baking, get your oven to the right temperature. A lot of recipes swear by 350° F ( 175° C) as a sweet spot.
- Mind Your Timing : You want to keep an eye on your food. For instance, when roasting veggies, set your timer for about 20- 25 minutes and check for that perfect golden brown.
- Visual Cues for Doneness : Ever wonder when that roast chicken is ready? Look for that crispy skin and juices that run clear. It’s your best indicator, friends.
Expert Techniques
Let’s level up. professional cooks have some tricks that can take your game from home-cook to chef level . always trust your instincts.
If your dish needs a splash of vinegar or a sprinkle of salt, don’t hesitate.
Here’s a critical step: quality checkpoints . taste your dish as you go. isn’t that the best part of cooking? you can adjust flavors as needed.
If it needs a little more zing, add a dash of lemon juice or try out some new herbs.
Troubleshooting tip : Ever had a sauce that was too thick? Add a splash of stock or water to loosen it up. It's like performing magic in the kitchen.
Success Strategies
Finally, let’s talk about success. even the best chefs make mistakes. one common mistake is over-complicating things. stick to easy recipes, like how to bake delicious disney cookies in 25 minutes .
People go wild for those nostalgic treats, and they’re stupid easy.
Quality assurance? always check the aroma; if it smells good, you’re likely on the right track. and don’t sleep on the make-ahead options .
Like cookie dough? secure that baby in the fridge for later and just scoop it out when you’re ready for fresh-baked goodies.
Transitioning to Additional Information
In wrapping this up, embracing professional cooking techniques will not only elevate your culinary skills but also add joy to your kitchen adventures.
Just remember, anyone can cook with a little prep and passion. if you're looking for something enchanting to try first, consider those iconic disney-themed desserts.
Kids love them, and they make for perfect sweet treats for movie nights.
So, gather your baking essentials, put on your favorite tunes, and get ready for some magical baking fun! And speaking of fun, stay tuned as we explore some cool, easy baking recipes to keep that sweetness rolling!
Pro Tips & Secrets
Alright, my friends! let’s get right into the juicy stuff. baking tips for beginners are super handy when you want to whip up those disney cookies in a snap.
First off, make sure your butter is super soft — we’re talking almost creamy. that’s gonna make mixing a breeze! also, if you want to save some time, get everything prepped first.
Measure out your baking essentials beforehand, and you won’t be scrambling around looking for things.
When it comes to flavor, don’t be shy about tweaking the recipe. try adding a splash of almond extract — it's like putting on a jam that’s just too good.
And for those who like it sweet, toss in a handful of toffee bits or use vanilla chocolate chip cookies as a base.
Perfect Presentation
Now, let’s chat about serving those bad boys up. plating is key to making your magical treats look as good as they taste! a simple way to elevate them is with a colorful cookie decoration.
You can sprinkle some colored sugar on top before baking, or if you’re feeling fancy, drizzle some melted chocolate on top once they’re cool.
It adds that visual appeal everyone loves!
You know what else looks cute? adding a few sprigs of mint or a sprinkle of powdered sugar just before serving.
It’s all about those little touches that make your cookies pop. remember, folks, presentation matters, especially for those festive cookie recipes at parties or family gatherings.
Storage & Make-Ahead
If you’re like me, you definitely don’t want those cookies to go to waste! so let’s dive into some storage guidelines .
After they’ve cooled, pop them in an airtight container. they’re best enjoyed fresh but can last about 5-7 days at room temperature.
If you want to stretch your cookie stash a bit longer, consider freezing them. wrap each cookie in plastic wrap and then toss them in a freezer bag.
They’ll stay good for about 2-3 months!
When you’re ready to enjoy them again, just let them thaw at room temperature, or pop them in the microwave for about 10-15 seconds to get that heavenly, warm cookie feel again.
Creative Variations
Now, let’s shake things up a bit! these cookies are a fantastic blank canvas. if you or your kiddos are fans of other flavors, try mixing in some butterscotch chips or dried cranberries for a spin! ever thought about making character-themed cookies ? a little food coloring in your dough can do wonders.
Think blue for a “frozen” theme or red for some “mickey mouse” magic.
And if you're feelin’ the holiday spirit, toss in some pumpkin spice for a fall twist or some cocoa powder for a chocolate version.
There are endless cookie baking techniques you can dabble in!
Complete Nutrition Guide
So, maybe you’re curious about what you’re munching on, huh? here’s a quick nutrition breakdown: each cookie packs about 150 calories , with roughly 2g of protein and 7g of fat .
They're not health food, but hey, we’re talking about sweet treats for movie night here! if you're watching your sugar intake, swapping out some of the sugars for alternatives can make these a bit more diet-friendly.
And remember the portion guidance: two cookies tend to go missing when you’re not looking, so keep some in check!
Expert FAQ Solutions
Let’s hit you with some common questions. “why are my cookies flat?” a classic one! often it’s because your dough was too warm when it hit the oven.
Always start with chilled dough if you want those fluffy cookies.
And if you’re worried about baking times — keep an eye out! every oven acts a bit different, and the last thing we want is overcooked edges.
Honestly, just take them out when the edges are lightly golden and the centers look just a tad underbaked.
Alright, folks, you’re all set! armed with these tips, you can bake delicious disney cookies in 25 minutes that will impress everyone in your house.
Whether it’s for the kids or a late-night snack while watching your favorite disney flick, these cookies will undoubtedly bring a touch of magic to your kitchen.
So grab those ingredients and get to baking! You'll be creating whimsical desserts that make everyone feel like a kid again. Happy baking!
Magical Disney Cookies in Just 25 Minutes! Card
⚖️ Ingredients:
- 1 cup (226g) unsalted butter, softened
- 1 cup (200g) granulated sugar
- 1 cup (220g) brown sugar, packed
- 2 large eggs
- 1 teaspoon (5ml) vanilla extract
- 3 cups (360g) all-purpose flour
- 1 teaspoon (5g) baking soda
- ½ teaspoon (3g) salt
- 1 cup (170g) chocolate chips or colored candy melts
🥄 Instructions:
- Step 1: Preheat the oven to 350°F (175°C).
- Step 2: In a large bowl, cream the softened butter with the granulated and brown sugars until light and fluffy (approximately 2-3 minutes).
- Step 3: Beat in the eggs one at a time, then add the vanilla extract, mixing until well combined.
- Step 4: In a separate bowl, whisk together the flour, baking soda, and salt.
- Step 5: Gradually add the dry ingredients to the wet mixture, mixing until just combined (do not overmix).
- Step 6: Gently fold in the chocolate chips or colored candy melts until evenly distributed.
- Step 7: Use a cookie scoop or tablespoon to drop rounded balls of dough onto a lined baking sheet, spacing them 2 inches apart.
- Step 8: Bake for 10-12 minutes, or until edges are golden brown and centers are set.
- Step 9: Remove from the oven and let the cookies cool on the baking sheet for 5 minutes before transferring them to a wire rack to cool completely.
Previous Recipe: Discover My Ultimate Sautéed Langostinos in Creamy Mushroom Bliss
Next Recipe: How to Make Delicious Stir-Fry Kabocha Squash with Garlic & Ginger